background image

signage display

41

2. 

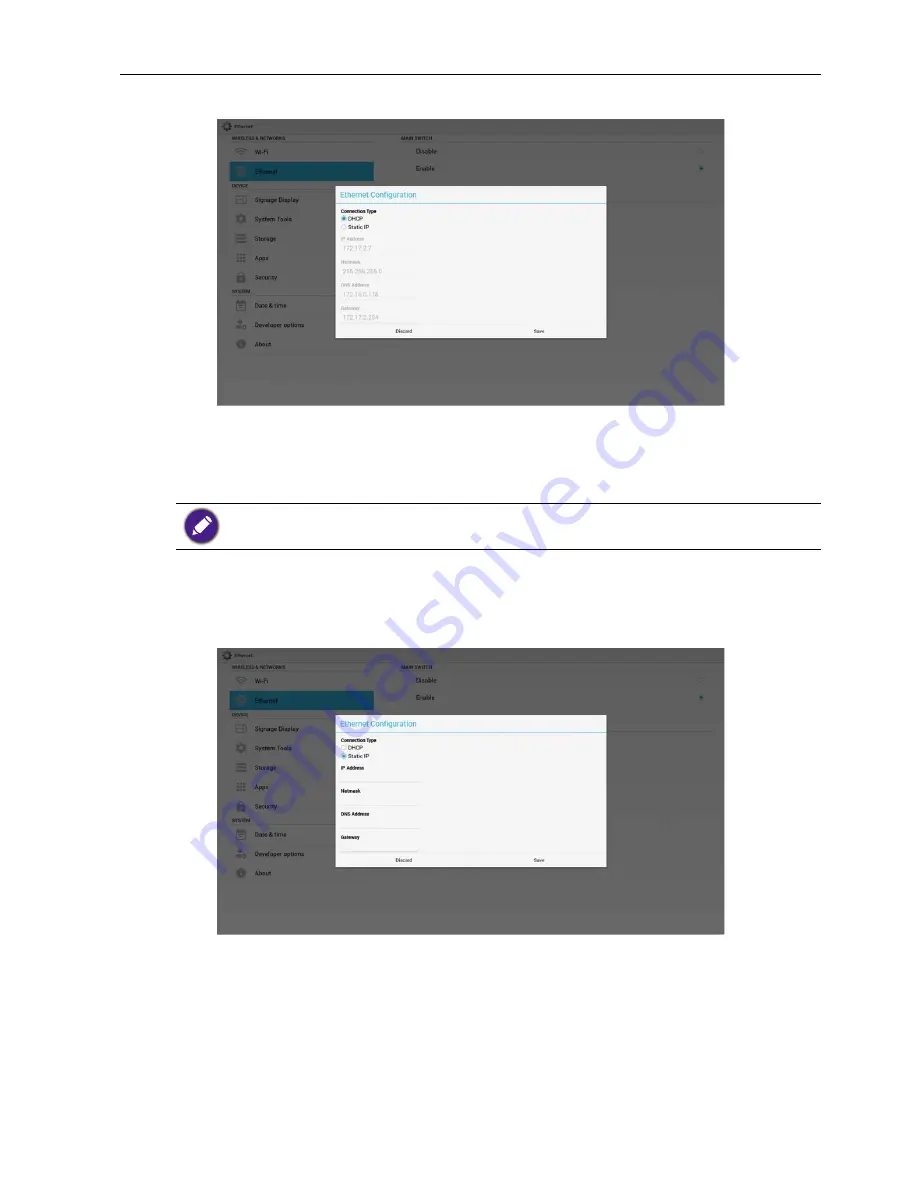
If connect successfully, it will display current network configuration.

Static IP

Under Static IP. User can manually input IP Address, Netmask, DNS Address and 

Gateway.

IP address, netmask, DNS address and gateway address input limitation.

1.  Format:

I.  number 0-9
II.  decimal point “.”

Signage Display

Divide into 2 groups: General Settings / Source Settings
1.  General Settings

A.  Signage Display Name
B.  Boot Logo

2.  Source Settings

A.  Media Player

Summary of Contents for SL490

Page 1: ...SL490 SL550 User Manual ...

Page 2: ...contents thereof without obligation to notify any person of such revision or changes Copyright Copyright 2016 BenQ Corporation All rights reserved No part of this publication may be reproduced transmitted transcribed stored in a retrieval system or translated into any language or computer language in any form or by any means electronic mechanical magnetic optical chemical manual or otherwise witho...

Page 3: ...Mounting on aWall 6 Mounting in Portrait Position 7 Parts and Functions 8 Control Panel 8 Input OutputTerminals 10 Remote control 11 Connecting External Equipment 18 Connecting External Equipment DVD VCR VCD 18 Connecting a PC 18 ConnectingAudio Equipment 19 Connecting Multiple Displays in a Daisy chain Configuration 20 IR connection 21 Operation 22 Watch the ConnectedVideo Source 22 Change Pictur...

Page 4: ...OSD Menu 56 Navigating the OSD Menu 56 OSD Menu Overview 57 USB device compatibility 79 Input Mode 81 Pixel Defect Policy 83 Pixels and Sub Pixels 83 Types of Pixel Defects Dot Definition 83 Bright Dot Defects 84 Dark Dot Defects 84 Proximity of Pixel Defects 85 Pixel DefectTolerances 86 MURA 86 Cleaning andTroubleshooting 87 Cleaning 87 Troubleshooting 88 Technical Specifications 90 ...

Page 5: ...mpletely disconnect this equipment from the AC mains disconnect the power cord plug from the AC receptacle Do not place this display on an uneven sloping or unstable surface such as a trolley where it may fall and cause damage to itself or others Do not place this display near water like a spa or pool or in a position which will allow the splashing or spraying of water onto the display like in fro...

Page 6: ...ion to avoid injury from tip over 14 Unplug this apparatus during lightning storms or when unused for long periods of time 15 Refer all servicing to qualified service personnel Servicing is required when the apparatus has been damaged in any way such as power supply cord or plug is damaged liquid has been spilled or objects have fallen into the apparatus the apparatus has been exposed to rain or m...

Page 7: ...r or moisture Failure to do so could result in malfunction Confirm there is no object between the remote control and the remote sensor of the product When the remote control will not be used for an extended period remove the batteries Battery safety notice The use of the wrong type of batteries may cause chemical leaks or explosion Please note the following Always ensure that the batteries are ins...

Page 8: ...ment and standards pertaining to environmental management BenQ has spared no efforts in pushing our initiatives further to incorporate life cycle design in the aspects of material selection manufacturing packaging transportation using and disposal of the products BenQ ecoFACTS label lists key eco friendly design highlights of each product hoping to ensure that consumers make informed green choices...

Page 9: ...ding to regions Display design and accessories may differ from those illustrated above For all other regions apply a power cord that conforms to the AC voltage of the power socket and has been approved by and complies with the safety regulations of the particular country Type H05VV F 2G or 3G 0 75 or 1mm2 should be used You might like to save the package box and packing material for shipping the d...

Page 10: ...and will not affect the operation of the display This condensation will usually disappear after around 2 hours of normal operation Mounting on a Wall To mount this display to a wall you will have to obtain a standard wall mounting kit commercially available We recommend using a mounting interface that complies with TUV GS and or UL1678 standard Protective Sheet SL490 Protective Sheet Table SL550 V...

Page 11: ... earthquake or other natural disaster be sure to consult the bracket manufacturer for installation location Ventilation Requirements for enclosure locating To allow heat to disperse leave space between surrounding objects as shown in the diagram below 100 mm 100 mm 100 mm 100 mm Mounting in Portrait Position This display can be installed in portrait position 1 Remove the table stand if attached 2 ...

Page 12: ...se the adjustment while OSD menu is on or increase the audio output level while OSD menu is off Used as OK button in the On Screen Display menu 5 button Decrease the adjustment while OSD menu is on or decrease the audio output level while OSD menu is off 6 button Move the highlight bar up to adjust the selected item while OSD menu is on 7 button Move the highlight bar down to adjust the selected i...

Page 13: ...amber when the display enters sleep mode When SCHEDULE is enabled the light blinks green and red If the light blinks red it indicates that a failure has been detected Lights off when the main power of the display is turned off Pull down the lens to have better remote control performance and easy to observe the light information of power status Push up the lens before mounting the display for video...

Page 14: ...trol center 8 RS232 IN RS232 network input output for the loop through function 9 RS232 OUT 10 Audio OUT Audio output to external AV device 11 USB PORT B Service Use only 12 USB PORT A 1 For media play 2 5V2A for add current example for HDD 13 PC LINE IN Audio input for VGA source 3 5mm stereo phone 14 DVI IN DVI I video input 15 DVI OUT DVI or VGA video output 16 DisplayPort IN DisplayPort video ...

Page 15: ...mode source OSD Others Move the highlight bar up On VGA HDMI1 HDMI2 DVI D and Display Port source Pop up Audio source OSD Others Move the highlight bar down Source menu OSD Exit source menu OSD Volume menu OSD Decrease audio volume Others Move the highlight bar left Source menu OSD Go to selected source Volume menu OSD Increase audio volume Others Move the highlight bar right 7 OK button Confirm s...

Page 16: ...tton Change Image Zoom Mode Full 4 3 1 1 16 9 21 9 Custom 13 BACK button Return to the previous menu page or exit from the previous function 14 INFO button Show Information OSD 15 OPTIONS button No function 16 VOLUME button Adjust volume ...

Page 17: ... to control For example press 0 and 1 for display No 1 press 1 and 1 for display No 11 The numbers available are from 01 98 2 Not pressing any button within 10 seconds will exit the ID Mode 3 If an error pressing of buttons other than the digits occurred wait 1 second after the red LED lights off and then lights up again then press the correct digits again 4 Press ENTER button to confirm The red L...

Page 18: ...or Schedule by OSD menu 3 When playing PDF video or music press to stop playing Then if pressing again playing will be started from the beginning of the file 4 When playing PDF video or music press button to pause playing 5 All media or PDF files should be put at the folder which is named benq with sub folder under the root directory of the specified storage internal USB SD Card All sub folders vi...

Page 19: ...Toggle Audio Mute Unmute 10 COLOR buttons 1 No function in Android 2 1 In the content of the web page move the focus up to the next clickable items 2 Move the focus up to the next control or widget such as buttons 3 1 In the content of the web page move the focus down to the next clickable items 2 Move the focus down to the next control or widget such as buttons 11 Number ID SET ENTER button 1 No ...

Page 20: ...llow these instructions Place AAA batteries matching the and signs on each battery to the and signs of the battery compartment Do not mix battery types Do not combine new batteries with used ones It causes shorter life or leakage of batteries Remove the dead batteries immediately to prevent them from liquid leaking in the battery compartment Don t touch exposed battery acid as it can damage your s...

Page 21: ...ton Use the remote control within a distance of less than 5m 16ft from the display s sensor and a horizontal and vertical angle of less than 30 degrees 30 30 The remote control may not function properly when the remote control sensor on the display is under direct sunlight or strong illumination or when there is an obstacle in the path of signal transmission ...

Page 22: ...l Equipment Connecting External Equipment DVD VCR VCD Using HDMI video input HDMI IN DVD VCR VCD HDMI Out Connecting a PC Using DVI I input VGA AUDIO IN DVI I IN VGA Out D Sub 15 pin PC Audio Out Using DVI input DVI IN DVI Out Audio Out VGA AUDIO IN PC ...

Page 23: ...cting External Equipment 19 Using HDMI input HDMI IN HDMI Out PC Using DisplayPort input DisplayPort Out PC Connecting Audio Equipment Connecting an external audio device Audio In AUDIO OUT Stereo Amplifier ...

Page 24: ...isplay control connection Connect the RS232 OUT connector of DISPLAY 1 to the RS232 IN connector of DISPLAY 2 RS 232C IN RS 232C OUT RS 232C IN RS 232C PC DISPLAY 1 DISPLAY 2 Digital video connection Connect the DVI OUT DVI I OUT connector of DISPLAY 1 to the DVI IN connector of DISPLAY 2 PC DVI DVI IN DVI DVI I OUT DVI IN DISPLAY 1 DISPLAY 2 DVI Daisy chain to 5 5 without splitter DVI with HDCP u...

Page 25: ...o 3840x2160 30Hz HDMI with HDCP up to 7th Analog video connection Connect the DVI OUT DVI I OUT connector of DISPLAY 1 to the DVI I IN connector of DISPLAY 2 PC DVI I DVI I IN DVI DVI I OUT DVI I IN DISPLAY 1 DISPLAY 2 Analog Daisy chain to 3 3 without splitter IR connection IR IN IR OUT IR IN DISPLAY 1 DISPLAY 2 External IR Receiver 1 This display s remote control sensor will stop working if the ...

Page 26: ...ource Each video source has its available picture formats The available picture formats depend on the video source 1 Press FORMAT button 2 Press or button to choose a picture format then press OK button PC mode Full 4 3 1 1 16 9 21 9 Custom Video mode Full 4 3 1 1 16 9 21 9 Custom Android reminder page 1 Android reminder page Every app leaves by pressing the back key The screen will go to Android ...

Page 27: ...Compose edit playlist Settings setting play properties 2 Select Play on home page first you should choose one playlist to play between FILE 1 and FILE 7 The pencil icon means the playlist is non empty 3 Select Compose on home page first you should choose one playlist to edit between FILE 1 and FILE 7 The pencil icon means the playlist is non empty ...

Page 28: ...ce All media files should be placed in benq of root directory For example videos in root benq video photos in root benq photo The limit of resolution is 4096x4096 music in root benq music 5 You could edit or delete a non empty playlist just choose the desired playlist which is with pencil icon ...

Page 29: ...ch slide bar Play key play media file Info key show media info Ok key select unselect file 6 1 In the slide bar it helps you to do the following select all select all storage files delete all delete all playlist files add remove update playlist from source sort sort playlist save abort save or abort playlist back return 7 if you choose Sort in the slide bar you can change the order of files one by...

Page 30: ...ou will get the detail information 9 Press play key after you choose desired file you will play the media file directly 10 If you make a playlist with all image files before saving the app will ask you if you want to have background music while playing slideshow ...

Page 31: ...deshow effect Effect Duration photo effect duration 12 Media Hotkey Play Playback file Pause Pause file Fast forward forward 20 second photo not support Rewind back 20 second photo not support Stop Stop file and return to start For GIF format it will be paused Browser manual 1 Home page of Browser app this page has one item Settings Press Settings then enter next page ...

Page 32: ...Operation 28 2 Users can choose 1 7 Press any one will show a dialog 3 Enter URL and press OK then data will save on List ...

Page 33: ...9 4 Press Option then left side will pop up a list Import Import URL list file Export Export URL list file Delete all Delete all URL record on right side Back left side list will be closed 4 1 Import Click import ...

Page 34: ...Operation 30 Choose storage Choose file contains URL Import file and URL will show on list ...

Page 35: ...Operation 31 File format for import Format should be like below with file extension txt 4 2 Export Click export ...

Page 36: ...Operation 32 Choose storage The dialog shows file path and name Press save button then URL on list will be saved 5 Press OK then URL records will be saved ...

Page 37: ...f you select non empty item it will show a dialog to ask edit or play URL If press Edit it will show edit URL dialog if press Play it will show web page of item s URL 7 OSD menu interaction with Browser 7 1 Demonstration Boot on source ...

Page 38: ...menu Advanced option Schedule On time1 Off time2 Input is BROWSER any day you want of week and Play List Then PD will show web page with URL in Browser app at time1 and finish at time2 PDF reader play 1 Home page of PDF Player this page has three items Play Compose and Settings Play select playlist to play Compose edit playlist Settings setting play properties 2 Select Play on home page first you ...

Page 39: ...ne playlist to edit between FILE 1 and FILE 7 The pencil icon means the playlist is non empty 4 If an empty playlist is chosen the app will guide you to select the media source All media files should be placed in benq of root directory For example pdfs in root benq pdf ...

Page 40: ...s in playlist There are 4 icons which map to the keys of remote controller Option key launch slide bar Play key play media file Info key show media info Ok key select unselect file 6 1 In the slide bar it helps you to do the following select all select all storage files delete all delete all playlist files add remove update playlist from source sort sort playlist save abort save or abort playlist ...

Page 41: ...e Sort in the slide bar you can change the order of files one by one 8 Select Settings on home page this page has two parts Repeat Mode and Effect Duration Repeat Mode play mode Effect Duration photo effect duration Media Hotkey ...

Page 42: ...oom out 10 OK Restore zoom Arrow keys Up Down Left Right Adjust page When the page has zoomed in out Left Previous Page When the page has not zoomed in out Right Next Page When the page has not zoomed in out Combination key Number key OK key select specific page and press ok key to change page Press number key Press OK key the bottom of the page will show the page number if page number over total ...

Page 43: ...ls 5 Storage 6 Apps 7 Security 8 Date time 9 Developer options 10 About Wi Fi Via Enable Disable to control Wi Fi On OFF After Enable the screen will list all available WiFi AP 1 Please make sure your Wi Fi dongle is approved by BenQ 2 Ethernet will be disable automatically if Wifi turn on and connect to network ...

Page 44: ...will display 1 Connect Type available type is DHCP Static IP A DHCP B Static IP C IP Address D Netmask E DNS Address F Gateway Address 2 Mac Address WiFi will be disable automatically if Ethernet turn on and connect to network DHCP DHCP mode 1 Cannot modify IP Address Netmask DNS Address and Gateway ...

Page 45: ...an manually input IP Address Netmask DNS Address and Gateway IP address netmask DNS address and gateway address input limitation 1 Format I number 0 9 II decimal point Signage Display Divide into 2 groups General Settings Source Settings 1 General Settings A Signage Display Name B Boot Logo 2 Source Settings A Media Player ...

Page 46: ...racters 2 format no limit 2 Boot Logo 1 Scalar OSD menu to control Android boot logo enable disable Scalar OSD Menu operation RCU Home Configuration2 Logo On Off User In User mode user can choose their own boot logo animation file 1 Boot animation file name must be bootanimation zip 2 Will pop up a window for user to select USB and SD card No priority issue ...

Page 47: ...on file which is copied from SD card or USB mnt external_sd Use boot animation file under SD card mnt usb_storage Use boot animation file under USB b Save Press Save key to save SD card or USB bootanimation zip to data local and set it as boot logo c Forget Press Forget key to delete data local bootanimation zip and not show boot logo d Cancel Close dialogue w o changes Scenario introduction ...

Page 48: ...List will be blank Save and Forget button will be gray and useless Case 2 The users do not settle customized boot log PD find bootanimation zip file under SD or USB The screen will show bootanimation zip and select the first file automatically Case 3 The user settle customized boot logo The screen will show data local bootanimation zip ...

Page 49: ...signage display 45 3 If OSD menu Logo item is On or Off the users cannot choose boot animation in Android settings Source Settings 1 Media Player Can Edit Media Player play list and effect settings ...

Page 50: ...signage display 46 1 Open Media Player Player List edit page 2 Open Media Player slideshow effect edit page 2 Browser Can edit Bookmark configuration 1 Open Browser setting page ...

Page 51: ...signage display 47 3 PDF Player Can edit PDF Player Play List and Effect Settings 1 Open PDF Player Player List edit page 2 Open PDF Player effect edit page ...

Page 52: ... Export Clear Storage The purpose is to clear all data in Benq folders Divided into 4 mode 1 Clear all benq folder 2 Only clear benq folder under Internal storage 3 Only clear benq folder under USB storage 4 Only clear benq folder under SD card Pop up the window to display all folders which can be clear ...

Page 53: ...signage display 49 Factory Reset Factory Reset can recover to Factory default settings Press OK to execute Reset function automatically Import Export ...

Page 54: ...l save to benq folder in storage 1 Export Will export settings db to benq folder under USB or SD card If no benq folder exists in USB or SD card it will be created automatically 2 Import Import settings db from benq folder under USB or SD card Storage Display current PD Android storage information ...

Page 55: ...signage display 51 SD CARD and USB STORAGE Need to insert SD card or USB the information will show up total space and available of SD card or USB storage Apps Display applications information ...

Page 56: ...signage display 52 Date time Adjust date time and timezone via NTP Set date and time by yourself when you disable Automatic date time setting Setting date ...

Page 57: ...signage display 53 Setting time Developer options Android developer options ...

Page 58: ...version 3 Kernel version 4 Build number BenQ Software Update Software upgrade via the Internet or USB device After select update zip file PD will restart and start to update Supplementary Rotation Via Scalar OSD menu to operate Rotation Home Configuration2 Rotation OSD rotation ...

Page 59: ...5 1 Landscape After set up Landscape mode the setting screen will divide into 2 part Select Left item right side will display the sub menu 2 Portrait After set up Portrait mode the setting screen only display one layer ...

Page 60: ...nu press OK or button to enter the submenu 5 Press button to return to the previous menu or press button to exit the OSD menu When there is no OSD menu on the screen press to display the menu of picture mode When there is no OSD menu on the screen press to display the menu of Audio source Navigating the OSD menu using the display s control buttons 1 Press MENU button to display the OSD menu 2 Pres...

Page 61: ...mperature Color control Medium Native Native 70 50 50 50 Name Description Brightness Picture Adjust the overall image and background screen brightness backlight Contrast Adjust the image contrast ratio for the input signal Sharpness This function is digitally capable to keep crisp image at any timings It is adjustable to get a distinct image or a soft one as you prefer and set independently for ea...

Page 62: ...erature It is used to adjust the color temperature The image becomes reddish as the color temperature decreases and becomes bluish as the color Color control The color levels of red green and blue are adjusted by the color bars R Red gain G Green gain B Blue gain Available when Color Temp User1 or User2 only Picture mode PQ setting PC mode Standard Highbright sRGB Video mode Standard Highbright Ci...

Page 63: ... reste Full Zoom Action Action 50 50 50 50 Name Description H position Control Horizontal Image position within the display area of the LCD V position Control Vertical Image position within the display area of the LCD Clock VGA input only Clock phase Improves focus clarity and image stability by increasing or decreasing this setting VGA input only ...

Page 64: ...of pictures transmitted in 16 9 using the full screen display 4 3 The picture is reproduced in 4 3 format and a black band is displayed on either side of the picture 1 1 This mode displays the image pixel by pixel on screen without scaling the original image size 16 9 The picture is reproduced in 16 9 format and a black band at the top and bottom 21 9 The picture is reproduced in 21 9 format and a...

Page 65: ...ze of the image only V zoom Expands the vertical size of the image only H position Moves the horizontal position of the image left or right V position Moves the vertical position of the image up or down Auto adjust Press Set to detect and adjust H position V position Clock Phase automatically Screen reset Reset all settings in the Screen menu to factory preset values Select Yes and press SET butto...

Page 66: ... left or right audio output balance Treble Adjust to increase or decrease higher pitched sounds Bass Adjust to increase or decrease lower pitched sounds Volume Adjust to increase or decrease the audio output level Audio out line out Adjust to increase or decrease line out output level Maximum volume Adjust your own limitation for the maximum volume setting This stops the volume from being played t...

Page 67: ...e Audio menu to factory preset values PIP menu P Picture Screen Audio PIP Configuration 1 Sub mode PIP size PIP position PIP change PIP Source PIP Audio PIP reset Off Small Bottom Right Action VGA Main Action Name Description Sub mode Select the sub mode Choose from Off PIP POP Quick swap PBP Off PIP PBP 2Win Sub Win1 Input Quick swap Switch main on top or sub on top PIP size Select the size of th...

Page 68: ...nu to factory preset values The PIP function is available only for certain signal source combinations as shown in the table below HDMI1 HDMI2 DVI DisplayPort VGA Medoa Player Browser X Sign PDF Reader Android HDMI1 O X X O O X X X X X HDMI2 X O X O O X X X X X DVI X X O O O X X X X X DisplayPort O O O O O O O O O O VGA O O O O O O O O O O Medoa Player X X X O O O X X X X Browser X X X O O X O X X ...

Page 69: ...cord Panel saving Choose to enable the panel saving functions and thus reduce the risk of image persistence or ghost imaging Brightness Select On and the image brightness will be reduced to an appropriate level The Brightness setting in the Picture menu will be unavailable when selected Pixel shift Select the time interval Auto 10 900 Seconds Off for the display to slightly expand the image size a...

Page 70: ... PIP Configuration1 Configuration2 and Advanced option to the factory preset values Android settings will also reset when factory reset Press or button to select Reset and press OK button to do the reset Factory reset Cancel Reset Configuration2 menu 2 Configuration 2 Advanced option OSD turn off OSD H position OSD V position OSD transparency Information OSD Logo Monitor ID Heat status Monitor inf...

Page 71: ...st the vertical position of the OSD menu OSD Transparency Adjust OSD transparency Off Transparency off 1 100 Transparency level 1 100 Information OSD Set the period of time the information OSD is displayed on the upper right corner of the screen The information OSD will display when input signal is changed The information OSD will remain on the screen with Off selection The options are 1 60 second...

Page 72: ...us at any time A temperature warning message will be shown on the screen if the temperature reaches 97 C 207 F All key functions except key will then be disabled Once the temperature reaches 98 C 208 F the display power will be shut down automatically Monitor information Shows information about your display including model number serial number operating hours and software version Model name SL550 ...

Page 73: ...D Rotate Off On when value is on OSD rotate 90 Off is restored All Off On when value is on all Window screen rotate 90 Off the reference set individual window Main Off On when value is onn Main window screen rotate 90 Off is restored Sub Off On when value is on Sub1 Window screen rotate 90 Off is restored When the Main Sub source is the same rotation is given priority to with Sub Not suupored De I...

Page 74: ...g off the power and turning it on again IR control Select the operation mode of the remote control when multiple displays are connected via an RS232C connection Normal All displays can be operated normally by the remote control unit Primary Designate this display as the primary display for remote control operation Only this display can be operated by the remote control In primary mode IR key will ...

Page 75: ...ess to all Keyboard Control functions To enable or disable the keyboard control lock press both and of remote control buttons and hold down continuously for more than 3 seconds Tiling With this function you can create a single large screen matrix video wall that consists of up to 100 sets of this display up to 10 sets on the vertical and 15 sets on the horizontal sides This function requires a dai...

Page 76: ...ide Position Select the position of this display in the screen matrix Frame comp Choose to turn the frame compensation function on or off If selected Yes the display will adjust the image to compensate for the width of the display bezels in order to accurately display the imag Enable Choose to enable or disable theTiling function If enabled the display will apply the settings in H monitors V monit...

Page 77: ...Minute 40 Daylight saving time Current date time 2015 01 01 22 41 00 Press OK to set clock 1 Press OK button to enter the submenu 2 Press or button to toggle between Year Month Day Hour Minute and Daylight saving time 3 Press or button to adjust all settings except Daylight saving time 4 Press OK button to enter the Daylight saving time submenu 5 Press or button to select item press or button to a...

Page 78: ... clock At daylight stop date the clock should be put back 1 hour at 2 o clock The existing daylight on off menu item should be replaced with the following menu structure Menu item Daylight saving setup opens submenu containing the following items Menu item Daylight saving start date Selection item 1st 2nd 3rd 4th last Sunday of selection item 1 12 month Menu item Daylight saving stop date Selectio...

Page 79: ...od We recommend you to set up current date and time in the Date and time menu before using this function 1 Press OK or button to enter the submenu Schedule Today 2015 01 04 SUN 04 14 01 1 2 3 4 5 6 7 MON TUE WED THU FRI SAT SUN Every week playlist 0 Clear all On Off Input 2 Press or button to select a schedule item item number 1 7 and then press OK button to mark it the item number 4 1 3 2 5 Sched...

Page 80: ...le settings press then repeat the steps above A check mark in the box next to the number of the schedule item indicates that the selected schedule is in effect If the schedules overlap the scheduled power on time takes priority over scheduled power off time If there are two schedule items programmed for the same time the highest numbered schedule takes priority For example if schedule items 1 and ...

Page 81: ...Please set to Mode 3 4 to wake up the display via MDA LAN control if this function is desired Mode 3 DC OFF Backlight off only Power Save Backlight off only Mode 1 default DC OFF Power Off Power Save Power Off Mode 4 DC OFF Backlight off only Power Save No signal Backlight On Mode 2 DC OFF Power Off Power Save Power Saving Power Save Following table is the action for Android board with different p...

Page 82: ...e User need to use APK to copy cloned data to another display Advanced option reset Reset all settings except Date and Time in the Advanced option menu to factory preset values 1 Press OK or button to enter the submenu 2 Press or button to select Reset and press the OK button to restore settings to factory preset values 3 Press the button or select Cancel and press the OK button to cancel and then...

Page 83: ...IF 128x96 QCIF 176x144 CIF 352x288 4CIF 704x576 Maximum Frame Rate 30fps Maximum Bit Rate 38 4Mbps Audio Codec MP3 1 Not support H 263 H 264 H 264 File Format AVI MKV MP4 MOV 3GP TS FLV V Supported Image Size 48x48pixels to 1920x1080pixels Maximum Frame Rate 30fps Maximum Bit Rate 57 2Mbps Audio Codec MP2 MP3 AAC PCM 1 Not support MBAFF GOOGLE VP8 VP8 File Format WEBM V Supported Image Size 48x48p...

Page 84: ... Decode Type Image Codec Photo Decode Encode Channel Remark JPEG JFIF file format 1 02 File Format JPG JPEG V Decode Resolution 48X48 to 8176X8176 1 Not Support Non interleaved Scan 2 Software support SRGB JPEG 3 Software supportAdobe RGB JPEG BMP BMP File Format BMP V MaximumSupported Image Size 4096x4096 pixels GIF GIF File Format GIF V Resolution No Restriction PNG PNG File Format PNG V Resolut...

Page 85: ... 9 Wide XGA UXGA 1600 1200 60 Hz 162 MHz 4 3 Ultra XGA HD1080 1920 1080 60 Hz 148 5 MHz 16 9 HD1080 SDTV Resolution Standard Resolution Active Resolution Refresh Rate Pixel Rate Aspect Ratio Stand for Mode H Pixels V Lines 480i 720 480 29 97 Hz 13 5 MHz 4 3 Modified NTSC Standard 480p 59 94 Hz 27 MHz 576i 720 480 25 Hz 13 5 MHz 4 3 Modified PAL Standard 576p 50 Hz 27 MHz HDTV Resolution Standard R...

Page 86: ... the PC power is turned off or if the PC is disconnected If so press the INPUT button to enter the video mode Also make sure that the PC is connected When horizontal synchronous signals seem irregular in RGB mode check PC power saving mode or cable connections The display settings table complies to the IBM VESA standards and based on the analog input The DVI support mode is regarded as same to the...

Page 87: ... or combinations of pixel defects are more noticeable than others Benq sets even higher quality standards for those Pixels and Sub Pixels subpixel pixel A pixel or picture element is composed of three sub pixels in the primary colors of red green and blue Many pixels together form an image When all sub pixels of a pixel are lit the three colored sub pixels together appear as a single white pixel W...

Page 88: ... One lit red green or blue sub pixel Two adjacent lit sub pixels Red Blue Purple Red Green Yellow Green Blue Cyan Light Blue Three adjacent lit sub pixels one white pixel Dark Dot Defects Black dot defects appear as pixels or sub pixels that are always dark or off These are the examples of black dot defects One dark dot Two adjacent dark dots 1 pair of dark dots ...

Page 89: ...ub pixels defects of the same type that are nearby one another may be more noticeable Benq also specifies tolerances for the proximity of pixel defects In the table below you can find specifications about Allowed amount of adjacent dark dots adjacent dark dots 1 pair of dark dots Minimum distance between dark dots Total no of all defective dots ...

Page 90: ...ed by long term operation under high ambient temperatures It is an industry wide phenomenon and Mura is not repairable It is also not covered by our warranty terms Mura has been around since the introduction of LCD technology and with screens getting bigger and in operation 24 7 many displays are running in low light conditions This all adds to the possibility of Mura affecting displays HOW TO SPO...

Page 91: ... soft lint free cloth If the surface becomes dirty soak a soft lint free cloth in a mild detergent solution Wring the cloth to remove excess liquid Wipe the surface of the display to remove dirt Then use a dry cloth of the same type to dry Do not scratch or hit the surface of the panel with fingers or hard objects of any kind Do not use volatile substances such as insert sprays solvents and thinne...

Page 92: ...e display Please verify its specifications with this display s specification section Display image doesn t fill up the full size of the screen 1 The zoom mode is not set correctly 2 Scan Mode may be set incorrectly to underscan 3 If the image exceeds the screen size Scan Mode may need to be set to Underscan Use the Zoom mode or Custom zoom function in the Screen menu to fine tune display geometry ...

Page 93: ...xamples of still pictures include logos video games computer images and images displayed in 4 3 normal mode A still picture is displayed for an over extended period of time Do not allow a still image to be displayed for an extended period of time as this can cause a permanent after image to remain on the display ...

Page 94: ...l L R Audio Input 3 5 mm Stereo x 1 0 5V rms Normal 2 Channel L R RS232C 2 5mm Phone jack x 2 RS232 in RS232 out RJ 45 RJ 45 Jack x 1 8 pin 10 100 LAN Port HDMI Input HDMI Jack x 2 Type A 19 pin Digital RGB TMDS Video Audio MAX Video 720p 1080p 1920 x 1080 60 Hz WUXGA Audio 48 KHz 2 Channel L R Supports LPCM only DVI I DVI D VGA Input DVI I jack Digital RGB TMDS Video Analog RGB 0 7V p p 75Ω H CS ...

Page 95: ...0Hz Power Consumption Max 121 W 139 W Power Consumption typ 67 W 76 W Power Consumption Standby Off 0 5W RS232 in active Dimensions Without Stand W x H x D 1097 6 x 633 9 x 45 5 mm 1233 4 x 710 3 x 45 5 mm Weight Without Stand 14 70 Kg 18 0 Kg Gross Weight Without Stand 19 90 Kg 24 4 Kg Environmental Condition Temperature Operational 0 40 C Storage 20 60 C Humidity Operational 20 80 RH No condensa...

Reviews: