background image

Set up for Interactive Function

14

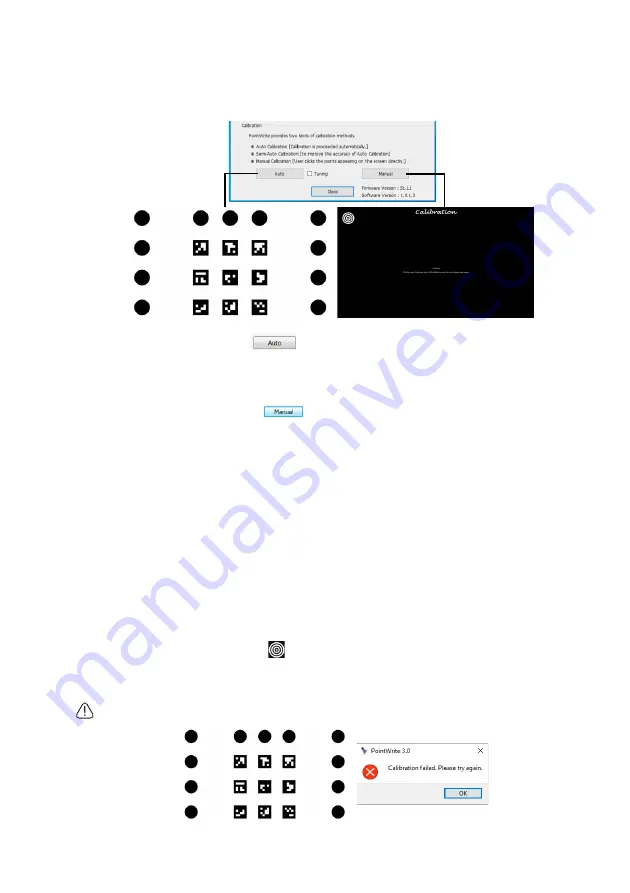
PointWrite Calibration

PointWrite provides two kinds of calibration methods: auto calibration and manual 
calibration.

Auto calibration

: Click on 

 and the calibration process will run automatically.

When you choose this method, white image is shown on the screen and the pattern image 
is displayed.

Manual calibration

: Click on 

 and calibration window will be projected on the 

screen.

Tuning: Check “Tuning” and do “Auto calibration” then the “ tuning” function become 
effective. 

Under this selection Setup Software starts calibration process like below 
1) Run auto calibration 
2) After finishing auto calibration, manual calibration is run automatically then click manual 
calibration points

Through these two process, PW31U does auto calibration by referring manual calibration 
result and gets more precise result.

* Usage of "Tuning": even though try auto calibration many times, but offset ( pen position 
to cursor ) appears always.

Use the PointWrite pen to click 

 on the center of calibration cursor immediately after 

it appears. Then the next cursor will display. Repeat this process until the last calibration 
cursor disappears.

Caution:

 In rare circumstances, auto calibration may fail or accuracy may be low. In this case, please execute 

the manual calibration. 

Summary of Contents for PointWrite PW31U

Page 1: ...PW31U...

Page 2: ...ector 7 About PointWrite Pen 8 Installing the Batteries 8 Replacing the Pen Tip 8 Setup Software Installation 9 Setup Software Installation Complete 10 Connecting the PointWrite to PC 11 Set up for In...

Page 3: ...Start Guide PointWrite easy to use instructions 3 Two PointWrite Pens PointWrite Pen G2 1 PointWrite Pen is a pen type wireless mouse Before using the pen insert the batteries into the pen 4 Mini USB...

Page 4: ...d For an optimal interactive writing quality follow these guidelines 1 Close window curtains 2 Select a projection area away from direct sunlight to prevent writing interference 3 Keep infrared device...

Page 5: ...loss painted surface to reduce glare from the projector to achieve optimal touch quality and to reduce wear on the pen nib Selecting a board surface Attach a dry erase board to the wall if you re proj...

Page 6: ...ease the external light intensity and unexpected interference may happen Caution For a existing glossy board it is recommend to use the projection film to coverage the existing surface to get a better...

Page 7: ...ector Attach the PointWrite to the projector as illustrated and tighten the screw to secure the PointWrite 1 Remove the cover on the projector as illustrated 2 Connect the cable to the PointWrite and...

Page 8: ...Touch and drag an object on the screen Installing the Batteries Caution When inserting the batteries into the PointWrite Pen make sure the battery polarities are correct Remark To save the battery pow...

Page 9: ...intWrite Module please install set up Software for Configuration setting 1 https www benq com en us business support products projector pointwrite pw31u download html Go to BenQ Website Search PW31U G...

Page 10: ...d on C directory 64 bit Windows C Program Files x86 BenQ PointWrite 3 0 32 bit Windows C Program Files BenQ PointWrite 3 0 Remark Only First time using the PointWrite module need to install set up Sof...

Page 11: ...PointWrite to PC Plug the USB mini B end into the projector and plug the USB type A end into PC Check Device Manager from your computer to make sure that PointWrite device is recognized by your compu...

Page 12: ...ode pen and finger can be used simultaneously 2 PointWrite Option Ceiling Mount Mode Click this item if you mount the projector on the ceiling When the projector is placed on the table do not click th...

Page 13: ...ntWrite to the screen Alignment View When clicking on the Alignment View the screen image is displayed on the alignment view as illustrated If the screen image is not in the center the calibration wil...

Page 14: ...starts calibration process like below 1 Run auto calibration 2 After finishing auto calibration manual calibration is run automatically then click manual calibration points Through these two process...

Page 15: ...ation software please go to BenQ Website to Download QWrite software Notice 1 To secure the quality of interactive function we suggest users to adjust projector s input signal computer output signal t...

Page 16: ...pens simultaneously Multiple Operation 2 Units PC Connection Mini USB Power Source PC USB Power Max USB Cable Length 15 m 5 m USB cable Repeater OS Supported Windows Win 8 10 11 Mac 10 12 or later Sto...

Reviews: