background image

16  Positioning your projector  

Adjusting the projected image

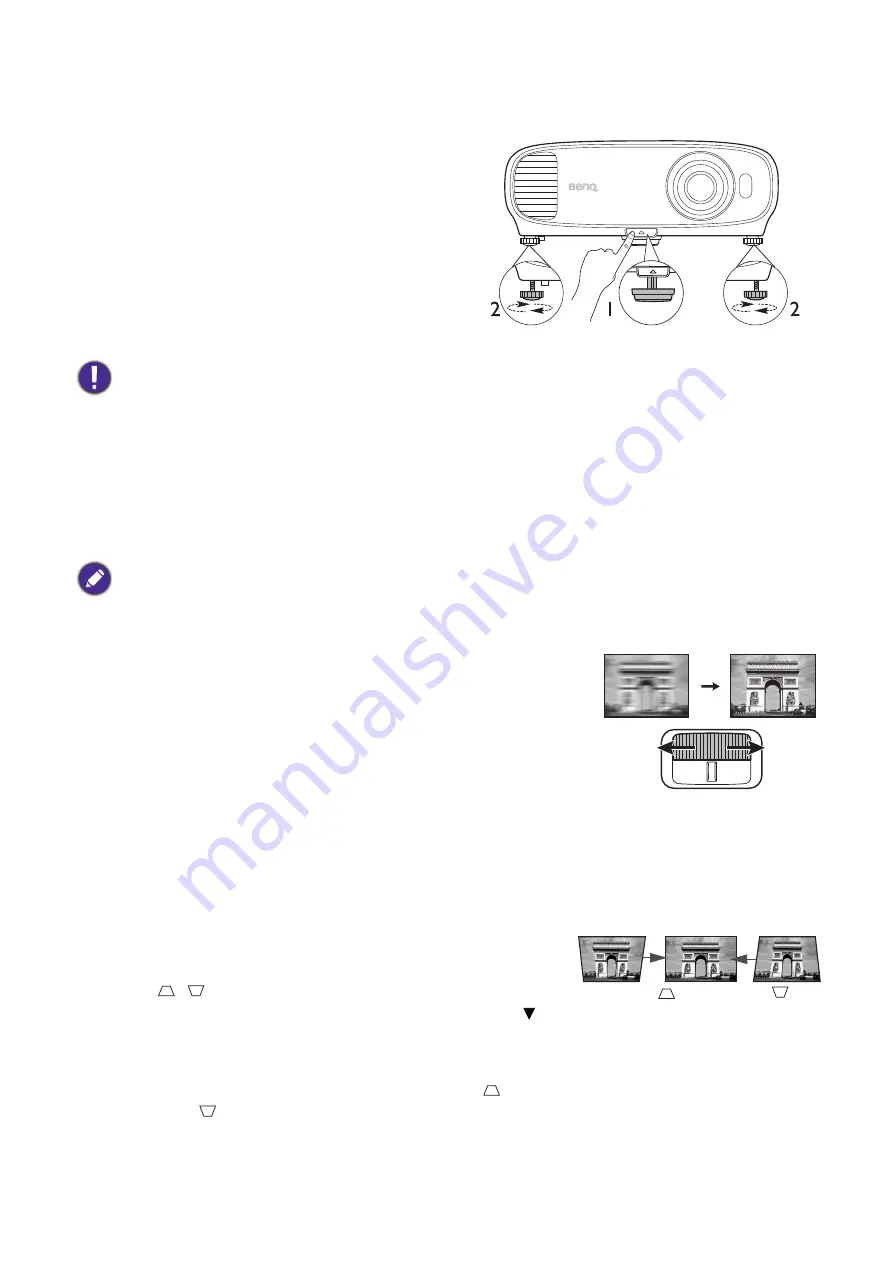
Adjusting the projection angle

If the projector is not placed on a flat surface or the 
screen and the projector are not perpendicular to 
each other, the projected image becomes 
trapezoidal. You can adjust the adjuster feet to 
fine-tune the horizontal angle.
To retract the feet, screw the adjuster feet in a 
reverse direction.

Auto-adjusting the image

In some cases, you may need to optimize the picture quality. To do this, press 

AUTO

. Within 3 

seconds, the built-in Intelligent Auto Adjustment function will re-adjust the values of Frequency and 
Clock to provide the best picture quality. 
The current source information will be displayed in the corner of the screen for 3 seconds.

Fine-tuning the image clarity

Correcting keystone

Keystoning refers to the situation where the projected image becomes a trapezoid due to angled 
projection.
To correct this, you will need to manually correct it following these steps.
1.  Do one of the following steps to display the keystone 

correction page.

• Press 

/

 on the projector. 

• Press 

QUICK INSTALL

 on the remote control. Press   to 

highlight 

Keystone

 and press 

OK

• Go to

 Advanced Menu - Display

 > 

Keystone

 and press 

OK

.

2.  After the 

Keystone

 correction page displays. Press 

 to correct keystoning at the top of the 

image. Press 

 to correct keystoning at the bottom of the image.

Do not look into the lens while the lamp is on. The strong light from the lamp may cause damage to your eyes.

This function is only available when PC signal (analog RGB) is selected.

Sharpen the image by rotating the focus ring.

Press

.

Press


.

Summary of Contents for MU641

Page 1: ...MU641 Digital Projector User Manual V 1 01 ...

Page 2: ...have other rights which vary from country to country For other information please visit www BenQ com Copyright Copyright 2017 by BenQ Corporation All rights reserved No part of this publication may be reproduced transmitted transcribed stored in a retrieval system or translated into any language or computer language in any form or by any means electronic mechanical magnetic optical chemical manual...

Page 3: ...unting the projector 15 Adjusting the projected image 16 Connection 17 Connecting smart devices 19 Connecting InstaShow WDC10 19 Operation 20 Starting up the projector 20 Using the menus 21 Securing the projector 23 Switching input signal 24 Shutting down the projector 25 Direct power off 25 Menu operation 26 Basic menu 26 Advanced menu 28 Maintenance 37 Care of the projector 37 Lamp information 3...

Page 4: ...ot during operation Allow the projector to cool for approximately 45 minutes prior to removing the lamp assembly for replacement 6 In some countries the line voltage is NOT stable This projector is designed to operate safely within a mains voltage between 100 to 240 volts AC but could fail if power cuts or surges of 10 volts occur In areas where the mains voltage may fluctuate or cut out it is rec...

Page 5: ...jector with a cloth or any other item Do not place inflammables near the projector If the ventilation holes are seriously obstructed overheating inside the projector may result in a fire 13 Always place the projector on a level horizontal surface during operation Do not use if tilted at an angle of more than 10 degrees left to right nor at angle of more than 15 degrees front to back Using the proj...

Page 6: ...s Space that is poorly ventilated or confined Allow at least 50 cm clearance from walls and free flow of air around the projector Locations where temperatures may become excessively high such as the inside of a car with all windows rolled up Locations where excessive humidity dust or cigarette smoke may contaminate optical components shorten the projector s life span and darken the image Locations...

Page 7: ...ies Make sure that the positive and negative ends are positioned correctly as illustrated 3 Slide the battery cover in until it clicks into place Projector Remote control with batteries User manual CD Quick start guide Warranty card Power cord VGA cable The supplied accessories will be suitable for your region and may differ from those illustrated The warranty card is only supplied in some specifi...

Page 8: ...d by the battery manufacturer Dispose of the used batteries according to the manufacturer s instructions and local environment regulations for your region Never throw the batteries into a fire There may be danger of an explosion If the batteries are dead or if you will not be using the remote control for an extended period of time remove the batteries to avoid damage to the remote control from pos...

Page 9: ...9 HDMI 1 input port 10 HDMI 2 MHL input port for HDMI dongle 11 USB Type A port 12 USB Mini B port 13 RGB PC signal input jacks 14 RGB PC signal output jack 15 RS 232 control port 16 S Video input jack 17 Video input jack 18 Audio input jacks Audio output jack 19 AC power jack 20 Kensington anti theft lock slot 21 Ceiling mount holes 7 6 19 3 21 3 3 8 3 3 5 4 9 11 14 12 16 13 17 15 10 18 21 21 3 3...

Page 10: ...d on ON Off Toggles the projector between standby mode and on 3 OK Confirms the selected On Screen Display OSD menu item 4 MENU Turns on the On Screen Display OSD menu 5 BACK Goes back to previous OSD menu exits and saves menu settings 6 IR remote sensor 8 9 10 6 7 1 2 5 4 3 All the key presses described in this document are available on the remote control or projector 2 7 5 9 3 4 13 8 10 15 17 14...

Page 11: ...omatically determines the best picture timings for the displayed image when PC signal analog RGB is selected 11 Source selection buttons PC 1 HDMI 12 PAGE PAGE Operate your display software program on a connected PC which responds to page up down commands like Microsoft PowerPoint 13 SMART ECO Displays the Lamp Mode menu for selecting a suitable lamp operating mode 14 FREEZE Freezes the projected ...

Page 12: ...ol effective range The remote control must be held at an angle within 30 degrees perpendicular to the projector s IR remote control sensor s to function correctly The distance between the remote control and the sensor s should not exceed 8 meters 26 feet Make sure that there are no obstacles between the remote control and the IR sensor s on the projector that might obstruct the infra red beam When...

Page 13: ...ble Select this location with the projector placed on the table in front of the screen This is the most common way to position the projector for quick setup and portability 2 Rear Table Select this location with the projector placed on the table behind the screen Note that a special rear projection screen is required 3 Front Ceiling Select this location with the projector suspended upside down fro...

Page 14: ...with max zoom Average Max distance with min zoom Inch mm 30 762 404 646 948 1043 1137 40 1016 538 862 1264 1390 1516 50 1270 673 1077 1580 1738 1895 60 1524 808 1292 1897 2086 2275 70 1778 942 1508 2213 2433 2654 80 2032 1077 1723 2529 2781 3033 90 2286 1212 1939 2845 3128 3412 100 2540 1346 2154 3161 3476 3791 110 2794 1481 2369 3477 3823 4170 120 3048 1615 2585 3793 4171 4549 130 3302 1750 2800 ...

Page 15: ... to prevent the projector from falling off such as during an earthquake The warranty doesn t cover any product damage caused by mounting the projector with a non BenQ brand projector mounting kit Consider the surrounding temperature where the projector is ceiling wall mounted If a heater is used the temperature around the ceiling may be higher than expected Read the user manual for the mounting ki...

Page 16: ... in the corner of the screen for 3 seconds Fine tuning the image clarity Correcting keystone Keystoning refers to the situation where the projected image becomes a trapezoid due to angled projection To correct this you will need to manually correct it following these steps 1 Do one of the following steps to display the keystone correction page Press on the projector Press QUICK INSTALL on the remo...

Page 17: ...y combo like FN function key with a monitor symbol turns the external display on off Press FN and the labeled function key simultaneously Refer to your notebook s documentation to find your notebook s key combination If the selected video image is not displayed after the projector is turned on and the correct video source has been selected check that the video source device is turned on and operat...

Page 18: ...pplications Any stereo audio input if provided is mixed into a common mono audio output through the projector speaker s The built in speaker s will be muted when the AUDIO OUT jack is connected Terminal Picture quality HDMI 1 Best HDMI 2 MHL Best Component Video through RGB input Better S Video Good Video Normal The projector is only capable of playing mixed mono audio even if a stereo audio input...

Page 19: ...on the projector and switch the input signal to HDMI 1 Connect the dongle to HDMI 2 MHL port on the projector and switch the input signal to HDMI 2 MHL Connecting InstaShow WDC10 Connect the HDMI cable to the HDMI out jack of the InstaShow Host and the HDMI input jack of the projector Connect one end of the supplied USB cable to the mini USB jack of the InstaShow Host and the other end to the USB ...

Page 20: ...h for input signals The current input signal being scanned appears If the projector does not detect a valid signal the message No Signal will continue displaying until an input signal is found You can also press SOURCE to select your desired input signal See Switching input signal on page 24 Please use the original accessories e g power cord to avoid possible dangers such as electric shock and fir...

Page 21: ...ions below 1 Go to Basic Menu Menu Type 2 Press OK and press to select Advanced Next time when you turn on the projector you may access the Advanced OSD menu by pressing MENU Below is the overview of the Advanced OSD menu The OSD screenshots below are for reference only and may differ from the actual design Menu Type Press OK to enter the menu Main menu Status Current input signal Press MENU to ex...

Page 22: ...ced OSD menu to the Basic OSD menu follow the instructions below 1 Go to Advanced Menu System Menu Settings and press OK 2 Select Menu Type and OK 3 Press to select Basic Next time when you turn on the projector you may access the Basic OSD menu by pressing MENU ...

Page 23: ...g password the password error message will appear and the Input Current Password message follows If you absolutely do not remember the password you can use the password recall procedure See Entering the password recall procedure on page 23 If you enter an incorrect password 5 times in succession the projector will automatically shut down in a short time Entering the password recall procedure 1 Pre...

Page 24: ...word Switching input signal The projector can be connected to multiple devices at the same time However it can only display one full screen at a time When starting up the projector automatically searches for the available signals Be sure the Advanced Menu Settings Auto Source Search menu is On if you want the projector to automatically search for the signals To select the source 1 Press SOURCE A s...

Page 25: ... power off The AC power cord can be pulled out right after the projector is turned off To protect the lamp wait about 10 minutes before re starting the projector If you attempt to re start the projector the fans may run for a few minutes to cool down In such cases press or again to start the projector after the fans stop and the power indicator turns orange To protect the lamp the projector will n...

Page 26: ...veral options to set the image s aspect ratio depending on your input signal source Auto Scales an image proportionally to fit the projector s native resolution in its horizontal or vertical width Real Projects an image as its original resolution and resizes it to fit within the display area For input signals with lower resolutions the projected image will be displayed in its original size 4 3 Sca...

Page 27: ...t for presentations with the mixture of text and graphics due to its high color brightness and better color gradation to see the details clearly 3D Is appropriate for playing 3D images and 3D video clips User 1 User 2 Recalls the settings customized based on the current available picture modes See Reference Mode on page 28 Volume Adjusts the sound level Lamp Mode See Setting the Lamp Mode on page ...

Page 28: ...t available picture modes See Reference Mode on page 28 Reference Mode There are 2 user definable modes if the current available picture modes are not suitable for your need You can use one of the picture modes except the User 1 User 2 as a starting point and customize the settings 1 Go to Picture Picture Mode 2 Press to select User 1 or User 2 3 Press to highlight Reference Mode and press to sele...

Page 29: ...tion provides six sets RGBCMY of colors to be adjusted When you select each color you can independently adjust its range and saturation according to your preference Primary Color Selects a color from among R Red G Green B Blue C Cyan M Magenta or Y Yellow Hue Increase in the range will include colors consisted of more proportions of its two adjacent colors Please refer to the illustration for how ...

Page 30: ...lution and resizes it to fit within the display area For input signals with lower resolutions the projected image will be displayed in its original size 4 3 Scales an image so that it is displayed in the center of the screen with a 4 3 aspect ratio 16 9 Scales an image so that it is displayed in the center of the screen with a 16 9 aspect ratio 16 10 Scales an image so that it is displayed in the ...

Page 31: ...Reference Mode The Keystone can only be adjusted within limited degrees 3D Sync Invert When you discover the inversion of the image depth enable this function to correct the problem Apply 3D Settings After the 3D settings are saved you can decide if you would like to apply them by choosing a set of 3D settings that you have saved Once applied the projector will automatically play the incoming 3D c...

Page 32: ...r remote control to navigate the picture 3 To reduce size of the picture press OK to switch back to the zoom in out function and press AUTO to restore the picture to its original size You can also press repeatedly until it is restored to the original size The picture can only be navigated after it is magnified You can further magnify the picture while searching for details Reset Display Returns al...

Page 33: ...o Source Search Allows the projector to automatically search for a signal Auto Signal Adjustment On Allows the projector to automatically determines the best picture timings for the displayed image when PC signal analog RGB is selected and AUTO is pressed Off The projector will not respond when AUTO is pressed Lamp Settings Lamp Mode See Setting the Lamp Mode on page 38 Reset Lamp Timer See Resett...

Page 34: ... the above it may display auto shut down symptoms which is designed to protect your projector from over heating In cases like this you should switch to High Altitude mode to solve these symptoms However this is not to state that this projector can operate under any and all harsh or extreme conditions Do not use the High Altitude Mode if your altitude is between 0 m and 1500 m and ambient temperatu...

Page 35: ...rrectly connected to devices Press to choose the source that you wish to use See Connection on page 17 for how to make the connection Background Settings Background Sets the background color for the projector Splash Screen Allows you to select which logo screen will be displayed during projector start up Menu Settings Menu Type Switches to the Basic OSD menu Menu Display Time Sets the length of ti...

Page 36: ...e factory preset values Information Native Resolution Shows the native resolution of the projector Detected Resolution Shows the native resolution of the input signal Source Shows the current signal source Picture Mode Shows the selected mode in the Picture menu Lamp Mode Shows the selected mode in the Lamp Settings menu 3D Format Shows the current 3D mode Color System Shows input system format La...

Page 37: ...with water and a neutral pH detergent Then wipe the case Storing the projector If you need to store the projector for an extended time please follow the instructions below Make sure the temperature and humidity of the storage area are within the recommended range for the projector Please refer to Specifications on page 44 or consult your dealer about the range Retract the adjuster feet Remove the ...

Page 38: ...stances the lamp may explode The following Lamp warning displays will remind you to change the lamp Lamp mode Description Normal Provides full lamp brightness Economic Lowers brightness to extend the lamp life and decreases the fan noise SmartEco Adjusts the lamp power automatically depending on the content brightness level while optimizing display quality LampSave Adjusts the lamp power automatic...

Page 39: ...k of injuries to fingers and damage to internal components use caution when removing lamp glass that has shattered into sharp pieces To reduce the risk of injuries to fingers and or compromising image quality by touching the lens do not touch the empty lamp compartment when the lamp is removed This lamp contains mercury Consult your local hazardous waste regulations to dispose of this lamp in a pr...

Page 40: ... on the projector Do not turn the power on with the lamp cover open Do not insert your fingers between the lamp and the projector The sharp edges inside the projector may cause injuries Pulling it too quickly may cause the lamp to break and scatter broken glass in the projector Do not place the lamp in locations where water might splash on it children can reach it or near flammable materials Do no...

Page 41: ...Settings Lamp Settings and press OK The Lamp Settings page appears Highlight Reset Lamp Timer and press OK A warning message is displayed asking if you want to reset the lamp timer Highlight Reset and press OK The lamp time will be reset to 0 Loose screw may cause a bad connection which could result in malfunction Do not over tighten the screw Do not reset if the lamp is not new or replaced as thi...

Page 42: ... lit up Thermal events Fan 1 error the actual fan speed is outside the desired speed Fan 2 error the actual fan speed is outside the desired speed Fan 3 error the actual fan speed is outside the desired speed Fan 4 error the actual fan speed is outside the desired speed Temperature 1 error over limited temperature Thermal sensor 1 open error Thermal sensor short error Thermal IC I2C connection err...

Page 43: ...al has not been correctly selected Select the correct input signal with the SOURCE key The lens cover is still closed Open the lens cover Blurred image Cause Remedy The projection lens is not correctly focused Adjust the focus of the lens using the focus ring The projector and the screen are not aligned properly Adjust the projection angle and direction as well as the height of the projector if ne...

Page 44: ...omputer input RGB input D Sub 15 pin female x 1 Video signal input S VIDEO Mini DIN 4 pin x 1 VIDEO RCA jack x 1 SD HDTV signal input Analog Component through RGB input Digital HDMI 1 x 1 HDMI 2 MHL 5V 0 9 A x 1 Audio signal input Audio in PC audio jack x 1 Environmental Requirements Operating temperature 0 C 40 C at sea level Operating relative humidity 10 90 without condensation Operating altitu...

Page 45: ...45 Specifications Dimensions 353 mm W x 135 mm H x 272 mm D 353 272 135 Unit mm ...

Page 46: ... 419 1280 x 720 1280 x 720_60 60 45 000 74 250 V V V 1280 x 768 1280 x 768_60 59 87 47 776 79 5 V V V 1280 x 800 WXGA_60 59 810 49 702 83 500 V V V WXGA_75 74 934 62 795 106 500 WXGA_85 84 880 71 554 122 500 WXGA_120 Reduce Blanking 119 909 101 563 146 25 V 1280 x 1024 SXGA_60 60 020 63 981 108 000 V V SXGA_75 75 025 79 976 135 000 SXGA_85 85 024 91 146 157 500 1280 x 960 1280 x 960_60 60 000 60 0...

Page 47: ... 467 51 419 1280 x 720 1280 x 720_60 60 45 000 74 250 V V V 1280 x 768 1280 x 768_60 59 870 47 776 79 5 V V V 1280 x 800 WXGA_60 59 810 49 702 83 500 V V V WXGA_75 74 934 62 795 106 500 WXGA_85 84 880 71 554 122 500 WXGA_120 Reduce Blanking 119 909 101 563 146 25 V 1280 x 1024 SXGA_60 60 020 63 981 108 000 V V SXGA_75 75 025 79 976 135 000 SXGA_85 85 024 91 146 157 500 1280 x 960 1280 x 960_60 60 ...

Page 48: ...0i 720 1440 x 480 59 94 15 73 27 480p 720 x 480 59 94 31 47 27 576i 720 1440 x 576 50 15 63 27 576p 720 x 576 50 31 25 27 720 50p 1280 x 720 50 37 5 74 25 720 60p 1280 x 720 60 45 00 74 25 1080 24P 1920 x 1080 24 27 74 25 1080 25P 1920 x 1080 25 28 13 74 25 1080 30P 1920 x 1080 30 33 75 74 25 1080 50i 1920 x 1080 50 28 13 74 25 1080 60i 1920 x 1080 60 33 75 74 25 Timing Resolution Vertical Frequen...

Page 49: ...mode Horizontal Frequency kHz Vertical Frequency Hz Color sub carrier Frequency MHz Supported 3D format Frame Sequential NTSC 15 73 60 3 58 V PAL 15 63 50 4 43 SECAM 15 63 50 4 25 or 4 41 PAL M 15 73 60 3 58 PAL N 15 63 50 3 58 PAL 60 15 73 60 4 43 NTSC4 43 15 73 60 4 43 ...

Reviews: