background image

Recovering your system

29

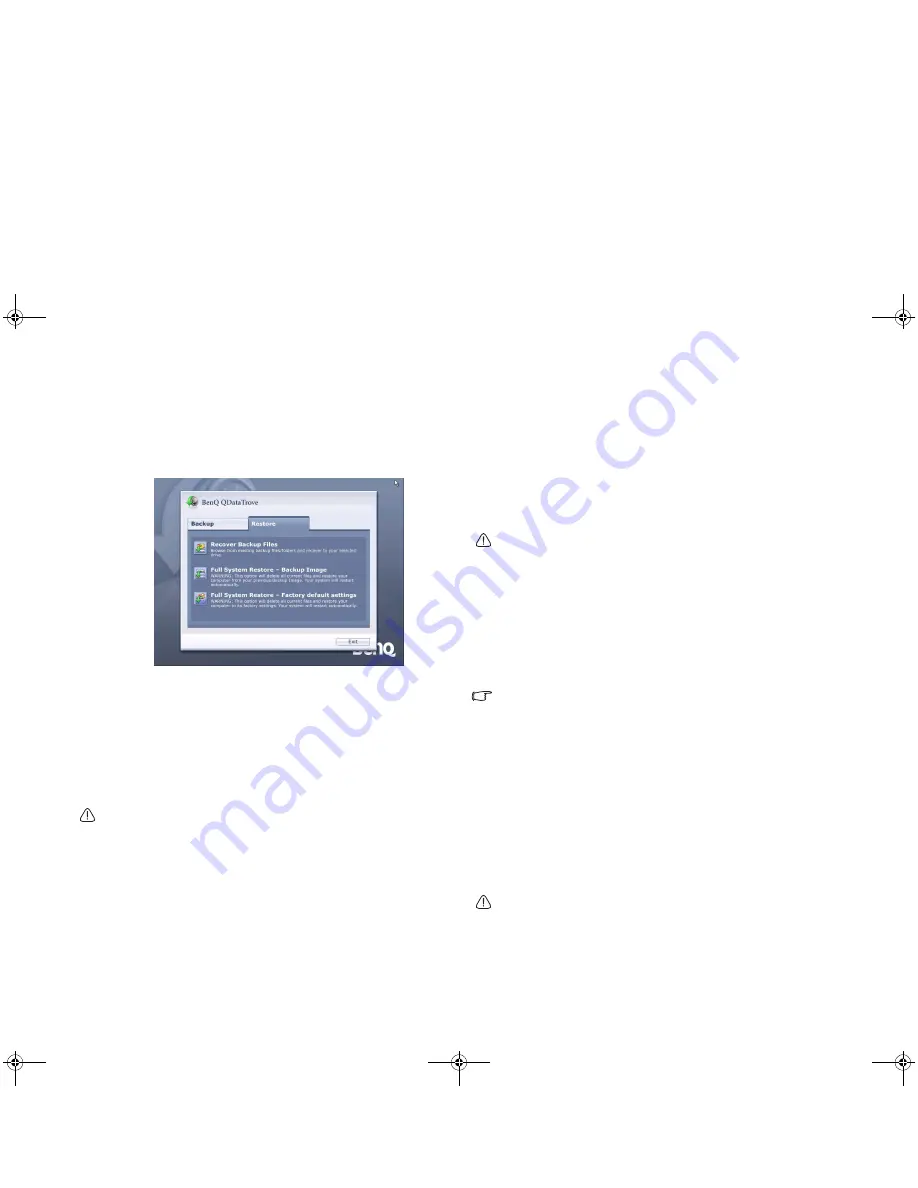
Recovering your backup files:

a. To browse your existing backup files or folders, and recover 

them to the drive you selected, click Recover Backup Files to 
proceed.

b. Follow the on-screen instructions to complete the task.

Restoring your backup image:

a. To restore your Joybook from your previous backup image, click 

Full System Restore - Backup Image.

b. Follow the on-screen instructions to complete the task.

Restoring your Joybook to factory default settings:

This process will ERASE ALL data on your system drive C: and 
restore the system to default factory configuration.

If this option is selected, all programs you installed or data you saved on 
the C: drive will be erased. However, data on the D: drive will not be 
affected.

a. To restore your Joybook to its factory settings, click Full System 

Restore - Factory default settings.

b. Follow the on-screen instructions to complete the task.

Recovering your system using the 

supplied discs

To recover your system using the “Operating System Disc” and “Drivers 
and Applications” discs, follow the procedure and instructions below 
carefully.

Step 1: Reinstalling a clean copy of Windows Vista

• All programs you installed or data you saved on the C: drive will be 

erased. However, data on the D: drive will not be affected.

• Recovering your system by using Method 2 (the supplied “Operating 

System Disc” and “Drivers and Applications” discs) will cause the 
QDataTrove function to become unavailable. You will also need to 
install the device drivers manually from the “Drivers and Applications” 
discs.

• Do not remove discs when the recovery is in progress until prompted to 

do so.

• Before using the “Operating System Disc” and “Drivers and 

Applications” discs, make sure the system is not in hibernation mode 
or turned off. Also make sure the lid of your Joybook is not closed.

The availability of the supplied discs may vary depending on your 
purchased model.

1. Turn on your Joybook.
2. Press the <F9> key when the BenQ logo appears on the screen during 

system startup. A Boot Devices screen appears.

3. Insert the supplied “Operating System Disc” into your optical drive.
4. Use < > or < > to select CD-ROM/DVD-ROM, and then press 

Enter.

5. Press any key when you are prompted with Press any key to boot from 

CD or DVD. Please wait while Windows is loading files.

6. The Install Windows screen appears. Select the operating system you 

want to install, and then click Next.

7. On the Where do you want to install Windows? screen, select the 

primary disk partition, and then click Format.

This will remove all programs and data on the C: drive where Windows 
Vista is currently installed. However, other drives will not be affected.

8. Click Next. Your Joybook will restart several times during the 

installation. Please wait while the installation is in progress. 

9. Follow the remaining on-screen instructions to complete the 

installation and setup.

JB_R42.book  Page 29  Monday, February 26, 2007  1:40 PM

Summary of Contents for Joybook C42 Series

Page 1: ...Welcome Joybook R42 C42 Series User Manual JB_R42 book Page i Monday February 26 2007 1 40 PM...

Page 2: ...ose Further BenQ Corporation reserves the right to revise this publication and to make changes from time to time in the contents hereof without obligation of this company to notify any person of such...

Page 3: ...ooth icons 21 Connecting to a Bluetooth device 21 Sending a file to a Bluetooth device 22 Using QMedia Bar 24 Setting up QMedia Bar 24 Customizing the P1 hotkey on Joybook R42 Series only 24 Using BIO...

Page 4: ...ral safety information 44 Safety information about the battery 44 Safety information about the AC adapter 44 Safety information about the modem 45 Caution 45 Disposal of Waste Electrical and Electroni...

Page 5: ...bout using system recovery tools Connecting to external display devices Information about how to connect your Joybook to external display devices Installing additional memory Information about how to...

Page 6: ...ory box If any of the items are missing or appear damaged contact your dealer immediately Save the packaging in case you need to ship your Joybook for service Getting your Joybook ready for use 1 Inst...

Page 7: ...power socket on your Joybook Connect the power cord to a wall outlet The Joybook will automatically start charging the battery Power systems and plug types may vary depending on your country region W...

Page 8: ...setup Your Joybook R42 C42 Series works best with Windows Vista Home Basic Installing other operating systems that have not been tested is not recommended and may not only void your warranty but also...

Page 9: ...our Joybook Connect a telephone line to the modem port of your Joybook and dial up to the Internet or send a fax Access local area network LAN by connecting a network cable to the LAN port of your Joy...

Page 10: ...of discs and enjoy movies or music Connect an earphone to the audio output socket to output sounds Connect a microphone to the microphone socket to record sounds Connect USB peripherals to the USB po...

Page 11: ...t in microphone Receives sounds and voices for recording 5 Audio output socket Can be used to connect to an earphone headset or external speaker for playing Joybook audio 6 Microphone input socket Can...

Page 12: ...your Joybook on or off Bluetooth is available on selected models 2 Indicators Refer to Indicators on page 12 for details 3 Built in microphone Receives sounds and voices for recording 4 Speakers 5 Pow...

Page 13: ...be careful to avoid plugging a RJ 11 phone cable connector in the RJ 45 port This will damage the LAN port They look similar but the RJ 45 connector is wider than the RJ 11 connector and has more con...

Page 14: ...rive ejection button Discs can be inserted ejected by pressing this ejection button 3 Manual tray opening If you wish to open the disc tray when your Joybook power is off or it can t be opened using t...

Page 15: ...for using an optional MiniCard A wireless network card in the MiniCard form factor design may have been pre installed on selected models To remove the cover a small Phillips head screwdriver is requir...

Page 16: ...stem is on and the battery is in use it lights up in blue When the battery is charging it lights up in amber When the battery is fully charged the light goes off Flashing blue indicates that the batte...

Page 17: ...chronize the system clock with an Internet time server How to locate download and install latest system device drivers How to setup scheduled events for system maintenance Turning off your Joybook pro...

Page 18: ...ion on Joybook C42 Series Alternatively you can do one of the following Click Start Control Panel Mobile PC and then click Windows Mobility Center Click the battery meter icon or in the notification a...

Page 19: ...d Mouse The touchpad is a pressure sensitive device that requires proper care to avoid damage Do not rest heavy objects on the touchpad or its buttons Do not scratch the touchpad with sharp pointed ob...

Page 20: ...indows Mobility Center refer to Using Windows Mobility Center on page 14 Fn F4 Decreases screen brightness Fn F12 Switches between all 3 combinations of WLAN and Bluetooth on off The status is indicat...

Page 21: ...ndows R Activates the Run dialog box E Opens the Computer window for browsing disks and files Num Lk Activates or deactivates the numeric keypad integrated in the keyboard indicated by the light gray...

Page 22: ...ght on or off Fn F4 Increases volume Fn F12 Puts Joybook into sleep mode Fn F5 Switches display between the screen and an external monitor projector or allows simultaneous display switches between int...

Page 23: ...ress and hold the Windows key and then press Tab to switch between windows R Activates the Run dialog box E Opens the Computer window for browsing disks and files Caps Lock Capitalizes all text entere...

Page 24: ...ion several times until WLAN is ON For Joybook C42 Series Press the Fn F1 hotkey combination several times until WLAN is ON When WLAN is turned on the icon flashes 3 Click on the WLAN icon in the noti...

Page 25: ...Bluetooth hotkey on your Joybook 2 Turn on the power of your Bluetooth device and activate its Bluetooth function You also need to make your Bluetooth device Discoverable For details about how to acti...

Page 26: ...tooth device If a default passkey is not specified in the documentation enter a custom alphanumeric passkey in the dialog box above And then enter the same passkey on your Bluetooth device when prompt...

Page 27: ...a on the same screen place a check mark next to the desired Bluetooth device and then click Send 4 Click OK after the file transfer is finished The example shown above is specifically for connecting t...

Page 28: ...Setting For details refer to Customizing the P1 hotkey Adjust the size of QMedia Bar on the screen by selecting Size and then select an appropriate value Customizing the P1 hotkey on Joybook R42 Seri...

Page 29: ...reference only The actual items or settings on your Joybook may differ The BIOS setup program may have been updated after the publication of this manual The settings you select in your operating syst...

Page 30: ...ailable _C1 C1 only _C12 C1 and C2 support _C123 C1 C2 and C3 support d Forced Display Toggle This item determines if toggling to an external display device will be allowed even when no device is conn...

Page 31: ...setup without saving the changes you have made Load Setup Defaults loads factory default values for all the items Discard Changes cancels all changes since last save without exiting the BIOS setup uti...

Page 32: ...cess press the F10 key when you see Press F10 key to enter QDataTrove on the upper left part of the screen 3 The following options will then display on the screen Click Backup or Restore to proceed ac...

Page 33: ...c and Drivers and Applications discs will cause the QDataTrove function to become unavailable You will also need to install the device drivers manually from the Drivers and Applications discs Do not r...

Page 34: ...ed to go to Chipset and Audio to perform the driver installation first To make your system work properly install all drivers and applications that are available for your model 3 Follow the remaining o...

Page 35: ...ble is connected properly simultaneous display will be available on your Joybook and the external display device automatically Pressing the Fn F3 hotkey combination on your Joybook R42 Series or the F...

Page 36: ...ry refer to the product information from http BenQ com Please follow the steps below to consult the FAQ information and find out the types of BenQ certified memory modules for your Joybook 1 Connect t...

Page 37: ...onal grounding equipment like an anti static wristband or touch the metal surface on the inside of your Joybook to discharge any static electricity Handle the memory module by its edge and avoid touch...

Page 38: ...battery retainer A to the to the lock position 2 Connect the AC adapter When you start Joybook it will automatically test and configure the new memory It is recommended that you go into BIOS to load s...

Page 39: ...ld I do with the battery if I will not use my Joybook for a long time Recharge the battery or discharge it to about 40 full and then store it in a dry place at about 15 C to 25 C Extremely high or low...

Page 40: ...of the telephone lines A 56K modem does not guarantee all connections at 56K rather it s the ability to connect at up to 56K speed Can t connect to the Internet with the built in network interface on...

Page 41: ...is unwanted 4 Click Apply and then click OK Restart your Joybook Remove programs from the Startup folder Removing programs from the Startup folder also helps to prevent programs from running when Win...

Page 42: ...save power 8 Repeat steps 5 through 7 for each USB Root hub 9 Click OK and then close Device Manager Why does the keyboard and or palm rest get warm Typically the Joybook tends to be slightly warm Th...

Page 43: ...Exact capacity of a 40GB hard drive displayed in the OS 40 000 000 000 1024 1024 1024 37 2529 GB Furthermore when you partition a hard drive the system will reserve some space on the drive for system...

Page 44: ...s battery type and it is the easiest battery type to care for Display There is nothing visible on the screen Check the power indicator If it is not lit up no power is being supplied to Joybook Connect...

Page 45: ...VGA monitor Then connect the target display to Joybook again How can I judge if my LCD panel is out of order and what should I do if it happens If your Joybook cannot display images at the default re...

Page 46: ...extreme heat Do not incinerate Exposure of battery to extreme heat may result in an explosion 8 Do not use AC adapters other than the one provided with the Joybook 9 Do not place the battery within r...

Page 47: ...Contains answers to frequently asked questions about the Joybook as well as additional tips Contact Center Here you can directly contact BenQ Customer Service for answers and advice to your questions...

Page 48: ...on the AC adapter or power cord 12 The AC adapter is a high voltage component Do not attempt to repair it yourself Should it become damaged please contact an authorized BenQ distributor or service ce...

Page 49: ...rotects human health and environment Declaration of Conformity For the following equipment Type of Equipment Notebook PC Brand name or mark BenQ Model designation s Model no s DHR400 Joybook R42 C42 S...

Page 50: ...i i numai cu acela i tip sau cu un tip echivalent recomandat de produc torul echipamentului Arunca i bateriile folosite n conformitate cu instruc iunile produc torului 4 Conecta i adaptorul la o surs...

Page 51: ...elietojiet un neveiciet telefona l nijas piesl gumu negaisa laik Hrvatski 1 Pridr avajte se svih uputa i upozorenja u vezi sa sustavom 2 Ne postavljajte ra unalo u podru je jakih magnetskih polja 3 Ne...

Page 52: ...Appendix 48 Memo JB_R42 book Page 48 Monday February 26 2007 1 40 PM...

Reviews: