background image

Recovering Your System

34

Recovering Your System

Should your system become unstable and you wish to restore it to its original state 
or make a backup, you can do so following either of the methods below:

1. The Windows System Restore tool
2. The Quick Recovery function of your Joybook
3. The supplied Recovery CDs
It is recommended that you try the Windows System Restore tool before attempt-
ing the other 2 options.

System recovery is a data destructive process. You should backup all data and

applications prior to restoring. Please make sure your system is connected to AC

Power before continuing.

Using the Windows System Restore Tool

1. Start your Joybook to Windows.
2. Insert Recovery CD Disc 1 into the optical drive.
3. The Windows System Recovery tool will appear on the screen automatically. 

Follow the on-screen instructions to proceed.

Using the Quick Recovery Function

Your Joybook provides you with a Quick Recovery method from its hard drive.

To recover using the quick recovery method:

1. Restart your Joybook. 
2. During the restart process, press the F10 key when you see "F10 to Recover" on 

the upper left part of the screen. A language selection menu will appear. Click to 
select the language you prefer.

3. The following options will then appear on the screen. Use the touch pad or Tab 

key to make your selection and then press the Enter key to confirm.

This process will ERASE ALL data in your system drive (C:) and restore the sys-
tem to default factory configuration: restores the system disk (C:) of your Joybook 
to its original, factory preload state.

If this option is selected, all programs you installed or data you saved on drive C:

will be erased. However, data on drive D: will not be affected.

To backup all data in your system drive (C:) to drive (D:), please click "Next". 
Please make sure your system is connected to AC Power before continuing: back 
up all data on drive C: to drive D:. Click N

Next and the following options will 

appear:

Start creating backup files. First please check your drive D: for sufficient free space 
and the disk format must be FAT32. If you already have an old backup file on 
drive D:, then the backup file will be replaced: start backing up all data on drive C: 
to drive D:.

• Old backup data will be overwritten by a new one.

• Before you select this option, make sure that there is enough space on drive D: for

storing the backup data and the disk format of drive D: is FAT32. For example, to

back up 6GB data on drive C: to drive D:, you need at least 3GB free space on

drive D:. You can follow the steps below to check the used or available space and

disk format of drive C: and D:.

1. Click the Start button and then select My Computer.

2. Right-click on the C: or D: drive icon and then select Properties from the menu

that appears.

• Do not delete the file Mysystem.pqi in the MyBackup folder in drive D:. Otherwise

the backup data will be deleted.

Restore all data to system drive (C:) from the backup data in drive D:: restore 
drive C: using the backup data from drive D:.

• The default partitioning of your Joybook’s hard disk is as follows: 60% of the total

space for the C: disk, 2 GB for the hidden partition and the rest to the D: disk. 

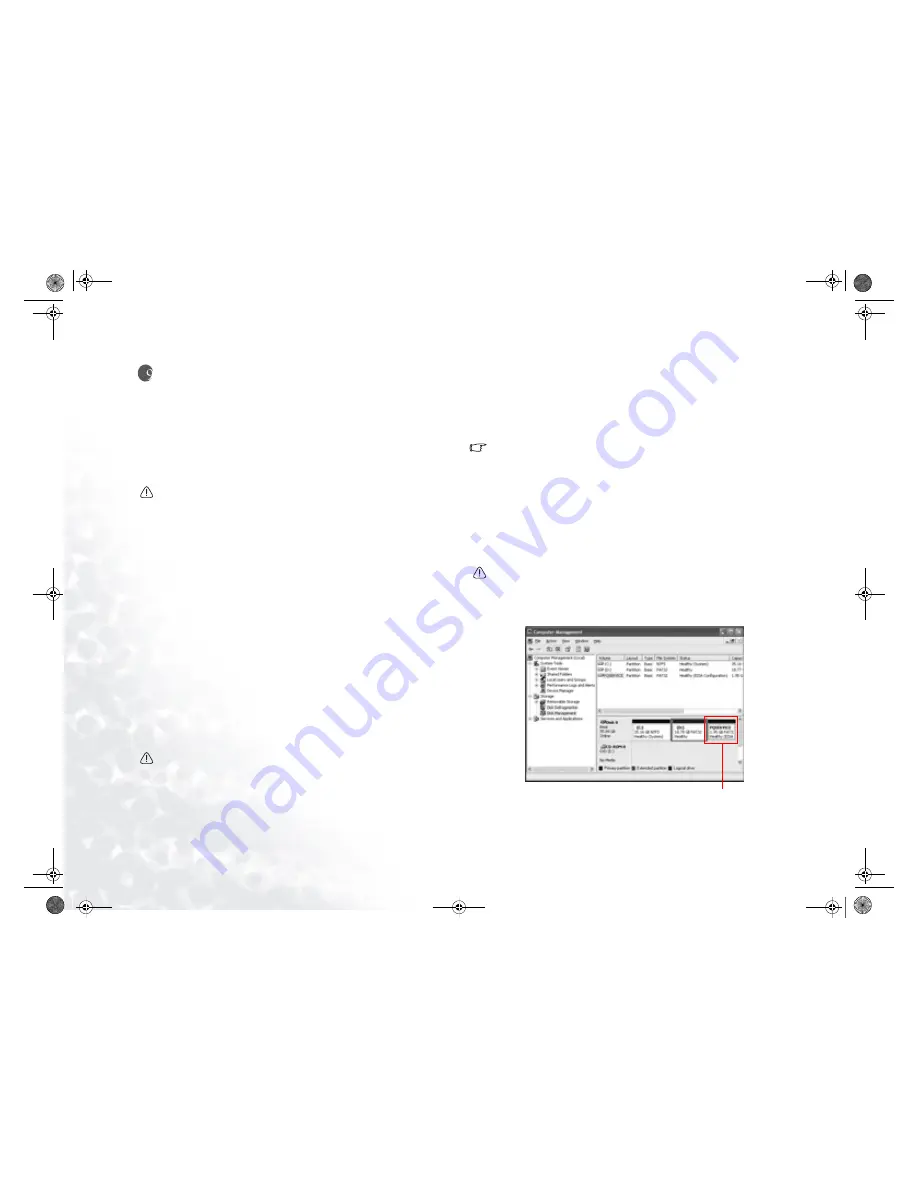
• The Quick Recovery data is stored in the PQSERVICE partition on the hard disk

drive. Do not delete this partition, or the Quick Recovery function will become

unavailable. If this happens, please contact your local BenQ service center for

help.

Do not delete this partition

KC3211F/cppl!!Qbhf!45!!Xfeoftebz-!Opwfncfs!21-!3115!!22;61!BN

Summary of Contents for Joybook 2100 Series

Page 1: ...Welcome Joybook 2100 Series User s Manual KC3211F cppl Qbhf j Xfeoftebz Opwfncfs 21 3115 22 61 BN...

Page 2: ...sentations or warranties either expressed or implied with respect to the contents hereof and specifically disclaims any warranties merchantability or fitness for any particular purpose Further BenQ Co...

Page 3: ...8 Playing a Music CD 18 Creating a Playlist 18 Converting CD Music into MP3 Format 19 Creating an MP3 Music CD 19 Viewing Digital Photographs Creating Slide Shows and Calendars 20 Photo Explorer Works...

Page 4: ...Table of Contents ii Joybook Online Registration 42 Appendix 43 Worldwide Power Systems and Plug Types 43 KC3211F cppl Qbhf jj Xfeoftebz Opwfncfs 21 3115 22 61 BN...

Page 5: ...ove accordingly Tap on the touch pad once to execute the same action as clicking on the left button of a mouse Tap twice to execute the same action as dou ble clicking Q Left and Right Selection Butto...

Page 6: ...7 for details Scroll Lock Indicator Lights up in green when the Scroll Lock function is activated refer to Function Hotkeys on page 7 for details Wireless Network Indicator Lights up in green when Jo...

Page 7: ...the PC card Ventilation Holes For dissipating heat and keeping Joybook at an optimal temperature Ethernet Port Allows Joybook to connect to an 10 100BaseT Ethernet network USB Port For connecting peri...

Page 8: ...D RW or DVD R DVD RW discs The disc tray can be opened by pressing the small ejection button on the drive If you wish to open the disc tray when your Joybook power is off or it can t be opened using t...

Page 9: ...hts up in green when Joybook power is on Flashes green when Joybook has been put to the Standby mode Battery Indicator Lights up in green when the battery is fully charged and connected to AC power Li...

Page 10: ...PCI wireless network card may have been pre installed O Battery Retainer A Secures the battery in place P Battery Pack Supplies power to Joybook when external power is not connected Q Battery Retaine...

Page 11: ...refer to Setting up Fn F12 Key Func tion on page 11 for details Fn F3 Decreases speaker volume F Fn F7 Increases screen brightness F Fn NumLk Activates or deactivates the numeric keypad integrated in...

Page 12: ...l windows Tab Makes the next item on the Windows Taskbar active R Activates the R Run dialog E Opens the M My Computer window for browsing disks and files Application Key Provides the same function as...

Page 13: ...f you are asked to select the type of keyboard and you are not sure please check the specification label on the packing carton to determine the correct keyboard type After you are done answering the q...

Page 14: ...s fully discharged The Joybook will shut down automatically 4 Connect the AC adapter to fully charge the battery pack Checking the Battery Level Any battery level indication is an estimated result The...

Page 15: ...Hibernation Hibernation is a very useful feature People frequently open many applications when they use computers It takes some time to get all these applications open and running and normally they al...

Page 16: ...reas On the top line is the menu bar containing the titles of available menus Each menu title contains a specific menu The center left column of the menu contains information regarding the current set...

Page 17: ...ssword in the entry fields and press Enter Confirm your password by typing it again and pressing Enter If the E Enable Password to Power on sub item is enabled the set password is always required to b...

Page 18: ...r To change the color of an element such as text graphic and background click on the corresponding color square and the a window appears where you can specify the color Windows would retain the settin...

Page 19: ...r convert and save CD music into MP3 format or create your personal favorite music album Click to start up P PowerDVD for playing DVD or movie clips Click to open N Nero Express for burning your favor...

Page 20: ...pass words e mail servers and other settings please consult your system administrator ISP or contact BenQ Customer Service for help For more information on how to use Outlook Express please consult th...

Page 21: ...ss words and other settings please consult your system administrator ISP or contact BenQ Customer Service for help For more information on how to use Internet Explorer please consult the on line Help...

Page 22: ...list while cre ating a playlist under My Playlist only creates shortcuts to the music files If the music files are deleted error will occur No Button Icon Description 1 Action Buttons Used to execute...

Page 23: ...ongs you selected this process may take a while 4 When the conversion process is completed you will see the converted songs on the Song List To change the name of the playlist right click on it and se...

Page 24: ...to another frame or select a file from the storyboard click the M Move button on the Slideshow toolbar then find the frame where you would like to move the file and click once 5 Remove selected files...

Page 25: ...he entire show to a friend or relative that also uses Photo Explorer Click the E Export button to create a Web Slideshow that can be uploaded to a Web server or packaged in a self extracting EXE file...

Page 26: ...figuration settings are all located here 1 2 3 4 5 6 7 8 9 10 11 12 13 14 15 16 17 18 19 20 21 22 23 24 25 13 Select Source Selects media source for playback 14 Eject Ejects discs from the optical dri...

Page 27: ...that the source is correct If not click the S Select Source button and choose the right drive 2 Click the P Play button The VCD SVCD will begin playing Depending on the VCD SVCD title some may offer a...

Page 28: ...DVD RW disc into the DVD Combo DVD RW DVD Dual Drive of your Joybook 2 According to the type of disc you wish to burn click the D DVD or C CD button located at the upper right part of the dialog 3 Ta...

Page 29: ...list by right clicking a file and select D Delete Click N Next 8 The following window will appear Select the correct drive to use and then specify the name of the disc and writing speed number of cop...

Page 30: ...ner to design the cover for the disc you just burned or save the setting of this disc for future use Or you can simply click E Exit to exit Nero Express For more information on how to use Nero Express...

Page 31: ...to set up wireless network connection click Yes Otherwise click No to use the standard configuration tool of the Windows system For more information about how to use the Intel PROSet wireless network...

Page 32: ...reless network connection detected by Joybook will appear Click a wireless network in the window and then click Connect When Joybook is connected to a wireless network the signal strength and connec t...

Page 33: ...ng a presentation you can output Joybook s video signal to an external display device such as a projector or monitor Press the Fn F5 hotkey combination to switch between Joybook s own screen and the e...

Page 34: ...ion set or VCR for viewing or recording To do so follow the steps below 1 Turn off Joybook and connect it to the TV or VCR using an S Video cable 2 Turn on Joybook right click on Windows Desktop and s...

Page 35: ...or customer service center for the upgrade or memory replacement The memory of your Joybook can be extended to up to 2 GB Please follow the steps below to consult the FAQ information and find out the...

Page 36: ...Retainer B to the unlock position and while still holding the Retainer pull the battery away from its compartment 4 Use a screwdriver to remove the screw that secures the memory compartment over 5 Ope...

Page 37: ...ge downwards until the module locks into place 8 Replace the cover and use a screwdriver to secure it with the screw 9 Place the battery on its original position and then slide Battery Retainer A to t...

Page 38: ...drive C will be erased However data on drive D will not be affected To backup all data in your system drive C to drive D please click Next Please make sure your system is connected to AC Power before...

Page 39: ...sing the Recovery CDs 1 Restart your Joybook 2 When Joybook starts up press the F F9 key to enter the Boot Menu during Power On Self Test POST while the BenQ Joybook logo is being displayed 3 Insert t...

Page 40: ...y installed Make sure that the battery is fully charged If this does not work consult your BenQ dealer What should be the run time of a battery Run time will vary on individual Joybooks based on the a...

Page 41: ...6K modem does not guarantee all connections at 56K rather it offers the ability to connect at up to 56K speed Can t connect to the Internet with the built in network interface on Joybook Check if the...

Page 42: ...ct N New Folder Give the folder a name This folder will be used later 2 Right click the S Start button and then select O Open A folder named P Programs will appear in the Start Menu window 3 Double cl...

Page 43: ...l There is no sound coming from the speakers Check the following The speakers may have been muted Look at the volume control speaker icon on the Windows Taskbar to see if mute has been set If so turn...

Page 44: ...the problem The screen s brightness may be set too low Use the Fn F7 hotkey com bination to increase the brightness The display mode may be set to use an external display Use the Fn F5 hotkey combina...

Page 45: ...ly charge discharge battery up to 4 cycles before achieving full capacity of a new battery 2 Fully discharge and then fully charge the battery every two to three weeks for battery conditions 3 Remove...

Page 46: ...re you can directly contact BenQ Customer Service for answers and advice to your questions You can also obtain the information about the BenQ service stations in your country Forum An open space where...

Page 47: ...230 50 America United States 120 60 Hawaii 120 60 Guam Saipan 120 60 Canada 120 60 Mexico 127 60 Panama 120 60 Argentina 220 50 Bolivia 220 50 60 Europe France 127 220 50 United Kingdom 200 50 German...

Page 48: ...Appendix 44 Memo KC3211F cppl Qbhf 55 Xfeoftebz Opwfncfs 21 3115 22 61 BN...

Reviews: