background image

18 Installation 


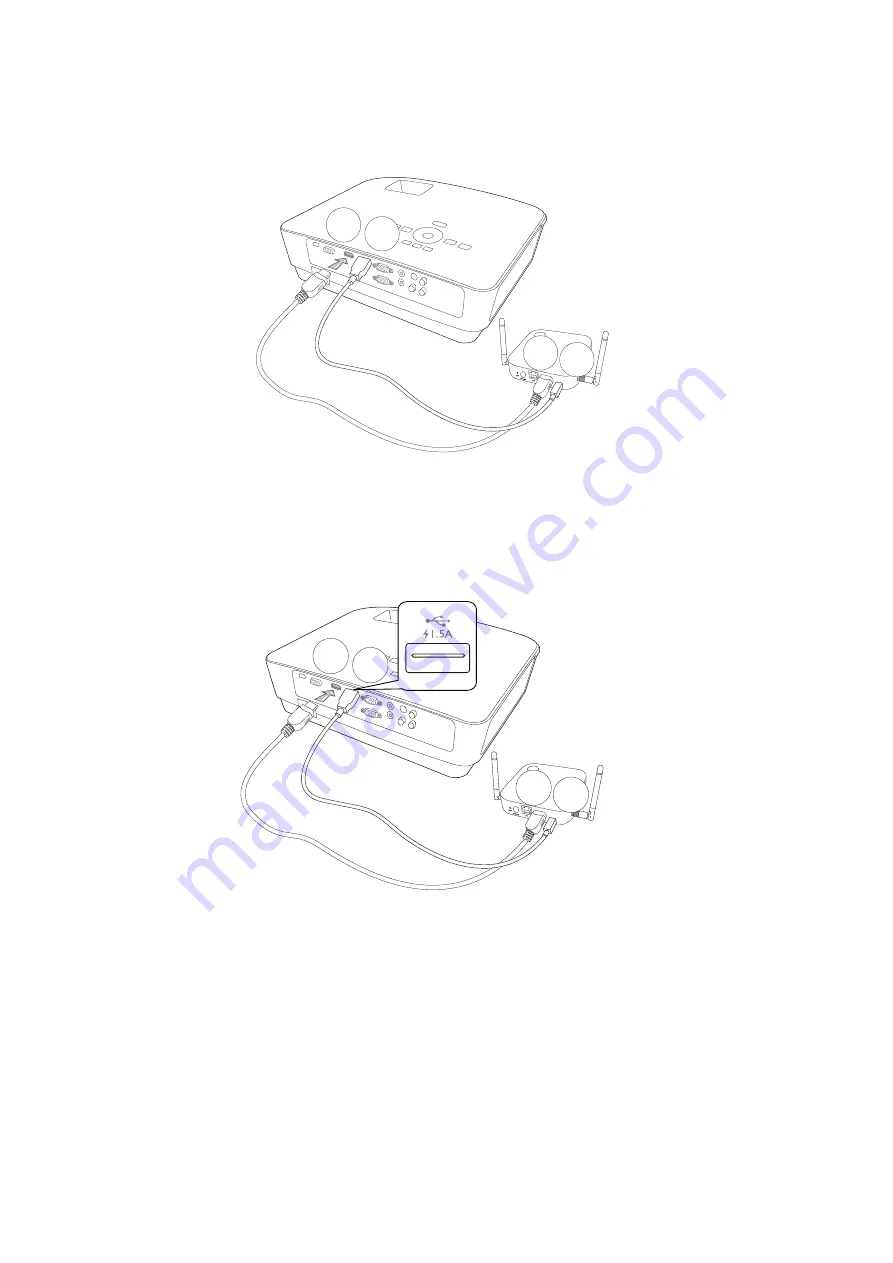
Connecting the HDMI cable

Connect the HDMI cable to the HDMI out jack of the InstaShow Host and the HDMI input jack of 
the projector.

Power supply via a USB type A jack (5V/1.5A)

Connect one end of the supplied USB cable to the mini USB jack of the InstaShow Host and the 
other end to the USB type A jack (1.5A) of the BenQ projector. See the illustration.

HDMI

HDMI

USB

USB

HDMI

HDMI

USB

USB

Summary of Contents for InstaShow WDC10TC

Page 1: ...WDC10TC InstaShow User Manual...

Page 2: ...ccurate information to customers and thus all contents may be modified from time to time without prior notice Please visit www benq com for the latest version of this manual The illustrations and the...

Page 3: ...e HDMI cable and power 16 Assembling the adapter 17 Connecting the HDMI cable 18 Power supply via a USB type A jack 5V 1 5A 18 Power supply via a power adapter 19 LAN connection 19 Setting up and powe...

Page 4: ...4 Main column 39 Function bar 40 WAN 41 Wireless Network 42 Pairing 46 Advance Setting 49 Scheduling 55 Tool 56 Legal Announcement 62 Troubleshooting 63 2 19 19...

Page 5: ...features InstaShow is equipped with the following features Features Description True Plug Play Simply connect InstaShow into your USB C port then push the button to start presenting immediately No Sof...

Page 6: ...ck may decrease transmission distance According to regulatory restrictions in different regions of the world Wi Fi channels cannot be used in countries outside the purchased region InstaShow Buttons I...

Page 7: ...Max 8M between the InstaShow Button and the InstaShow Host Temperature range Operating 0 C to 40 C 32 F to 104 F Storage 10 C to 60 C 14 F to 140 F Humidity Storage 5 to 90 relative humidity non conde...

Page 8: ...sembling the InstaShow Host on page 11 for more information 2 DC 1 5A port Connect to an adapter or a display using a Cable USB A M to Micro B M 3 HDMI port Connect to a display using a Cable HDMI A M...

Page 9: ...device is trying to connect to an InstaShow Host or encountering a problem Static red The device is starting up Off The device is powered off Quick flashing red The reset process is triggered LED ind...

Page 10: ...installation may vary according to the actual environment and your display specifications Follow the procedures below and refer to the specified sections for details 1 Assemble the InstaShow Host with...

Page 11: ...hole 2 Use the screws provided to lock the lid to the ceiling 3 Lock the first hole 1 4 Follow the instruction in the illustration below to lock the other holes 2 4 5 Rotate the InstaShow Host counter...

Page 12: ...ollowing the process described below 1 Align the top of the lid over the bottom of InstaShow Host so that the alignment hole is pointed towards the Open text located at the front side of the InstaShow...

Page 13: ...es on the lid and put the InstaShow Host right next to the display Please only use the rubber foot provided with the kit to attach to the InstaShow Host Please see Positioning the InstaShow Host anten...

Page 14: ...Host 2 Affix the InstaShow Host on the wall near the display 3 Keep the antennas away from any signal obstructions You can also place the InstaShow Host on a mobile display trolley See the illustratio...

Page 15: ...pointed downwards at an angle roughly perpendicular to the ceiling For ceiling mount installation Position the antennas so that they are both point either upwards or downwards roughly parallel to the...

Page 16: ...and power Once the InstaShow Host has been positioned properly near the display connect the HDMI cable and power to ensure signal transmission To supply power to the InstaShow Host do one of the foll...

Page 17: ...dard British plugs To connect the plug of your choice follow the steps below 1 Align and insert the bottom hook to the adapter 2 Close the gap by pushing the plug 3 The adapter is successfully assembl...

Page 18: ...w Host and the HDMI input jack of the projector Power supply via a USB type A jack 5V 1 5A Connect one end of the supplied USB cable to the mini USB jack of the InstaShow Host and the other end to the...

Page 19: ...directly to a laptop The LAN connection can be used to configure your InstaShow and update the software Insert a network cable with RJ 45 connectors into the LAN port and connect the other side to a...

Page 20: ...the LED indicator turns green If you purchase an additional InstaShow Button via an InstaShow Button Kit please follow the process described below 1 Connect the InstaShow Button s USB C jack to the co...

Page 21: ...ing up 3 When the InstaShow button is ready to present the LED indicator will turn green Press the Present key when the LED indicator turns green Handle the InstaShow Button cable with care Rough hand...

Page 22: ...kit and you want to pair the new InstaShow Buttons with your InstaShow Host you need to follow the instruction below as well When the InstaShow Host is placed on a table 1 Make sure your InstaShow Ho...

Page 23: ...ow Host will blink blue for two minutes waiting to pair with an InstaShow Button If the InstaShow Host is attached to the ceiling so that it is not easy to press the PAIRING key please use the pairing...

Page 24: ...LED indicator of the InstaShow Button will blink blue for about 10 seconds The pairing process is ongoing The Pairing message will be shown on the screen The images are for reference only Each produc...

Page 25: ...are provided with two different ways to store the InstaShow Buttons in the cradle Place the InstaShow Buttons in the cradle vertically 1 or horizontally 2 See the illustrations Resetting a InstaShow H...

Page 26: ...plete Resetting a InstaShow Button Resetting an InstaShow Button allows you to return the InstaShow Button to its original factory settings You may want to reset an InstaShow Button because it has bee...

Page 27: ...nstaShow Host is not powered on Under these conditions where the InstaShow Button is not connected to the corresponding InstaShow Host and its LED flashes red use the following steps to reset the Inst...

Page 28: ...egin quick flashing red flash red twice every second for 10 seconds then light up static red for 15 to 20 seconds indicating that the InstaShow Button is resetting 4 Once the InstaShow Button LED flas...

Page 29: ...low and refer to the specified sections for details 1 To start a presentation see Starting presentation on page 29 for details 2 To stop a presentation see Idle presentation on page 31 for details 3 T...

Page 30: ...tatic green when the InstaShow Button is connected and working properly You will then see the Idle screen 4 To start a presentation press the Present key 5 The device starts presenting and the LED ind...

Page 31: ...ions Idle presentation 1 To stop a presentation press the Present key 2 The device stops presenting and the LED indicator of the InstaShow Button turns green 3 Users can press the Present key to retur...

Page 32: ...By enabling presenters to quickly customize the projection for precise productivity or smooth wireless Full HD 1080p video users can confidently blend text graphs and charts pictures and multimedia a...

Page 33: ...n play full HD 1080p videos smoothly InstaShow is primarily for the use of business presentation with documents such as PowerPoint Word Excel PDF and Full HD video clips If users have home theater wir...

Page 34: ...ion 8 0 or Firefox version 46 0 1 Accessing the web management interface Logging into the web management interface via direct connection 1 Connect your InstaShow Host directly to a laptop using a netw...

Page 35: ...is 192 168 20 1 Change your laptop s IP address to 192 168 20 x e g 192 168 20 100 4 On your browser enter the IP address 192 168 20 1 On the login page enter the default user name admin and password...

Page 36: ...36 Web management Logging into the web management interface via LAN If your InstaShow Host is connected to your LAN you can enter the IP Address shown on the screen via a web browser...

Page 37: ...of Logging into the web management interface via direct connection on page 34 The following is an example of how you can log into the web management interface via a mobile device with IEEE 802 11ac 1...

Page 38: ...age go to the language settings panel and you can see all available languages 2 Click the language you want to switch to and your new language will be set 3 Once a new language has been set both the w...

Page 39: ...39 Web management 2 A confirmation window will pop up Press Apply to log out Main column The main column shows the detailed content from the function bar...

Page 40: ...nt Function bar Information Click Information and you will see detailed information for System Information WAN Wireless Network and Screen Message You can change the Host Name under System Information...

Page 41: ...AN and you will see the default WAN IP Address of the InstaShow Host The default connection type is DHCP Acquire the IP Address from your DHCP server of your network If you want to change your WAN IP...

Page 42: ...ent interface via a wireless network Refer to Logging into the web management interface via a wireless network on page 37 for more information Disable The InstaShow Host deactivates its SSID which pro...

Page 43: ...u can change Transmission Power from 1 6 6 being the strongest In the real network environment every scale up can increase the signal strength between 1 3 dBm For The InstaShow Host automatically gene...

Page 44: ...r choppy due to interference to the wireless connection between the InstaShow Host and InstaShow Button from other wireless devices in the area users can switch the Channel by pressing Rescan By press...

Page 45: ...45 Web management After you configure all the Wireless Network settings press Apply to proceed...

Page 46: ...as it is not easy to press the PAIRING key of the InstaShow Host when the device is high on the ceiling You can pair a InstaShow Button and InstaShow Host via the web management interface See Advance...

Page 47: ...s start pairing to pair the InstaShow Host to the InstaShow Button via the web management interface you will have two minutes to pair with the InstaShow Button 5 Press the MODE key on the side of the...

Page 48: ...st and InstaShow Button are successfully paired 7 You may press stop pairing anytime to stop the pairing process Images are for reference only Each product features a different serial number The maxim...

Page 49: ...ll be changed to Video mode The mode set by Picture Quality Mode in web management is the default mode next time when the InstaShow host restarts That is if the mode is Video mode and is switched to P...

Page 50: ...utton is connected to only features a USB 2 0 power connection The use of Low Power mode will result in a lower display quality and choppier video than Presentation mode and Video mode When Low Power...

Page 51: ...ow Host InstaShow button and HDMI display the InstaShow Host reads the EDID data provided by the connected HDMI display and determines the optimal video resolution and audio format based on the video...

Page 52: ...MI output from the InstaShow Host after a set amount of time in which there is no connection with an InstaShow Button When the InstaShow Host is in Network Standby Mode the LED will light up 50 static...

Page 53: ...how Host will enter HDMI Standby Mode under either one of the following conditions No HDMI cable connection is made between the InstaShow Host and a display for at least 10 minutes The display which i...

Page 54: ...gement If you want to restart the InstaShow Host press Restart and a window will pop up Press OK to proceed If you want to shutdown the InstaShow Host press Shutdown and a window will pop up Press OK...

Page 55: ...ge the schedule by clicking Scheduling You can set System Time and Periodical Restart You can select your Time Zone and check Enable to set Daylight Saving You can check Enable to set Periodical Resta...

Page 56: ...to proceed Tool By clicking Tool you can adjust Password Setup Firmware Upgrade Configuration Backup and Log Setting Password Setup You can change Password by 1 Entering your old Password 2 Entering...

Page 57: ...ware and driver according to the following sequence 1 Button_Driver_xxxx bin 2 Host_Driver_xxx bin 3 Button_Firmware_xxx bin 4 Host_Firmware_xxx bin You can change Mode to Firmware Upgrade or Driver U...

Page 58: ...o proceed To upgrade the InstaShow Host Driver ensure that both the InstaShow Host and InstaShow Button are properly connected and the LEDs on both devices are static green then follow the steps below...

Page 59: ...vices are static green then follow the steps below 1 Press Browse and choose the file to upgrade 2 Press Firmware Upgrade to proceed When upgrading firmware driver follow the warning messages shown on...

Page 60: ...ame SSID and wireless password settings and pairing status In Configuration Backup you can choose Import Configuration File Export Configuration File and Factory Default You can set Import Configurati...

Page 61: ...ress the Return to Factory Default Setting button a confirmation window will pop up When the process is confirmed the InstaShow Host will begin restoring to Factory Default and the LED will quick flas...

Page 62: ...t For information about disclaimer or privacy policy press Legal Announcement to find out more a Save To Flash On Allow the InstaShow Host to save the current log into the flash memory In other words...

Page 63: ...5V 1 5A Insufficient power supply Change power supply of the InstaShow Host to a power adapter The screen lags seriously and the audio breaks up sometimes Wi Fiinterferenceor signal attenuation Make s...

Page 64: ...signal attenuation Make sure the transmission distance is within 8M and with no obstacles The LED indicator of the InstaShow Button is blinking red when the power is on The InstaShow Host has not bee...

Page 65: ...by function is enabled Briefly press the power button on the InstaShow Host or power on the display connected to the InstaShow Host with an HDMI cable The InstaShow Host will wake up automatically The...

Page 66: ...InstaShow Host enters pairing mode the InstaShow Button should also enter pairing mode within two minutes Windows Software When presenting a video file via Gom Media Player the full screen image is c...

Reviews: