background image

  27

  How to adjust your monitor

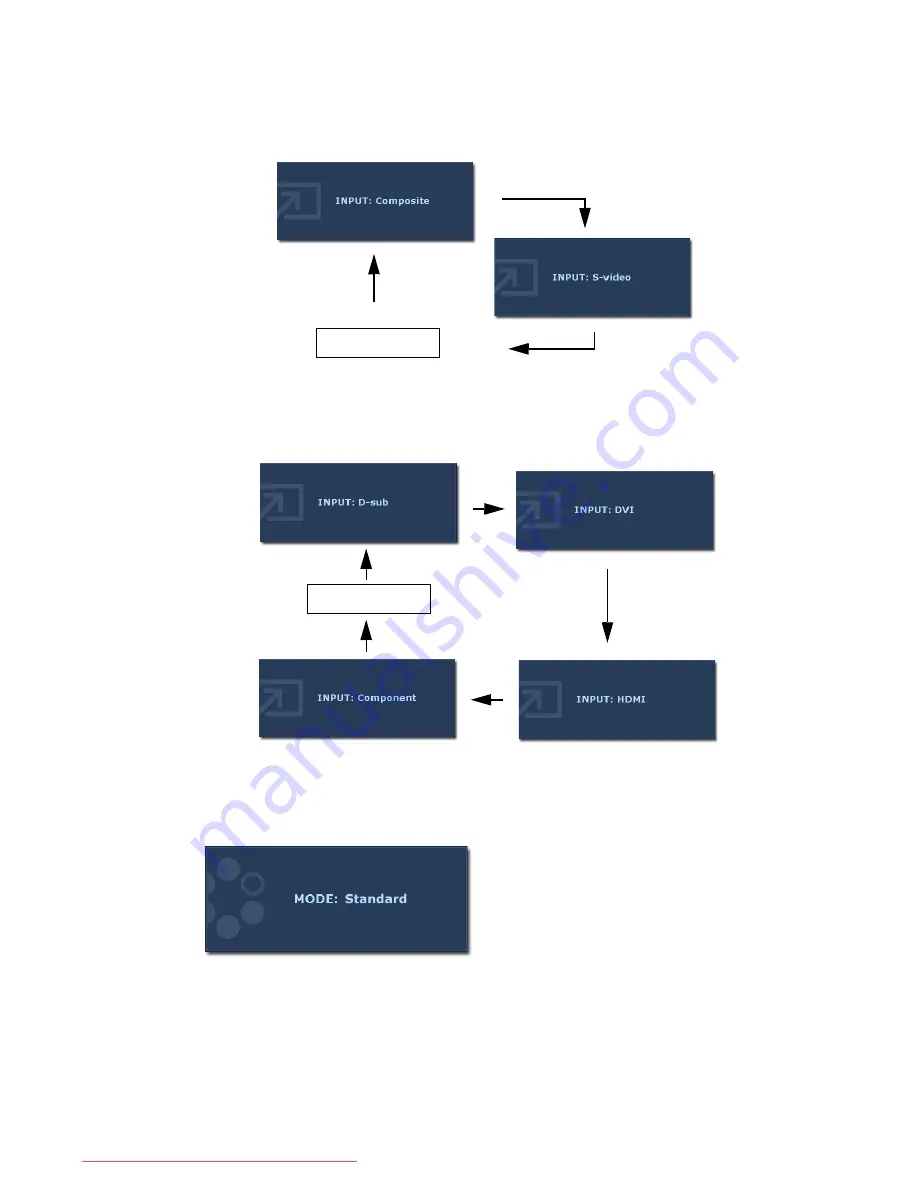
Mode hot key

If the input source of the main window is from the computer graphic/PC video signals 
(D-sub, DVI, HDMI, or Component), you will cycle through the following messages 
indicating the video input sources for the PIP window.

If the input source of the main window is from the video signals (Composite or S-video), 
you will cycle through the following messages indicating the computer graphic/PC video 
signals for the PIP window.

Press the key continually to switch between 
the 6 modes for the main window, including 
Standard, Movie, Dynamics, Photo, Action 
Game, and Racing Game. The setting will 
take effect immediately.
See also


Picture Mode on page 36. 

PIP off and Exit

PIP off and Exit

Downloaded from ManualMonitor.com Manuals

Summary of Contents for FP241VW - 24" LCD Monitor

Page 1: ...Welcome FP241VW 24 Wide Screen LCD Monitor User Manual Downloaded from ManualMonitor com Manuals...

Page 2: ...wer supply cord serves as a power disconnect device for pluggable equipment The socket outlet should be installed near the equipment and be easily accessible This product should be operated from the t...

Page 3: ...itor 14 How to install the monitor on a new computer 16 How to upgrade the monitor on an existing computer 17 How to install on Windows Vista systems 18 How to install on Windows XP system 19 How to a...

Page 4: ...esolution of 1920 x 1200 When unpacking please check you have the following items If any are missing or damaged please contact the place of purchase for a replacement BenQ LCD Monitor Top Mount Monito...

Page 5: ...d packaging in storage for use in the future when you may need to transport the monitor The fitted foam packing is ideal for protecting the monitor during transport USB cable optional HDMI cable optio...

Page 6: ...ctibles on the shelf to keep the desk roomy The two hooks on the rear of the allow you to hang accessories on hand such as the headset the game gear etc Never place cans of beer soda glasses of water...

Page 7: ...10 i key For more information about these keys please refer to The control panel on page 23 1 Earphone socket Plug the earphone or headset into the earphone socket to receive the audio signal from HDM...

Page 8: ...llowing the installation of a wall mount bracket See Using the monitor wall mounting kit on page 12 to learn more 1 Power AC input connector 2 DVI D input connector 3 HDMI input connector 4 D Sub inpu...

Page 9: ...et and the other end to the DVI D port on your computer optional The DVI D format is used for direct digital connection between source video and digital LCD monitors or projectors The digital video si...

Page 10: ...stationery items or toy collectibles on the shelf to keep the desk roomy The two hooks on the rear of the shelf allow you to hang accessories on hand such as the headset the game gear etc The shelf c...

Page 11: ...ees 6 Turn on the power Connect the other end of power cable to the nearby electric outlet Picture may differ from product supplied for your region Turn on the monitor by pressing the power key Turn o...

Page 12: ...ng the installation of a wall mount bracket Before starting to install a monitor wall mounting kit please read the precautions carefully Precautions Install your monitor and monitor mounting kit on a...

Page 13: ...13 How to assemble your monitor hardware 2 Follow the instruction manuals of the wall mount bracket you purchased to complete the installation Downloaded from ManualMonitor com Manuals...

Page 14: ...d only point Windows in the direction of that driver and Windows will install it for you How do I gain the most benefit from my new monitor To gain the most benefit from your new BenQ color LCD flat s...

Page 15: ...d on as an Administrator or as a member of the Administrators group in order to install the monitor driver software Furthermore if your computer is connected to a network which has security access req...

Page 16: ...following these instructions You should instead be following the instructions for How to upgrade the monitor on an existing computer 1 Follow the instructions in How to assemble your monitor hardware...

Page 17: ...other versions of Windows however as at the time of writing BenQ has done no testing of this driver on other versions of Windows and cannot guarantee its operation on those systems Installing monitor...

Page 18: ...Continue in the prompted User Account Control window 5 Click the Driver tab and the Update Driver button 6 Insert the BenQ LCD Monitor CD ROM into a CD drive on the computer 7 In the Update Driver So...

Page 19: ...r or the correct model is not currently shown you will need to continue with these instructions 5 Click the Driver tab and the Update Driver button The Hardware Update Wizard will display Follow the w...

Page 20: ...Software video drivers are often updated and available for new hardware video resolutions If necessary you may need to replace and update the PC video card hardware to be able to support the native re...

Page 21: ...he specification section of this User Manual Supported PC Timings on page 47 You can choose 60 70 and 75 Hertz but not 72Hz for the native resolution of 1920 x 1200 1 Double click the Display icon in...

Page 22: ...test image utility which you can use to check for screen color grayscale and line gradient display 1 Run the test program auto exe from CD ROM You could also use any other image such as the desktop o...

Page 23: ...ode key Switch between different modes including Standard Action Game and Racing Game 8 Input Swap key Manually switch between different video signals that may be connected to your monitor for the mai...

Page 24: ...Sub or DVI D PICTURE ADVANCED Picture Mode Standard Senseye Demo Movie Overscan Dynamics PerfectMotion Photo Action Game Racing Game ON OFF ON OFF Overscan is not available for use when the input sou...

Page 25: ...on Composite Spanish Reset All S Video Polish Japanese Czech Traditional Chinese Full Hungarian Simplified Chinese Aspect Serbo croatian 1 1 Romanian Dutch Language Russian H Position Swedish V Positi...

Page 26: ...n the messages of the desired input source displays release the key to set the PIP input source The message will last around 3 seconds The setting will take effect immediately This command can bring u...

Page 27: ...of the main window is from the video signals Composite or S video you will cycle through the following messages indicating the computer graphic PC video signals for the PIP window Press the key conti...

Page 28: ...ction is activated To specify the input source release the key when you see the message of the preferred input source which will be lasting for around 3 seconds The setting will take effect immediatel...

Page 29: ...source To specify the input signal release the key while the message displays If the current main window source is from the Computer Graphic PC video input signals the input signal messages will be d...

Page 30: ...ng pages Display menu on page 31 Picture menu on page 33 Picture Advanced menu on page 36 PIP Picture in Picture menu on page 39 Audio menu on page 41 System menu on page 42 The Audio menu is only ava...

Page 31: ...nu item and then press the ENTER key to select that item 4 Press the t or u keys to make adjustments or selections 5 To return to the previous menu press the MENU key Item Function Operation Range Aut...

Page 32: ...xel Clock Adjusts the pixel clock frequency timing to synchronize with the analog input video signal Not applicable to a digital input signal See also Picture optimization on page 22 0 to 100 Phase Ad...

Page 33: ...The function is not available for use when DynamicContrast is on Press the t key to increase the brightness and press the u key to decrease the brightness 0 to 100 Contrast Adjusts the degree of diffe...

Page 34: ...influence on the color tint of the image e g if you reduce the Blue level the image will gradually take on a yellowish tint If you reduce Green the image will become a magenta tint Press the t or u k...

Page 35: ...use when the input source is D Sub or DVI D Press the t or u keys to move the highlight to a menu item and then press the t or u keys to adjust the value 0 to 100 Saturation Adjusts the purity and in...

Page 36: ...mode that best suits the type of images shown on the screen Standard for basic PC application Movie for viewing videos Dynamics for viewing landscape specific videos Photo for viewing still images Act...

Page 37: ...when the input source is D Sub or DVI D When the input source is component composite or S video the function is ON by default however when the input source is HDMI the default setting is OFF Press the...

Page 38: ...improve the ghosting effect but by adopting the use of Black Frame Insertion technology the visual effect of motion blur resulted from human eye s spatial temporal integration can also be effectively...

Page 39: ...nnection type See also PIP hot key on page 26 Press the t or u keys to change the settings This command can bring up a window from a second image source Thus you can watch images from 1 computer graph...

Page 40: ...ncrease the contrast and press the u key to decrease the contrast 0 to 100 Sharpness Adjusts the clarity and visibility of the edges of the subjects in the images displayed in the PIP window Press the...

Page 41: ...the menu 3 Press the t or u keys to move the highlight to a menu item and then press the ENTER key to select that item 4 Press the t or u keys to make adjustments or selections 5 To return to the prev...

Page 42: ...to select that item 4 Press the t or u keys to make adjustments or selections 5 To return to the previous menu press the MENU key Item Function Operation Range Input Selects the video input for the m...

Page 43: ...s the input image in its native reso lution without scaling If Overscan is set to ON then the scaling is 1 1 05 Press the t or u keys to change the settings Full Aspect 1 1 OSD Settings Press ENTER to...

Page 44: ...s will be disabled Press the t or u keys to change the settings To unlock the OSD controls when the OSD is preset to be locked press and hold the ENTER key for 15 seconds to enter the OSD Lock option...

Page 45: ...at are permanently on or off and is a natural defect that occurs in LCD technology The image has a faulty coloration It has a yellow blue or pink appearance Select MENU PICTURE Color Reset Color and t...

Page 46: ...ched on the monitor running at its native resolution To have the optimal display performance of each type of input sources you can use the Display Mode function to set a proper aspect ratio for the in...

Page 47: ...DOS 640 x 480 31 47 60 00 25 18 DOS 640 x 480 35 00 67 00 30 24 Macintosh 640 x 480 37 86 72 80 31 50 VESA 640 x 480 37 50 75 00 31 50 VESA 800 x 600 37 88 60 32 40 00 VESA 800 x 600 48 08 72 19 50 00...

Page 48: ...automatic image setting 9 keys and i key Contrast brightness vert hor image position phase pixel clock color balance color palette hue saturation sharpness multiple language OSD OSD position OSD lock...

Page 49: ...ored from two aspects one is from the LCD technology itself and the other is from human visual perception As the combination of AMA Advanced Motion Acceleration technology and Black Frame Insertion te...

Reviews: