background image

Eng
lish

Preparing Your Camera for Use

4

• 

The camera must be used with the specified charger set. Damage caused by the use of an 

incorrect charger set is not covered under the warranty. Always make sure that the cam-
era is off before removing the battery.

• 

The battery may be warm after being charged or used. This is normal and not a malfunc-

tion.

• 

When using the camera in cold environments, keep the camera and its battery warm by 

holding it inside your jacket or other warm protective environment.

2.3

Inserting and Removing an SD Memory Card

The camera is equipped with 24MB internal memory, allowing you to record video clips, 
capture images, or make voice files in the camera. You can also expand the memory capacity 
by using an optional SD (Secure Digital) memory card to store more files.

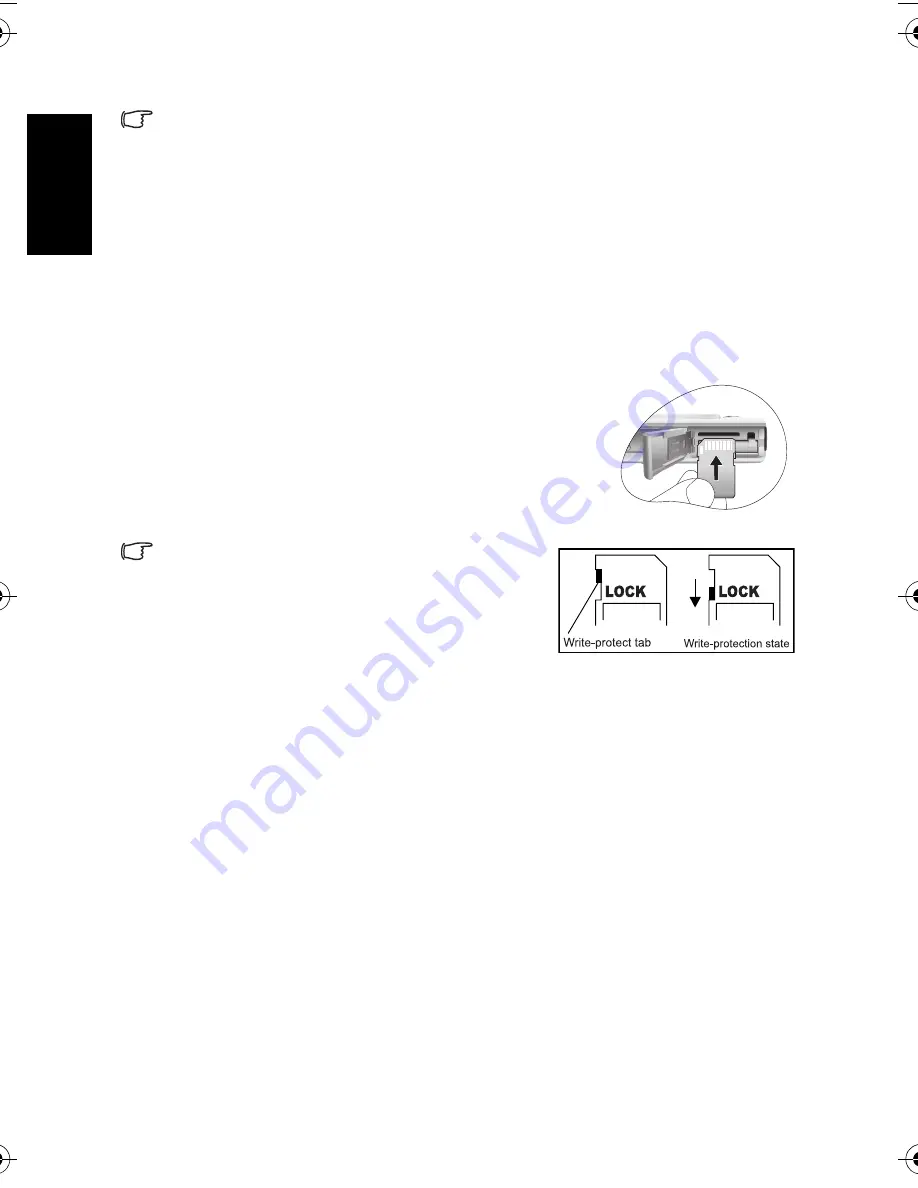
1. Always make sure the camera is turned off before inserting 

or removing a memory card.

2. Insert an SD memory card in the correct direction, as shown 

in the illustration.

3. Close the battery/SD memory card cover.

To remove the SD memory card, make sure the camera is 
turned off. Press lightly on the edge of the memory card and 
it will eject.

• 

Be sure to format the SD memory card with this cam-

era before the initial use. 

• 

To prevent valuable data from being accidentally 

erased from an SD memory card, you can slide the 
write-protect tab (on the side of the SD memory 
card) to “LOCK”. 

• 

To save, edit, or erase data on an SD memory card, 

you must unlock the card.

• 

While formatting the internal memory, do not insert a memory card into the camera. Oth-

erwise, the memory card is formatted instead of the camera’s internal memory.

• 

Formatting is an irreversible action and data cannot be recovered at a later time. Back up 

your data before formatting.

• 

An SD memory card having read or write problems may not be properly formatted.

• 

SD memory cards in the following sizes are supported: 8 MB, 16 MB, 32 MB, 64 MB, 128 

MB, 256 MB, 512 MB, and 1 GB. The camera is compatible with SD memory cards manu-
factured by Panasonic, Toshiba, and Sandisk. Please contact your local dealer for pur-
chasing information.

2.4

Setting the Date and Time

Before using your camera for the first time, please set the date and time. For more 
information, refer to the table in 3.4.1 “Setup Mode Menu” on page 20.

DC_E605_UM.book  Page 4  Monday, January 29, 2007  4:13 PM

Summary of Contents for DC E605

Page 1: ...Welcome DC E605 Digital Camera User Manual ...

Page 2: ...camera damage Do not use solvents such as alcohol to clean your camera If the lens is dirty use a lens brush or soft cloth to clean the lens Do not touch the lens with your fingers To prevent electric shock do not attempt to disassemble or repair your camera by yourself Water may cause a fire or electric shock Therefore store your camera in a dry place Do not use your camera outdoors when it is ra...

Page 3: ...against harmful interference in a residential installation This equipment generates uses and can radiate radio frequency energy and if not installed and used in accordance with the instructions may cause harmful interference to radio communications However there is no guarantee that interference will not occur in a particular installation If this equipment does cause harmful inter ference to radio...

Page 4: ...ing the Flash 8 3 1 6 Using the Self timer 9 3 1 7 Using the Optical Zoom 9 3 1 8 Using the Digital Zoom 10 3 1 9 Changing the Focus 10 3 1 10 Adjusting the EV 10 3 1 11 Snapshot Mode Menu Settings 10 3 2 Movie Mode 13 3 2 1 Movie Mode LCD Monitor Information 13 3 2 2 Movie Mode Menu Settings 14 3 2 3 Timer Recording 15 3 3 Playback Mode 15 3 3 1 Playback Mode LCD Monitor Information Image 16 3 3 ...

Page 5: ... dealer Save the packaging in case you need to ship your camera for service 1 2 Camera Components 1 2 1 Front View 1 User s Manual 2 Digital camera 3 USB cable 4 Lithium ion battery 5 Hand strap 6 Software CD ROM 7 Battery charger DLC 02 8 AC power adapter 9 AV cable 10 Pouch 1 Shutter button 2 Power button 3 Status LED indicator 4 Built in flash 5 Self timer LED indicator 6 Speaker 7 Lens Lens co...

Page 6: ...ect the pictures you take with the camera Indicators State Description Status LED indicator Solid blue The camera is powered up and ready to be used The USB connection is in progress The camera is in the power saving mode Blinking blue The camera is processing or accessing data Blinking orange There are error or warning messages Self timer LED indicator Solid red The sound recording or movie recor...

Page 7: ...3 When the battery has come out a little gently pull it out the rest of the way 2 2 Charging the Battery The battery charge status affects the performance of the camera To maximize the performance and life of the battery it is recommended that you fully charge the battery using the specified charger set charger and AC power adapter and then fully discharge it through the normal use at least one ti...

Page 8: ...ory card make sure the camera is turned off Press lightly on the edge of the memory card and it will eject Be sure to format the SD memory card with this cam era before the initial use To prevent valuable data from being accidentally erased from an SD memory card you can slide the write protect tab on the side of the SD memory card to LOCK To save edit or erase data on an SD memory card you must u...

Page 9: ...s area turns red To review the last captured image press the button Press the button to return to Snap shot Mode The LCD monitor darkens in strong sunlight or bright light This is not a malfunction To prevent your images from being blurred while pressing the shutter button always hold the camera steady This is especially important when you are shooting under low lighting conditions under which you...

Page 10: ...e Balance if chosen Detailed Info display Auto WB Sunny Cloudy Tungsten Fluorescent 5 EV Exposure Value 0 3 0 6 1 0 1 3 1 6 2 0 0 3 0 6 1 0 1 3 1 6 2 0 6 ISO ISO Auto ISO 100 ISO 200 ISO 400 7 Metering Center Avg Spot Average 8 Image Quality Fine Normal 9 Resolution Image size 2816 x 2112 2304 x 1728 1600 x 1200 1280 x 960 640 x 480 10 Available number of shots 11 zoom status 12 AF Area 13 Battery...

Page 11: ...ed 2 Use the buttons to select the desired mode and then press the OK button to confirm The table below will help you choose appropriate Shooting Mode Icon Shooting Mode Description Auto Select this mode when you want to leave the settings up to the camera to capture images with ease Manual Select this mode when you want to adjust the settings of White Balance Metering and ISO These menus are only...

Page 12: ...ubject The flash is fixed at Night Scene Portrait Select this mode when you want to have a clear shot of the subject and the background The flash is always on in this mode Icon Flash Description Flash Auto The flash fires automatically according to the photographic conditions Flash On The flash will always fire regardless of the surrounding brightness Select this mode for capturing images with hig...

Page 13: ...angle photography depending on the distance up to the subject You can further enlarge the center of the screen and capture images using the digital zoom 1 Press the button to enter Snapshot Mode or Movie Mode 2 Compose the image with the zoom key Adjusting the key to the right zooms in on the subject and enlarges the subject on the LCD monitor Adjusting the key to the left provides a wide angle im...

Page 14: ...ual For more information on setting Shooting Mode refer to 3 1 4 Setting Shooting Mode on page 7 2 Press the button The EV adjustment bar will be displayed on the bottom of the LCD monitor 3 By default the EV is 0 It can be adjusted between 2 0 to 2 0 To increase the EV bias press the button and then press the OK button To decrease the EV bias press the button and then press the OK button 3 1 11 S...

Page 15: ...g the date and time or the date format refer to the table of 3 4 Setup Mode on page 19 White Balance Only available in Manual mode Auto WB Sunny Cloudy Tungsten Fluorescent Sets the white balance when capturing images under spe cific lighting conditions Auto WB Automatically adjust the white bal ance Sunny Suitable for bright daylight conditions Cloudy Suitable for cloudy twilight or shady conditi...

Page 16: ...terval is 60 minutes Count 2 99 counts specifying how many shots can be taken 3 Use the buttons to adjust the settings and then press the OK button To capture images with Interval Shoot function 1 In Snapshot Mode toggle the button to select Interval Shoot mode 2 Press the shutter button to start Images will be captured according to the preset Interval and Count 3 If you wish to stop press the shu...

Page 17: ...on press the shutter button again To pause the recording session press the OK button To resume press the OK but ton again The flash cannot be used in Movie Mode EV compensation cannot be set or activated in Movie Mode While a video is being recorded to an SD memory card neither open the battery SD mem ory card cover nor remove the battery SD memory card Doing so might damage the SD memory card or ...

Page 18: ... Tungsten Fluorescent Sets the white balance when recording subjects under specific lighting conditions Auto WB Automatically adjust the white balance Sunny Suitable for bright daylight condi tions Cloudy Suitable for cloudy twilight or shady conditions Tungsten Suitable for subjects lit by tung sten incandescent lighting Fluorescent Suitable for subjects lit by flu orescent lighting Effect Normal...

Page 19: ...ress the shutter To exit press the button 6 The Timer Recording screen is displayed The camera enters the Standby mode and shows the information of your session If you wish to cancel the action press the shutter 7 When the recording session begins the camera enters the Recording mode After the recording session is complete the camera will power off automatically 3 3 Playback Mode In Playback Mode ...

Page 20: ...onitor 2 To view a different portion of the images press the buttons to adjust the display area You will see a frame with a square box inside The frame indicates the entire image while the square box shows the location of the currently enlarged area 3 To return to the regular display adjust the zoom key to the left until the normal image 1X magnification appears on the screen Or you can press the ...

Page 21: ...ng 4 Press the OK button again to play the voice memo 5 If you wish to remove the voice memo press the button choose Delete Voice and then press the OK button 3 3 3 Deleting Files When you are not satisfied with the images video clips or voice memos you can choose to delete them one by one or all at once Please note that the deleted files cannot be recovered 1 In Playback Mode press the button to ...

Page 22: ...lows you to trim a portion of a captured image To trim a captured image follow the steps below 1 In Playback Mode choose Trim and then press 2 Use the zoom key and buttons to move to the portion you want 3 Press the OK button A trimmed image will be saved as another file and has a smaller size Slideshow 1 sec 3 sec 5 sec This function enables you to set the time interval while playing back your im...

Page 23: ...f video clips Press the OK button to start playing back a video clip To pause or resume the video playback press the OK button To stop the video playback press the button To play back the video clip with slow motion press the button To start the fast forward video playback press the button To start the fast reverse video playback press the button The zoom function cannot be activated while playing...

Page 24: ...mat Memory This option is displayed when there is no SD memory card loaded It erases all data and reformats the internal memory Protected files are also erased Memory Copy to Card Format Card Copy to Card This option is displayed when there is an SD memory card loaded You may copy files from the camera s inter nal memory to a loaded SD memory card Format Card This option is displayed when there is...

Page 25: ...camera is powered on it will switch to power saving state according to your settings If the camera is in power saving state re activate it by pressing any button Off 30 sec 1 min 3 min If the camera is idle for 5 minutes the camera will power off automatically QuickView Allows you to get a quick preview immediately after an image is captured The preview shows briefly and then you may continue to c...

Page 26: ...date and time before using the camera for the first time Date Format Allows you to select the date format used for the Date Stamp feature Year Month Date Month Date Year Date Month Year Video Out The camera s TV out port provides video output for viewing images or video clips on a standard TV screen Set the video output mode to either NTSC or PAL Refer to your local authorities for information on ...

Page 27: ...ters and effects Assemble creative photo projects and share results via e mail and multiple print options Ulead Photo Explorer Ulead Photo Explorer 8 0 SE Basic provides an efficient way to transfer browse modify and distribute digital media It is an all in one tool for owners of digital cameras webcams DV camcorders scanners or for anyone who strives to effectively handle digital media Ulead Vide...

Page 28: ...r Connecting the Camera to a PictBridge compliant Printer 1 Connect the camera to the printer with the included USB cable and then turn on the camera 2 Select PictBridge If no selection is made within 10 seconds Mass Storage e g external hard disk is activated instead 3 When the connection is established you will be asked to select Print One Print All or Print Index Select the desired option and t...

Page 29: ...a is warm The camera or flash was used continu ously over a long period of time The flash does not fire The flash does not recharge The camera flash is turned off Set the flash to Auto Flash The light source is sufficient Even though the flash fired the image is dark The distance to the subject is greater than the flash s effective range Get closer to the subject and shoot The image is too bright ...

Page 30: ...ard does not have any free space Load a new card or delete unwanted files The flash is recharging Wait until the flash mode icon indicated on the screen stops flashing The camera does not recognize the mem ory card Format the memory card before the initial use or before using with another camera I cannot print images with PictBridge compli ant printers The camera is connected to the printer when t...

Page 31: ...uto 100 200 400 White Balance Auto Sunny Cloudy Sunset Tungsten Fluorescent File Format Still Image JPEG format Exif 2 2 DCF Image Size 2816 x 2112 2304 x 1728 1600 x 1200 1280 x 960 640 x 480 pixels Movie Clips Motion JPEG AVI format with Continuous recording Movie Size 640 x 480 320 x 240 160 x 128 pixels 30 fps Storage Built in memory 24MB SD memory card compatible Image Play Single image AVI p...

Page 32: ...English Service Information 28 7 Service Information Technical Support For free driver updates product information and news releases visit the following web site http www BenQ com ...

Reviews: