background image

BenQ DC 5530  User’s Manual

Camera Operating Mode

14

EEEEn

nnng

ggglllli

iiissssh

hhh

e of Contents

• 

 One shot at a time


* Using the 

 button.


* Using the [Delete] menu.

• 

 All frames at once

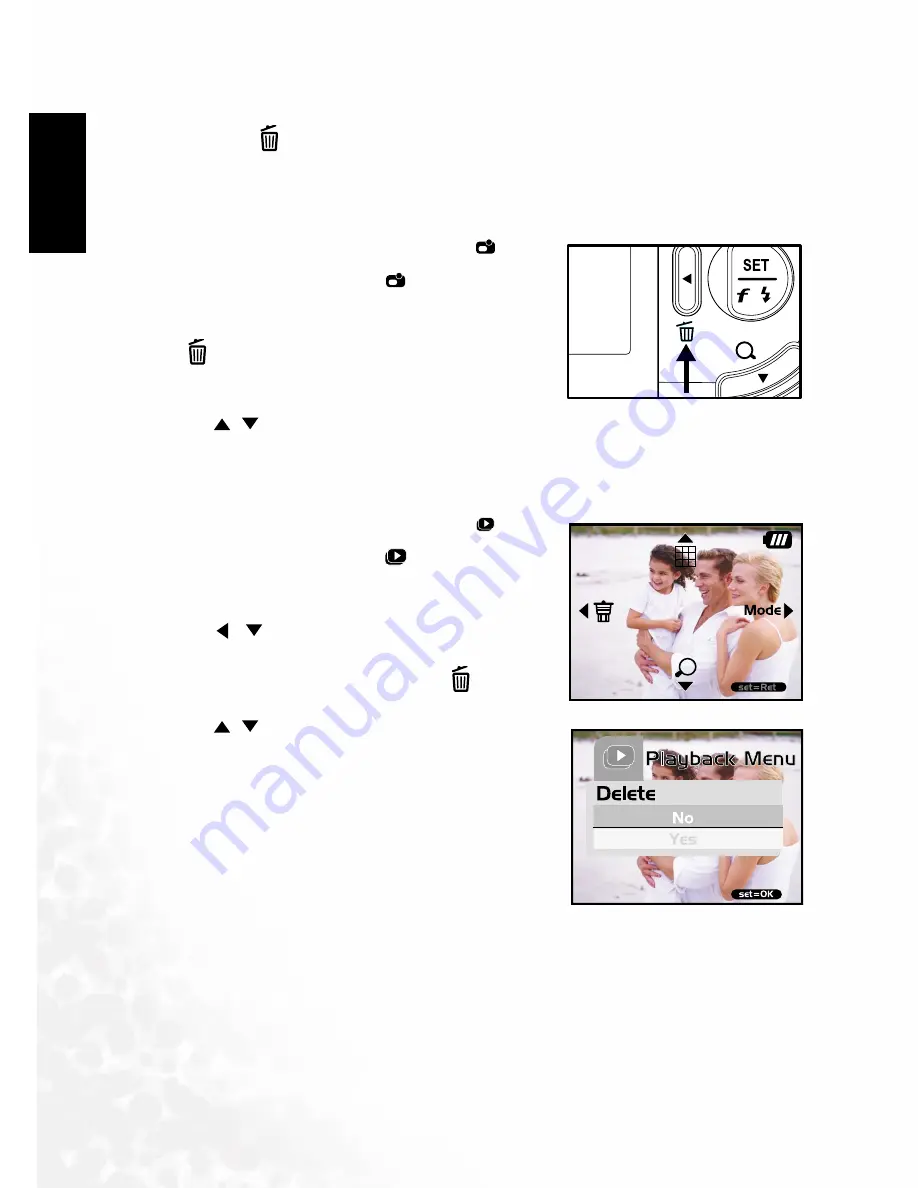
 To delete one image or movie (Quick Delete

-

 mode):

1.

Toggle the 

MODE

 button to

 , and press the 

SET


button. 

2.

To delete the last recorded image/movie, press the   

 button. 

3.

Press the 

SET

 button. 

4.

When the delete message appears, select [Yes]  using 
the 

/

 buttons and then press the 

SET

 button. 

•  If you wish to cancel the deletion, select [No].
•  It returns to the preview screen.

 To delete one image or movie (Quick Delete

-

 mode):

1.

Toggle the 

MODE

 button to

 , and press the 

SET


button. 

2.

Select the image/video clip you wish to delete using 
the /   

buttons. 

3.

Press the 

SET

 button.

4.

To delete this current image, press the 

 button.

5.

When the delete message appears, select [Yes] using 
the 

/

 buttons and then press the 

SET

 button. 

•  If you wish to cancel the deletion, select [No].

Summary of Contents for DC E30

Page 1: ...Welcome DC E30 Digital Camera DC E30 Digital Camera DC E30 Digital Camera DC E30 Digital Camera User s Manual User s Manual User s Manual User s Manual ...

Page 2: ...era Do not use your camera at temperatures below 0 C or above 40 C Do not use or store your camera in the environments listed below Direct sunlight High and dusty places Next to an air conditioner electric heater or other heat sources In a closed car that is directly under the sun Unstable locations If your camera becomes wet wipe it with dry cloth as soon as possible Salt or seawater may cause se...

Page 3: ... A A A O O O OP P P PE E E ER R R RA A A AT T T TI I I IN N N NG G G G M M M MO O O OD D D DE E E E 9 9 9 9 3 1 Record Mode 9 3 1 1 Taking Images 9 3 1 2 Digital Zoom 9 3 1 3 Self Timer 10 3 1 4 Flash 10 3 2 Playback Mode 11 3 2 1 Viewing Images 11 3 2 2 Zoom Playback 12 3 2 3 Displaying Thumbnail Images 12 3 2 4 Slideshow Display 13 3 2 5 Deleting Images 13 3 2 6 Formatting Media 16 3 2 7 Copying...

Page 4: ...B B B BL L L LE E E ES S S SH H H HO O O OO O O OT T T TI I I IN N N NG G G G 29 29 29 29 7 7 7 7 S S S SP P P PE E E EC C C CI I I IF F F FI I I IC C C CA A A AT T T TI I I IO O O ON N N NS S S S 30 30 30 30 8 8 8 8 S S S SE E E ER R R RV V V VI I I IC C C CE E E E I I I IN N N NF F F FO O O OR R R RM M M MA A A AT T T TI I I IO O O ON N N N 31 31 31 31 E E E E n n n n g g g g l l l l i i i i s s...

Page 5: ... appears damaged contact your dealer Save the packaging in the event you need to ship your camera for service Note Note Note Note Accessories and components may vary by retailer Note Note Note Note 16MB internal memory 14MB available for image storage lets you capture and store images without the need for an additional memory card However you may wish to expand the memory capacity up to 512MB capa...

Page 6: ...View Rear View Rear View Rear View 1 Strap eyelet 2 Lens cover 3 Lens 4 Self timer LED 5 Flash 6 POWER POWER POWER POWER Power button 7 Shutter buttonr 1 Focus switch Macro mode Normal mode 2 Status LED 3 Arrow button up Thumbnail button MENU Menu button 4 Arrow button right MODE Mode button 5 SET Set button Flash button 6 Arrow button down Zoom button 7 Arrow button left Quick view button Delete ...

Page 7: ... Record Mode Display icons Still Image Record Mode 1 2 3 4 5 6 7 8 9 1 Possible number of shots at the current size and quality settings 2 Battery level Full battery power Medium battery power Virtually no battery power 3 Memory card indicator 4 Flash mode Auto flash Flash off 5 Focus Mode Macro mode Normal mode 6 White balance A Auto Daylight Cloudy Tungsten Fluorescent 7 Image quality Super fine...

Page 8: ... Record Mode Display icons Still Image Record Mode Display icons Still Image Record Mode 1 2 3 3 1 2 3 3 1 2 3 3 1 2 3 3 Display icons Still Image Record Mode Display icons Still Image Record Mode Display icons Still Image Record Mode Display icons Still Image Record Mode 1 2 3 1 Battery level 2 Movie mode 3 Memory card indicator 1 2 3 4 1 Frame number 2 Battery level 3 Forward arrow 4 Reverse arr...

Page 9: ...affect the battery performance Avoid using batteries in extremely cold environments as low temperatures can shorten the battery life and reduce camera performance This low temperature will also influence Alkaline battery performance therefore Ni MH rechargeable battery is highly recommended If you are using the new rechargeable batteries or rechargeable batteries that have not been used for an ext...

Page 10: ...mera is turned off 2 Insert an SD memory card The front side of the memory card printed arrow should face towards the rear side of the camera If the card cannot be inserted check the orientation 2 3 2 3 2 3 2 3 To remove a memory card To remove a memory card To remove a memory card To remove a memory card Make sure the camera is turned off Press lightly on the edge of the memory card and it will e...

Page 11: ...etting the Date and Time Setting the Date and Time Setting the Date and Time Setting the Date and Time The Date Time screen will be presented if when Camera is turned on for the first time Camera is turned on after leaving the camera without batteries for an extended period of time When the Date Time screen appears follow these steps to set the correct date and time 1 Select the setting item with ...

Page 12: ...he effects that these settings will have on your images Higher resolution and higher quality images offer the best photographic results but produce large files sizes Therefore few images will take up a lot of memory space High resolution and quality settings are recommended for printed output and situations requiring the finest detail Lower resolution quality images take up less memory space and m...

Page 13: ...to the appropriate photography mode 1 Open the lens cover 2 Set the focus switch to 3 Toggle the MODE button to and press the SET button 4 Compose your shot on the display screen 5 Place the subject of your photo at the center and press the shutter button 3 1 2 3 1 2 3 1 2 3 1 2 Digital Zoom Digital Zoom Digital Zoom Digital Zoom Using digital zoom images appear closer Digital processing lets you ...

Page 14: ...ENU button 4 Select Self Timer using the buttons and press the button 5 Use the buttons to select Yes and press the SET button Toggle the button to exit from the menu mode 6 Press the shutter button The self timer function is activated To cancel the self timer at any time press the shutter button to disrupt the sequence 3 1 4 3 1 4 3 1 4 3 1 4 Flash Flash Flash Flash The flash is designed to funct...

Page 15: ...or run a slide show Playback mode also provides a thumbnail image display allowing you to quickly search for the image you want 3 2 1 3 2 1 3 2 1 3 2 1 Viewing Images Viewing Images Viewing Images Viewing Images When you take a still image or movie it is immediately stored in internal memory or on an SD memory card Still images and movie in internal memory or on an SD memory card can be displayed ...

Page 16: ...n 2 Select the image that you want to view using the buttons and press the SET button 3 Activate the digital zoom feature using the button Enlarge the image by toggling the SET button To view the different portion of the enlarged image press the buttons 3 2 3 3 2 3 3 2 3 3 2 3 Displaying Thumbnail Images Displaying Thumbnail Images Displaying Thumbnail Images Displaying Thumbnail Images This funct...

Page 17: ...nd entertaining feature for reviewing recorded images and for presentations To view still images follow the steps below 1 Toggle the MODE button to and press the SET button 2 Press the MENU button and move to Slide Show using the buttons 3 Press the button 4 Set the playback interval using the buttons and press the SET button The slideshow starts displaying your images on the LCD monitor one by on...

Page 18: ...SET button 4 When the delete message appears select Yes using the buttons and then press the SET button If you wish to cancel the deletion select No It returns to the preview screen To delete one image or movie Quick Delete mode 1 Toggle the MODE button to and press the SET button 2 Select the image video clip you wish to delete using the buttons 3 Press the SET button 4 To delete this current ima...

Page 19: ...ct Yes using the buttons and press the SET button The next image video clip appears To delete all images or movies at once 1 Toggle the MODE button to and press the SET button 2 Press the MENU button 3 Select Delete using the buttons and press the button 4 Select All Images using the buttons and press the SET button 5 To confirm the deletion on the selected image select Yes using the buttons and p...

Page 20: ...ory to a Memory Card Copying the Contents of Internal Memory to a Memory Card Thisfeatureallowsyouto copy your imagesfromthecamera sinternalmemory toanSD memory card Of course you can only do this if you have an SD memory card installed and some images in internal memory To copy still images and movies from internal memory to SD memory card follow the steps below 1 Be sure the camera power is off ...

Page 21: ...using the buttons 3 Press the MENU button 4 Select Save As Logo using the buttons and press the button 5 To set the new logo select Yes using the buttons and press the SET button Toggle the button to exit from the menu mode This new logo will be activated on the next time you turn on the camera 3 2 9 3 2 9 3 2 9 3 2 9 Setting the DPOF Setting the DPOF Setting the DPOF Setting the DPOF DPOF is a st...

Page 22: ...elect the desired image quantity Set Image Allow you to select another desired still image you want to specify using the buttons Exit Allow you to exit from the menu mode Press the SET button to exit from menu mode To set the DPOF setting on all still images at once 1 Toggle the MODE button to and press the SET button 2 Press the MENU button 3 Select DPOF using the buttons and press the button 4 S...

Page 23: ...lips Viewing Video Clips Viewing Video Clips To view a recorded video clip follow these steps 1 Toggle the MODE button to and press the SET button 2 Move to the movie you want to see using the buttons 3 Press the shutter button Playback begins The elapsed playback indicator or the elapsed time is displayed on the LCD monitor Press the shutter button again to stop the playback To pause resume press...

Page 24: ...ENU MENU MENU button The menu appears To select an item 1 Press the buttons to select the desired item 2 Press the button to enter the field menu To select a setting value 1 Press the buttons to select the desired setting 2 Press the SET SET SET SET button to confirm the selection 3 Toggle the button to exit from the menu mode To implement a confirmation screen 1 Press the buttons to select Yes 2 ...

Page 25: ...n white paper Portraiture with back lighting Very bright scenes such as snow and highly reflective subjects Shots made up predominantly of sky Negative Compensation Negative Compensation Negative Compensation Negative Compensation Spot lighted subjects particularly against dark backgrounds Imaging of printed text white characters on black paper Scenes with low reflectivity such as shots of green o...

Page 26: ...oudy Tungsten Fluorescent Setting Setting Setting Setting Description Description Description Description Option Option Option Option Delete Delete Delete Delete Refer to section in this manual titled Deleting Images Formatting Media for further details This Image All Images Format Exit Card Copy Card Copy Card Copy Card Copy Refer to section in this manual titled Copying the Contents of Internal ...

Page 27: ...Auto Power Off Auto Power Off Auto Power Off Auto Power Off Power Off Power Off Power Off If there is no camera activity no buttons are pressed for a defined period of time 3 minutes while the camera is powered on the camera will switch to an idle mode and eventually turn itself off to conserve power If the camera is idle re activate the camera by pressing any button dial If the camera has powered...

Page 28: ... CD ROM that came with the DC E30 5 1 5 1 5 1 5 1 Installing the Digital Camera Software Installing the Digital Camera Software Installing the Digital Camera Software Installing the Digital Camera Software It s recommended that you set up the driver and software before connecting the digital camera to your PC Normally a software installation menu appears automatically after this installation CD is...

Page 29: ... photo project software for digital images Acquire photos effortlessly from digital cameras or scanners Edit and enhance images using easy to use editing tools and cool photographic filters and effects Assemble creative photo projects and share results via e mail and multiple print options 3 Ulead Photo Explorer Ulead Photo Explorer provides an efficient way to transfer browse modify and distribut...

Page 30: ...a PC 1 Turn on the computer 2 Turn on the camera 3 Select Disk Drive using the buttons and press the SET button 4 Connect the camera to the PC with the included USB cable Ensure that the connection is secure 5 A new disk appears in Windows Explorer labelled Removable Disk See note below 6 Stored photos and movie clips can be found in the directory Removable Disk DCIM 100CAMEA Copy view delete and ...

Page 31: ...onferencing your computer system must include Microphone Sound card Speakers or headphones Network or Internet connection Step 1 Install the PC Camera Driver Step 1 Install the PC Camera Driver Step 1 Install the PC Camera Driver Step 1 Install the PC Camera Driver The PC camera driver included on the CD ROM is exclusively for Windows The PC camera function is not supported for Mac platforms 1 Ins...

Page 32: ...onferencing 1 Go to Start Programs Accessories Communications NetMeeting Start Programs Accessories Communications NetMeeting Start Programs Accessories Communications NetMeeting Start Programs Accessories Communications NetMeeting to launch the NetMeeting program 2 Click the Start Video Start Video Start Video Start Video button to view live video 3 Click the Place Call Place Call Place Call Plac...

Page 33: ...witch on the power The close up image is The close up image is The close up image is The close up image is blurred blurred blurred blurred Select the correct focus range If the subject is within 40 to 60 cm select Macro mode The flash does not fire The flash does not fire The flash does not fire The flash does not fire The camera flash is turned off The light source is sufficient The flash is not ...

Page 34: ...ze Image size Image size Image size 2912 x 2184 pixels FW interpolation to 6 3 Mega pixels 2032 x 1520 pixels 1600 x 1200 pixels 1280 x 960 pixels 640 x 480 pixels Storage Type Storage Type Storage Type Storage Type 16MB internal memory 14MB available for image storage SD memory card optional up to 512MB capacity Interface Interface Interface Interface USB connector Power Source Power Source Power...

Page 35: ... O OR R R RM M M MA A A AT T T TI I I IO O O ON N N N If you encountered problems using DC E30 and the camera driver program please visit the following website for technical support answers to frequently asked questions and download services http support BenQ com For free driver program updates product information and news release please visit the following web address http www BenQ com ...

Reviews: