background image

48 Specifications 


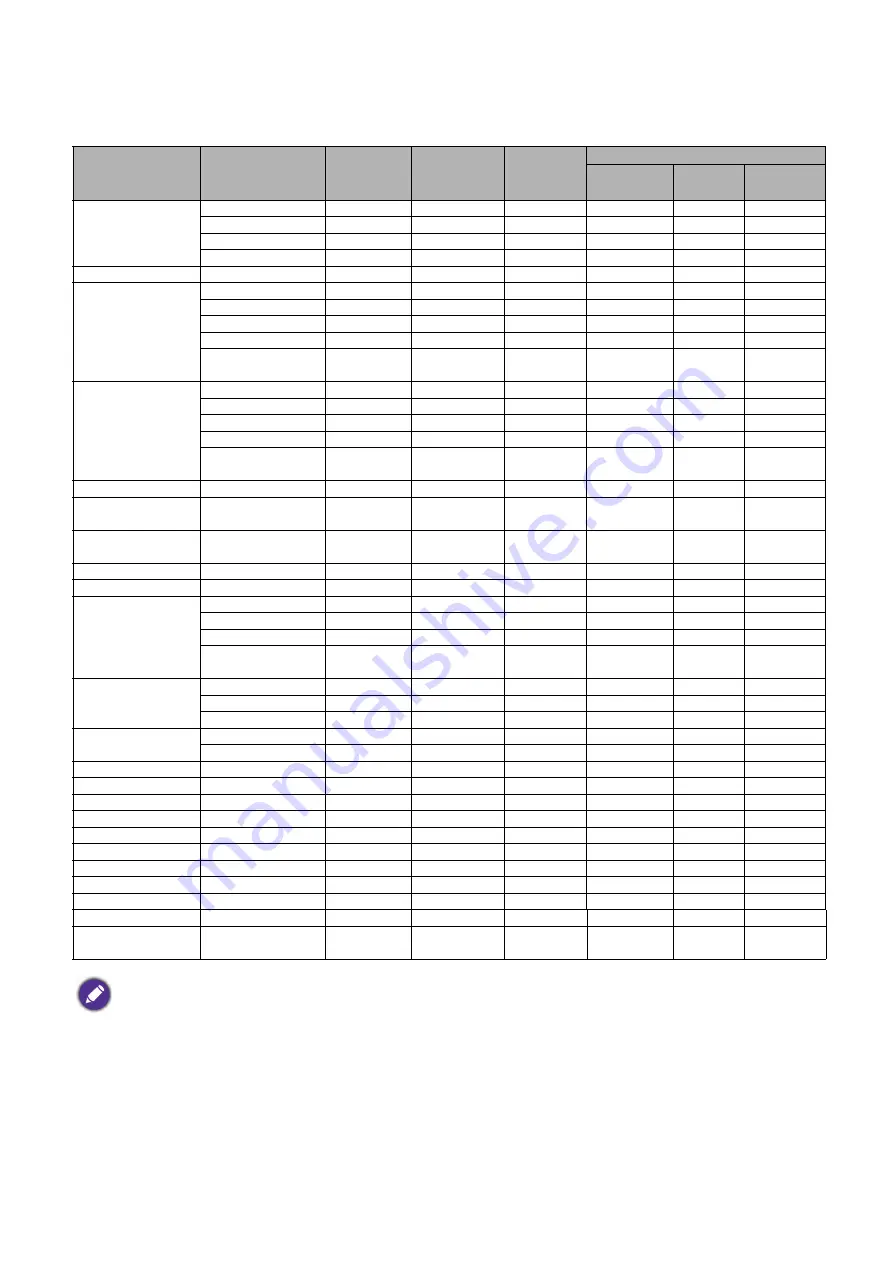
Supported timing for HDMI (HDCP) input

• PC timings

Resolution

Mode

Vertical 

Frequency 

(Hz)

Horizontal 

Frequency 

(kHz)

Pixel 

Frequency

(MHz)

Supported 3D format

Frame 

Sequential

Top 

Bottom

Side by 

Side

640 x 480

VGA_60

59.940 31.469 25.175  V

V

V

VGA_72

72.809 37.861 31.500 

VGA_75

75.000 37.500 31.500 

VGA_85

85.008 43.269 36.000 

720 x 400

720 x 400_70

70.087

31.469

28.3221

800 x 600

SVGA_60

60.317 37.879 40.000  V

V

V

SVGA_72

72.188 48.077 50.000 

SVGA_75

75.000 46.875 49.500 

SVGA_85

85.061 53.674 56.250 

SVGA_120 (Reduce 

Blanking)

119.854

77.425

83.000

V

1024 x 768

XGA_60

60.004 48.363 65.000  V

V

V

XGA_70

70.069 56.476 75.000 

XGA_75

75.029 60.023 78.750 

XGA_85

84.997 68.667 94.500 

XGA_120 (Reduce 

Blanking)

119.989

97.551

115.5

V

1152 x 864

1152 x 864_75

75

67.5

108

1024 x 576@60Hz

BenQ Notebook 

Timing

60.00

35.820

46.996

1024 x 600@65Hz

BenQ Notebook 

Timing

64.995

41.467

51.419

1280 x 720

1280 x 720_60

60

45.000

74.250

V

V

V

1280 x 768

1280 x 768_60

59.870

47.776

79.5

V

V

V

1280 x 800

WXGA_60

59.810

49.702

83.500

V

V

V

WXGA_75

74.934

62.795

106.500

WXGA_85

84.880

71.554

122.500

WXGA_120 

(Reduce Blanking)

119.909

101.563

146.25

V

1280 x 1024

SXGA_60

60.020 63.981 108.000 

V

V

SXGA_75

75.025

79.976

135.000

SXGA_85

85.024

91.146

157.500

1280 x 960

1280 x 960_60

60.000

60.000

108

V

V

1280 x 960_85

85.002

85.938

148.500

1360 x 768

1360 x 768_60

60.015

47.712

85.500

V

V

1440 x 900

WXGA+_60

59.887

55.935

106.500

V

V

1400 x 1050

SXGA+_60

59.978

65.317

121.750

V

V

1600 x 1200

UXGA

60.000

75.000 

162.000

V

V

1680 x 1050

1680 x 1050_60

59.954

65.290

146.250

V

V

640 x 480@67Hz

MAC13

66.667

35.000

30.240

832 x 624@75Hz

MAC16

74.546

49.722

57.280

1024 x 768@75Hz

MAC19

75.020

60.241

80.000

1152 x 870@75Hz

MAC21

75.06

68.68

100.00

1920 x 1080@60Hz

1920 x 1080_60

60

67.5

148.5

V

V

1920 x 1200

1920 x 1200_60 

(Reduce Blanking) 

59.950

74.038

154.0000

V

V

The timings showing above may not be supported due to EDID file and VGA graphic card limitations. It is possible 
that some timings cannot be chosen.

Summary of Contents for 241601

Page 1: ...MS550 MX550 MW550 MH550 TH550 Digital Projector User Manual V 1 01...

Page 2: ...ave other rights which vary from country to country For other information please visit www BenQ com Copyright Copyright 2018 by BenQ Corporation All rights reserved No part of this publication may be...

Page 3: ...d projected image size 13 Mounting the projector 16 Adjusting the projected image 17 Connection 19 Operation 21 Starting up the projector 21 Using the menus 22 Securing the projector 24 Switching inpu...

Page 4: ...t during operation Allow the projector to cool for approximately 45 minutes prior to removing the lamp assembly for replacement 6 In some countries the line voltage is NOT stable This projector is des...

Page 5: ...ector with a cloth or any other item Do not place inflammables near the projector If the ventilation holes are seriously obstructed overheating inside the projector may result in a fire 13 Always plac...

Page 6: ...Space that is poorly ventilated or confined Allow at least 50 cm clearance from walls and free flow of air around the projector Locations where temperatures may become excessively high such as the in...

Page 7: ...r your region and may differ from those illustrated The warranty card is only supplied in some specific regions Please consult your dealer for detailed information 1 Spare lamp kit 2 3D glasses 3 Dust...

Page 8: ...page 9 7 Lamp cover 8 Vent air inlet 9 Audio input jack Audio output jack 10 HDMI 1 input port 11 HDMI 2 input port 12 RGB PC signal input jack 13 RGB PC signal output jack 14 RS 232 control port 15...

Page 9: ...ACK Goes back to previous OSD menu exits and saves menu settings 5 Arrow keys When the On Screen Display OSD menu is activated these keys are used as directional arrows to select the desired menu item...

Page 10: ...on PC 1 Selects PC 1 input source for display 12 Source selection button HDMI Selects HDMI input source for display 13 PAGE PAGE Operate your display software program on a connected PC which responds...

Page 11: ...sensor s to function correctly The distance between the remote control and the sensor s should not exceed 8 meters 26 feet Make sure that there are no obstacles between the remote control and the IR s...

Page 12: ...ss this menu 1 Front Table Select this location with the projector placed on the table in front of the screen This is the most common way to position the projector for quick setup and portability 2 Re...

Page 13: ...22 90 2286 1372 1829 3584 3758 3932 137 100 2540 1524 2032 3983 4176 4369 152 110 2794 1676 2235 4381 4593 4806 168 120 3048 1829 2438 4779 5011 5243 183 130 3302 1981 2642 5178 5428 5679 198 140 3556...

Page 14: ...2 3850 4028 0 120 3048 1615 2585 4006 4200 4394 0 130 3302 1750 2800 4340 4550 4760 0 140 3556 1885 3015 4676 4900 5126 0 150 3810 2019 3231 5008 5250 5492 0 160 4064 2154 3446 5342 5600 5859 0 170 43...

Page 15: ...1 3994 110 120 3048 1494 2657 3958 4158 4357 120 130 3302 1619 2878 4288 4504 4720 130 140 3556 1743 3099 4618 4850 5083 139 150 3810 1868 3321 4948 5197 5446 149 160 4064 1992 3542 5278 5543 5809 159...

Page 16: ...projector should its attachment to the mounting bracket become loose Ask your dealer to install the projector for you Installing the projector on your own may cause it to fall and result in injury Ta...

Page 17: ...he screen and the projector are not perpendicular to each other the projected image becomes trapezoidal You can screw the adjuster feet to fine tune the horizontal angle To retract the feet screw the...

Page 18: ...trapezoid due to angled projection To correct this you will need to manually correct it following these steps 1 Do one of the following steps to display the keystone correction page Press on the proje...

Page 19: ...deo ports when connected to a projector Usually a key combo like FN function key with a monitor symbol turns the external display on off Press FN and the labeled function key simultaneously Refer to y...

Page 20: ...cinema applications Any stereo audio input if provided is mixed into a common mono audio output through the projector speaker s The built in speaker s will be muted when the AUDIO OUT jack is connecte...

Page 21: ...for input signals The current input signal being scanned appears If the projector does not detect a valid signal the message No Signal will continue displaying until an input signal is found You can...

Page 22: ...ons below 1 Go to Basic Menu Menu Type 2 Press OK and press to select Advanced Next time when you turn on the projector you may access the Advanced OSD menu by pressing MENU Below is the overview of t...

Page 23: ...ed OSD menu to the Basic OSD menu follow the instructions below 1 Go to Advanced Menu System Menu Settings and press OK 2 Select Menu Type and OK 3 Press to select Basic Next time when you turn on the...

Page 24: ...r the wrong password the password error message will appear and the Input Password message follows If you absolutely do not remember the password you can use the password recall procedure See Entering...

Page 25: ...put signal The projector can be connected to multiple devices at the same time However it can only display one full screen at a time When starting up the projector automatically searches for the avail...

Page 26: ...power off The AC power cord can be pulled out right after the projector is turned off To protect the lamp wait about 10 minutes before re starting the projector If you attempt to re start the projecto...

Page 27: ...set the image s aspect ratio depending on your input signal source Auto Scales an image proportionally to fit the projector s native resolution in its horizontal or vertical width Real Projects an im...

Page 28: ...for presentations with the mixture of text and graphics due to its high color brightness and better color gradation to see the details clearly 3D Is appropriate for playing 3D images and 3D video cli...

Page 29: ...available picture modes See Reference Mode on page 29 Reference Mode There are 2 user definable modes if the current available picture modes are not suitable for your need You can use one of the pict...

Page 30: ...ion provides six sets RGBCMY of colors to be adjusted When you select each color you can independently adjust its range and saturation according to your preference Primary Color Selects a color from a...

Page 31: ...rtionally to fit the projector s native resolution in its horizontal or vertical width Real Projects an image as its original resolution and resizes it to fit within the display area For input signals...

Page 32: ...de When 3D function is activated The brightness level of the projected image will decrease The following settings cannot be adjusted Picture Mode Reference Mode The Keystone can only be adjusted withi...

Page 33: ...tory preset values Projector Installation See Choosing a location on page 12 Remote Receiver Allows you to enable all the remote receivers or one specific remote receiver on the projector Auto Source...

Page 34: ...the above it may display auto shut down symptoms which is designed to protect your projector from over heating In cases like this you should switch to High Altitude mode to solve these symptoms Howeve...

Page 35: ...that you wish to use See Connection on page 19 for how to make the connection Background Settings Background Sets the background color for the projector Splash Screen Allows you to select which logo s...

Page 36: ...factory preset values Information Native Resolution Shows the native resolution of the projector Detected Resolution Shows the native resolution of the input signal Source Shows the current signal so...

Page 37: ...n the projector off using the proper shutdown procedure as described in Shutting down the projector on page 26 and unplug the power cord To remove dirt or dust wipe the case with a soft lint free clot...

Page 38: ...mpSave mode A is the longest lamp life spec among X Y Z A To obtain the lamp hour information 1 Go to Advanced Menu Settings Lamp Settings and press OK The Lamp Settings page appears 2 Press to select...

Page 39: ...evel while optimizing display quality LampSave Adjusts the lamp power automatically depending on the content brightness level while offering a longer lamp life The apparent brightness of the projected...

Page 40: ...he risk of injuries to fingers and or compromising image quality by touching the lens do not touch the empty lamp compartment when the lamp is removed This lamp contains mercury Consult your local haz...

Page 41: ...that secures the lamp cover 14 Connect the power and restart the projector Pulling it too quickly may cause the lamp to break and scatter broken glass in the projector Do not place the lamp in locatio...

Page 42: ...u Settings Lamp Settings and press OK The Lamp Settings page appears Highlight Reset Lamp Timer and press OK A warning message is displayed asking if you want to reset the lamp timer Highlight Reset a...

Page 43: ...rt fail Lamp events Lamp error in normal operation Lamp is not lit up Lamp life exhausted Thermal events Fan 1 error the actual fan speed is outside the desired speed Fan 2 error the actual fan speed...

Page 44: ...l has not been correctly selected Select the correct input signal with the SOURCE key The lens cover is still closed Open the lens cover Blurred image Cause Remedy The projection lens is not correctly...

Page 45: ...receiver x 2 Input terminals Computer input RGB input D Sub 15 pin female x 1 Video signal input S VIDEO Mini DIN 4 pin x 1 VIDEO RCA jack x 1 SD HDTV signal input Analog Component through RGB input D...

Page 46: ...46 Specifications Dimensions 296 mm W x 120 mm H x 221 mm D 296 221 120 Unit mm...

Page 47: ...Notebook_timing 64 995 41 467 51 419 1280 x 720 1280 x 720_60 60 45 000 74 250 V V V 1280 x 768 1280 x 768_60 59 87 47 776 79 5 V V V 1280 x 800 WXGA_60 59 810 49 702 83 500 V V V WXGA_75 74 934 62 7...

Page 48: ...280 x 720_60 60 45 000 74 250 V V V 1280 x 768 1280 x 768_60 59 870 47 776 79 5 V V V 1280 x 800 WXGA_60 59 810 49 702 83 500 V V V WXGA_75 74 934 62 795 106 500 WXGA_85 84 880 71 554 122 500 WXGA_120...

Page 49: ...5 V V Timing Resolution Vertical Frequency Hz Horizontal Frequency kHz Pixel Frequency MHz Supported 3D format Frame Sequential 480i 720 x 480 59 94 15 73 13 5 V 480p 720 x 480 59 94 31 47 27 V 576i...

Reviews: