background image


Ver1.5    Page 17   


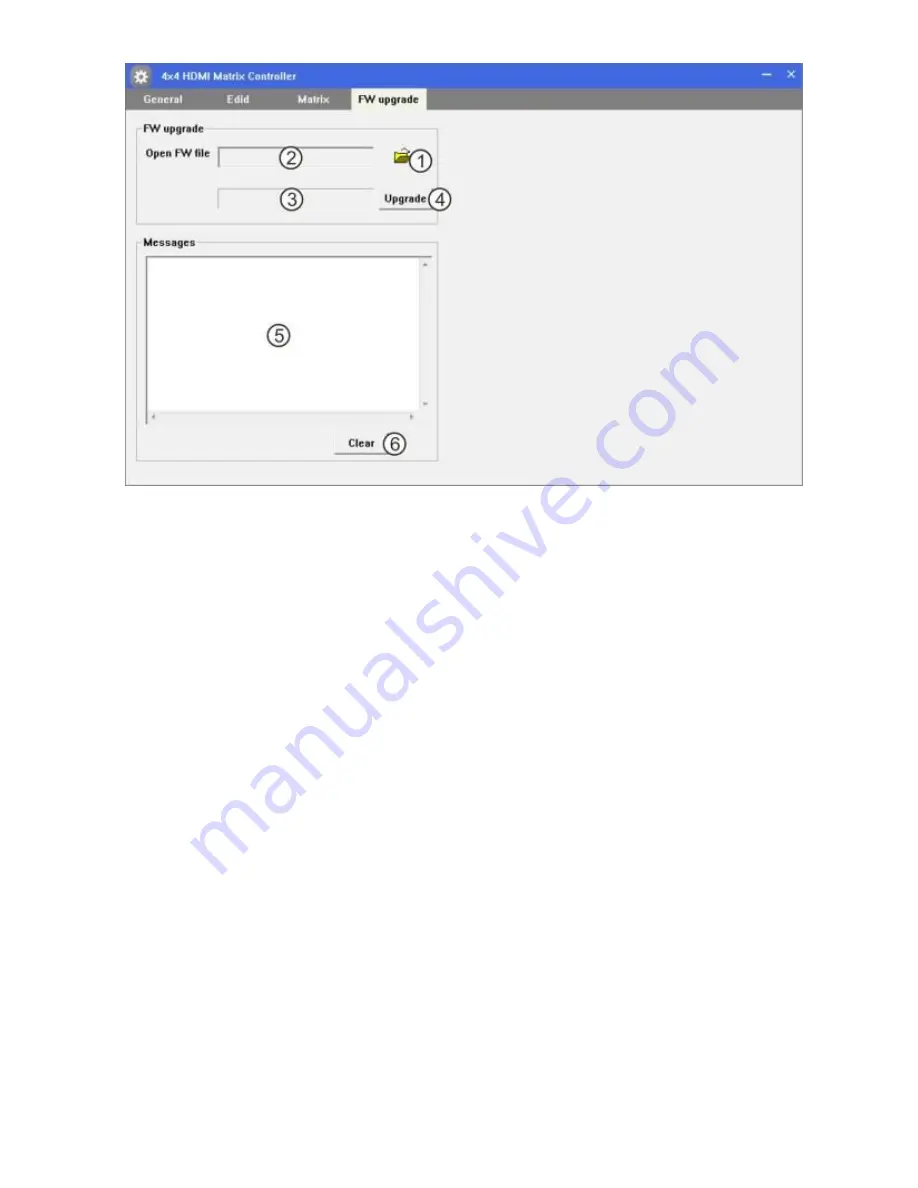
1.


Click to open FW file(file extension is “.fw”) 

2.


Display the FW file path 

3.


Displaying the progress of the software upgrade 

4.


Click to upgrade the Matrix software 

5.


Display the message of the software upgrade 

6.


Clear the message of the software upgrade 

Note: The matrix after software upgrade required again to power 
supply. 

Summary of Contents for AVH-SW0404IR

Page 1: ...HDMI VGA AV mixed inputs Video Processing Matrix switcher 4x4 AVH SW0404IR Operation Manual ...

Page 2: ...rsity through the front panel button remote control RS 232 and TCP IP control As a video wall processor the matrix switcher is able to zoom in one input image four times to the outputs And as a Multi viewer processor the matrix switcher can mix inputs with any combos to one image and then transfer to all the outputs 2 Features Compliant HDMI1 3 HDCP1 3 and DVI1 0 Input video supports HDMI VGA and ...

Page 3: ... 5pcs Video Processing Mixed Matrix IR Remote 1pcs Mounting ears 2pcs RS232 cable 1pcs 4 Specifications Input Ports 4 HDMI 4xVGA 4xRCA 1 RS 232 1xRJ 45 Control 5 IR INPUT 4xAudio Output Ports 4 HDMI 4xIR OUTPUT Input Resolutions Support Up to 1920x1080P 60Hz Output Resolutions Support Up to 1920x1080P 60Hz Control IR RS 232 TCP TP Buttons ESD Protection Human body Model 8kV Air gap discharge 4kV C...

Page 4: ...ntrol signal of this device only POWER Press this button to power the device on off The LED will illuminate green when the power is on red when it is in Standby mode LOCK Press this button to lock all the buttons on the panel press again to unlock Part 3 OUTPUT INPUT Press the OUTPUT and INPUT button to select the output corresponding input For example Press OUPUT ALL INPUT 1 The OUTPUT A B C D wi...

Page 5: ... and press buttons A B C D select different mode c Select video wall mode press buttons CV M1 ENTER and press buttons A B C D select different input Part 6 EDID Smart EDID management the LCM will display the EDID operation Press the MENU button will enter the EDID management window press UP or DOWN button to select the needed EDID setting press ENTER button to select the download input source It c...

Page 6: ...ix to provide a single EDID for each source to read What options do I have to manage the EDID in the HDMI Matrix First it is important to note that each source device can only output one video audio signal type This includes resolutions and timings When multiple devices displays are used such as with the HDMI Matrix it is important to use devices displays that have similar or compatible resolution...

Page 7: ... control introduction Part2 VGA CV AND AUDIO INPUT Connect to the VGA or CV input source devices such as a DVD player a Set top Box or PC with VGA cable or RCA coaxial cable Each VGA or CV input is accompanied with a 3 5mm stereo audio input Part 3 PC CONTROL TCP IP This port is the link for TCP IP controls connect to an active Ethernet link with an RJ45 terminated cable RS232 Connect to a PC or c...

Page 8: ...will be scaler adjust Note The AUTO ADJUST button only work on VGA input 4 Input selection and Sources input selection a Numbers correspond with the inputs on the matrix b Press the button to select source input For example Press input 1 VGA The input 1 will be select the VGA video input 5 Mode selection Select switch mode matrix multi viewer and video wall and in multi viewer mode press buttons I...

Page 9: ...TX1 Input2 TX2 etc with plugs secured in correct ports and secondly that the IR TX emitter sensors are firmly attached directly to the front of inputs and covering infrared sensor windows of the source device Some later adjustment may be needed to the location of the sensor to achieve the best performance results sometimes moving the sensor to different areas on the source can improve IR performan...

Page 10: ...Ver1 5 Page 9 ...

Page 11: ...CP IP to complete installation Preparation Connect PC and Matrix by RS232 cable headers of both sides of cable should be FEMALE or TCP IP local area network Power up Matrix Double click MatirxController exe icon to run it How to control Matrix General page 1 Select RS232 COM or TCP mode 2 Select RS232 COM port 3 Click to connect or disconnect PC and Matrix 4 Select Matrix IP ...

Page 12: ...e Multi viewer mode for details please refer to the Multi viewer mode 11 Click to button system into the video wall mode for details please refer to the video wall mode 12 Click to button select one input image zoom in four times to the outputs 13 Enable or disable Beep Configure TCP After action of 7 edit form will pop up as below 1 Select auto or static IP 2 Rewrite the Matrix IP 3 Rewrite the M...

Page 13: ... modes All the display modes as below Detailed operations While the PC software is running normally click on the button via the mode of the drop down box choose 1 2 3 4 mode and via the audio of the drop down box choose 1 2 3 4 input audio Picture outside Picture POP Displaying Mode 1 ...

Page 14: ...Ver1 5 Page 13 Mode 2 Mode 3 Picture in Picture PIP Displaying Mode 4 ...

Page 15: ...this area users can set the bezel size of the adjacent images in zoom in model to make the whole image looks coherently As shown in Figure 1 and Figure 2 will show you the difference between the original image and the image adjusted Figure 1 The Original Image Figure 2 The Image Adjusted Diagram of Video Wall Displaying ...

Page 16: ... is able to zoom in the input image and spilt to 4 parts and then full screen display on the output displayers one to one EDID control page 1 Select the needed EDID to input port and click set button the EDID will write to the selected HDMI input ports ...

Page 17: ...ect previous or next Input port for respective Output port 4 Click to select the seamless switching output mode 5 Click to select the seamless switching time 6 Click to automatically adjust the output picture 7 Click to scaler the output picture 8 Click to select the input signal source Note The signal source for the VGA input 6 can use FW upgrade page ...

Page 18: ...ay the FW file path 3 Displaying the progress of the software upgrade 4 Click to upgrade the Matrix software 5 Display the message of the software upgrade 6 Clear the message of the software upgrade Note The matrix after software upgrade required again to power supply ...

Page 19: ... HD displays using the output ports A D on the matrix 3 OPTIONAL Connect the IR receiving extender to the IR EXT port on the matrix 4 OPTIONAL Connect an Ethernet cable from the TCP IP port on the matrix to a local Area Network 5 OPTIONAL Connect an RS 232 cable from the RS232 port on the matrix 6 OPTIONAL Connect the IR receiving extender to the IR INPUT port and the IR emission extender to the I...

Reviews: