background image

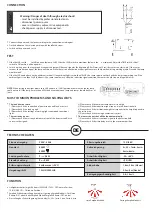
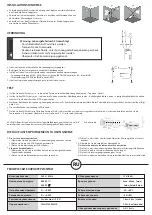
Connect the power and the load according to the connection-wire diagram.
Fix the bottom on the selected position with the inflated screw. 
Switch on the power and test it.

CONNECTION

Slide the LUX switch          to SUN position (below is SUN). Slide the SENS switch to maximum (below is the          maximum). Adjust the TIME switch, slide 5” 

switch to ON position. (slide upwards)
Switch on the power; the sensor and its connected lamp will have no signal at the beginning. After Warm-up 30sec, the sensor can start work .If the sensor 

receives the induction signal, the lamp will turn on. While there is no another induction signal any more, the load should stop working within 5sec and the lamp 

would turn off. 
Slide the LUX knob above on the minimum (moon). If the ambient light is more than 10LUX, the sensor would not work and the lamp stop working too. If the 

ambient light is less than 3LUX (darkness), the sensor would work. Under no induction signal condition, the sensor should stop working within 5sec.

TEST

DE

TECHNISCHE DATEN

Warning! Danger of death through electric shock!

- must be installed by professional electrician

- disconnect power source

- cover or shied any adjacent live components

- check power supply is disconnected

The load does not work:

1) Please check if the connection of power source and load is correct.

2) Please check if the load is good.

3) Please check if the settings of working light correspond to ambient 

light.

The sensitivity is poor:

1) Please check if there is any hindrance in front of the detector to affect it 

to receive the signals.

MOST COMMON PROBLEMS AND SOLVING WAYS

2) Please check if the ambient temperature is too high.

3) Please check if the induction signal source is in the detection field.

4) Please check if the installation height corresponds to the height required in 

the instruction.

5) Please check if the moving orientation is correct.

The sensor can not shut off the load automatically:

1) Please check if there is continual signal in the detection field.

2) Please check if the time delay is set to the maximum position.

Stromversorgung

Nennlast

Leistungsaufnahme

Standby-Leistung

Erfassungsreichweite

Umgebungslicht

230V~ 50Hz 

800W               

400W

P

on

: <0.5W

P

sb

: <0.5W

3m/6m max (<24°C)

10LUX/2000LUX

Erfassungsbereich

Zeitverzögerung

Arbeitsfeuchtigkeit

Arbeitsfeuchtigkeit

Einbauhöhe

Bewegungsgeschwindigkeit

120º/360º

5s, 30s, 1min, 3min, 

5min, 8min

-20~+40°C

<93%RH

1.8m~2.5m (Mauer)

2.2m~4m (Decke)

0.6~1.5m/s

FUNKTION

Helligkeitsschalter (night/24 hours): 2000LUX (TAG) – OFF (untere Position) 

10LUX (NACHT) – ON (obere Position).
Empfindlichkeitseinstellung (sens adjust): geringe Empfindlichkeit – für kleine 

Räume (ON - oben), hohe Empfindlichkeit für große Räume  (OFF- unten). 
Einstellung der Zeitverzögerung (time-delay): 5s, 30s, 1min, 3 min, 5 min, 8 min. 

Gute Empfindlichkeit  

Geringe Empfindlichkeit

NOTE: 

When testing in daylight, please turn LUX knob to       (SUN) position, otherwise the sensor lamp 

could not work! If the lamp is more than 60W, the distance between lamp and sensor should be 60cm at 

least.

Summary of Contents for B51-SES24WH

Page 1: ...mieszczeń ON góra wysoka czułość dla dużych pomieszczeń OFF dół Przełączniki czasu załączenia obciążenia time delay 5s 30s 1min 3 min 5 min 8 min Należy unikać montażu w pobliżu źródeł ciepła takich jak wentylacji klimatyzacji źródeł światła poziome natężenia rzędu ok 3LUX Należy unikać montażu w pobliżu firanek wysokich roślin Należy unikać montażu w pobliżu powierzchni odbijających światło np lu...

Page 2: ...d night when turn it to MOON above is moon it will only work in the ambient light less than 10LUX As for adjustment please refer to testing way SENS adjustable It can be adjusted according to using location The detection distance of low sensitivity could be only 3m and high sensitivity could be 6m which fits for large room Time Delay is added continually When it receives the second induction signa...

Page 3: ...espond to ambient light The sensitivity is poor 1 Please check if there is any hindrance in front of the detector to affect it to receive the signals MOST COMMON PROBLEMS AND SOLVING WAYS 2 Please check if the ambient temperature is too high 3 Please check if the induction signal source is in the detection field 4 Please check if the installation height corresponds to the height required in the in...

Page 4: ...sition sonst kann der Sensor nicht ordnungsgemäß funktionieren Die Last ist nicht eingeschaltet 1 Überprüfen Sie den Anschluss der Stromversorgungsleiter des Sensors 2 Prüfen Sie ob die Last LOAD gut abgestimmt ist 3 Prüfen Sie die Einstellung des LUX Schalters Schwache Empfindlichkeit 1 Überprüfen Sie ob sich in der Nähe des Sensors keine signalstörenden Gegenstände befinden 2 Prüfen Sie ob die B...

Page 5: ...лектросети 3 Соответствует ли требуемое освещение окружающему Низкая чувствительность 1 Проверьте нет ли в поле улавливаемости дополнительных помех мешающих правильной работе датчика 2 Проверьте чтобы температура внешней среды не была завысокой 3 Проверьте попадает ли сигнал от движимого объекта в диапазон улавливания НЕКОТОРЫЕ ВОЗМОЖНЫЕ ПРОБЛЕМЫ И ИХ РЕШЕНИЯ 4 Проверьте чтобы высота установки дат...

Page 6: ...pojte zdroj napájení Ujistěte se že zařízení nemůže být zapnute Zkontrolujte připojení napájecího Poznámka Při testování zařízení za denního světla nastavte polohu spínače LUX v dolní poloze jinak provoz snímače může být nesprávny FUNKCE Přepněte intenzitu světla noc 24 hodin 2000LUX DEN OFF dole pozice 10LUX NOC on horní poloha Přepínač citlivosti sense úpravě nízkou citlivost pro malé prostory n...

Page 7: ...ionālam elektriķim atvienojiet strāvas avotu pārklājiet vai noņemiet visas blakus esošās dzīvās sastāvdaļas pārbaudiet vai strāvas padeve ir atvienota PAREDZĒTIE IZMANTOŠANAS MĒRĖI Apgaismojuma slēdzis nakts 24 stundas 2000LUX DIENA OFF apakšējā 10LUX NAKTS ON augšējā pozīcija Jūtīguma slēdzis sens adjust zems jūtīgums mazām telpām ON uz augšu augsts jūtīgums lielām telpām OFF apakša Slodzes piesl...

Page 8: ...ldevējam nav traucējumus izraisoši objekti Maitinimo įtampa Šviesos šaltinio galia Energijos sąnaudos Budėjimo režimas Aptikimo atstumas Apkārtējā gaisma 230V 50Hz 800W 400W Pon 0 5W Psb 0 5W 3m 6m max 24 C 10LUX 2000LUX Aptikimo diapazonas Įsijungimo laikas Darbinė temperatūra Darbinė drėgmė Montavimo aukštis Judėjimo greičio aptikimas 120º 360º 5s 30s 1min 3min 5min 8min 20 40 C 93 RH 1 8m 2 5m ...

Page 9: ...nimą Pritvirtinkite jutiklio korpusą kaip parodyta žemiau Prijunkite jutiklį pagal toliau nurodytas laidų žymes 230V 50Hz maitinimo šaltinis fazė L ruda BROWN neutrali N mėlyna BLUE apkrova ĮKROVIMAS mėlyna mėlyna ir raudona raudona Įjunkite maitinimą patikrinkite jutiklį SUSIJUNGIMAS Nustatykite LUX jungiklį į apatinę padėtį kaip parodyta aukščiau esančiame paveikslėlyje žemyn dieną aukštyn naktį...

Reviews: