background image

Remote Display Quick Start Guide v2.5 


Page 5 

8040-0028-0M Rev A 04/21 

Hardwire Network Example: 


6. 

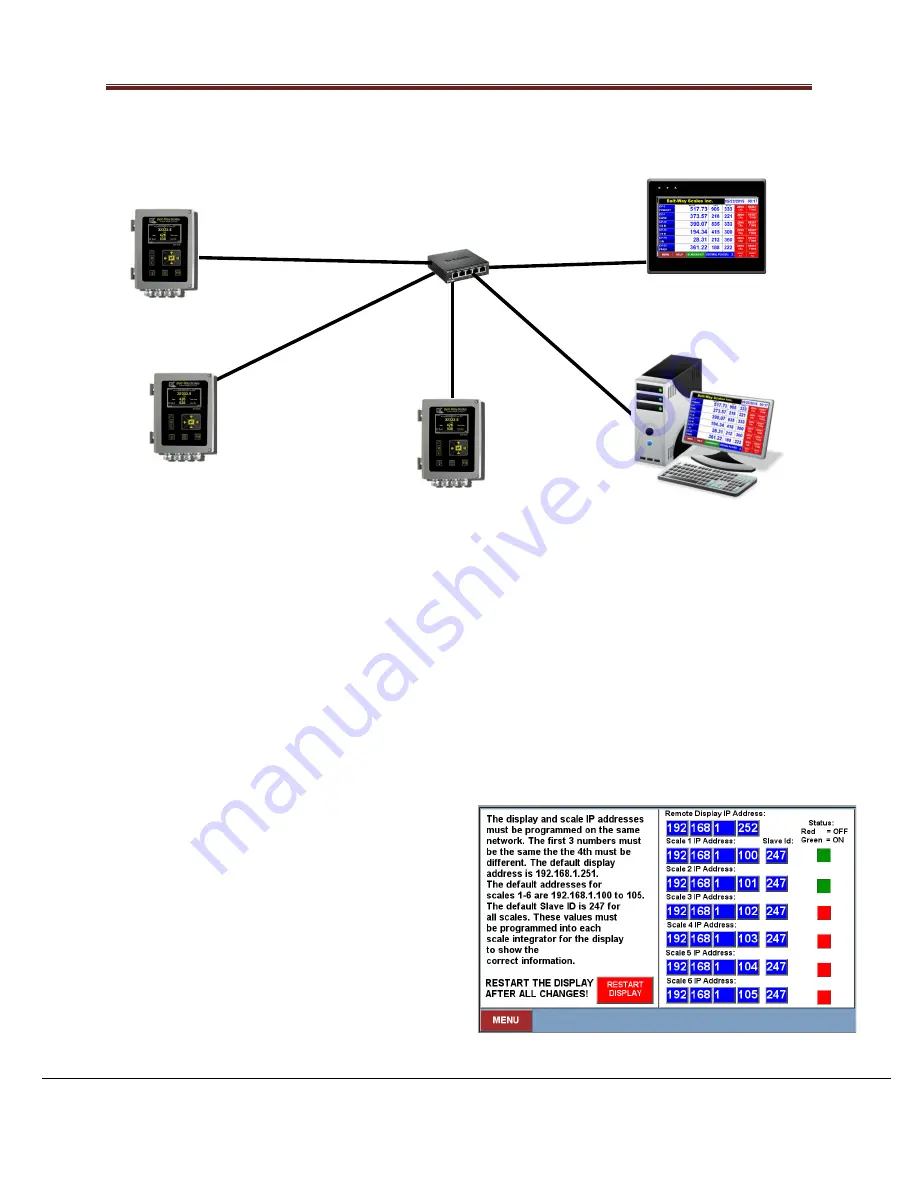
Display Network Screen 

The Network screen shows scale IP addresses currently programmed into the display. All 
devices must be on the same subnet (e.g. 192.168.1.XXX) but the 4th number must be 
unique. The default remote display IP address is 

192.168.1.251

. Scale 1 defaults to 

192.168.1.100

, Scale 2 defaults to 

192.168.1.101

, etc. The Scale IP address 

MUST MATCH

 the 

actual IP address programmed into the scale control box.  
The default 

Slave ID value is 247

. It must 

match the Slave ID programmed into the 
corresponding control box. Each IP value may 
be modified by pressing the numeric input 
field. Click the 

RESTART DISPLAY

 button to 

reboot the display and save any IP Address 
and Slave ID changes. The new settings will 
take effect once the display restarts.   


       Scale 2 

192.168.1.101 


Scale 1 

192.168.1.100 


Remote Display 

192.168.1.251 


Scale 3 

192.168.1.102 


Ethernet Switch 


Network Device 

Running VNC VIEWER


Cat5e cable segments MUST be less than 300 ft 


Summary of Contents for ASM0294

Page 1: ...Belt Way Scales Inc 1 Beltway Rd Rock Falls IL 61071 Phone 815 625 5573 sales beltwayscales com www beltwayscales com 2021 REMOTE DISPLAY QUICK START GUIDE V2 5...

Page 2: ...CIFICATIONS 3 4 INSTALLATION PROCEDURE 3 5 NETWORK SETUP 4 6 DISPLAY NETWORK SCREEN 5 7 INTEGRATOR IP ADDRESS SETUP 5 8 MAIN SCREEN ZERO CALIBRATION 6 7 9 MENU 8 10 CAL DATA 8 11 TOTALS 8 12 SETUP 9 1...

Page 3: ...display also displays historical production information and records accumulated weight and flow rate data files to the included USB flash drive NOTE The remote display is designed to communicate with...

Page 4: ...5 x 6 5 x 4 7 inch Enclosure Dimensions 10 5 x 8 5 x 6 Environmental Temperature Rating 32 122 F Protection IP65 Nema 4 Suitable for Indoor Use only 4 Installation Procedure STEP 1 Mount the display e...

Page 5: ...g the power cord into a grounded outlet The display will turn on 5 Network Setup The scale network may be wireless or hardwired The remote display scale integrators wireless transmitters and other dev...

Page 6: ...c The Scale IP address MUST MATCH the actual IP address programmed into the scale control box The default Slave ID value is 247 It must match the Slave ID programmed into the corresponding control box...

Page 7: ...to the remote display Use the MENU button to navigate to other display screens Use the blue buttons to label each scale or product The keyboard appears when the button is pressed Use RESET TONS button...

Page 8: ...o calibrate multiple scales Use the SCREENSHOT button to save a copy of the screen to the USB flash drive The file is saved as a bitmap in the Hardcopy folder The filename is YYMMDD_0000 bmp ZERO ALL...

Page 9: ...ator turns green and displays RUNNING They automatically return to normal when each scales ZERO CALIBRATION process completes THE ZERO CALIBRATION SHOULD BE PERFORMED A MINIMUM OF ONCE PER DAY OR AS N...

Page 10: ...n is performed All other calibration values are read only 11 Totals The Totals Screen shows accumulated weight totals for all scales The Job Total may be manually reset at any time The Daily Weekly Mo...

Page 11: ...up time Press the SAVE button to record changes 13 Time and Date Use the blue buttons to manually adjust the Time or Date 14 Connection Status The Connection Status Screen continually monitors which s...

Page 12: ...ck on the screen to show the exact values of each scale at any point The SCREENSHOT button creates a picture copy of the graph on the USB flash drive Screenshots are bitmap files that can be opened in...

Page 13: ...separated values and may be viewed in Excel or other spreadsheet software The files are saved by date and named in the following format YYYYMMDD_weight csv YYYYMMDD_tph csv YYYYMMDD_speed csv TPH Exam...

Page 14: ...tore Each device must be connected to the same hardwire or wireless network and have a similar IP address e g 192 168 1 XXX as the remote display Various VNC Viewers look slightly different but work t...

Page 15: ...es to the display can be downloaded from the USB drive The update files are emailed from Belt way as Zip files Step 1 Remove the USB drive from the display and plug it into the computer Download the Z...

Page 16: ...ollow the steps to save the Zip file as a new folder on the USB drive Step 4 Right click on the USB drive and choose Eject Remove the USB drive from the computer Step 4 Insert the USB drive into the d...

Page 17: ...se the keyboard to enter the default password of 1 Step 6 The Pick a Directory window appears Double click the usbdisk folder Double click the disk_a_1 folder Single click to highlight the update fold...

Reviews: