background image

10

Preparation

Vapore steam tray

The Vapore steam tray is used to gently cook foods while preserving their vitamins. Steaming is 

one of the healthiest ways of cooking. 

Benefits of steaming

1.  Vitamins and nutrients are preserved

2.  Saves time as multiple dishes can be prepared at the same time

3.  Healthy food, low in salt and fat

4.  Food remains moist

5.  No transfer of flavours

Using the Vapore 

1.  Fill the jar with at least 700 ml of water or other steaming fluid, such as stock. 

2.  Grease the inset bowls so that the food does not stick.

3.   Place the ingredients on steam trays. Make sure that food that takes longer to cook is 

placed in the deep steam tray. Leave some of the holes free to allow the steam to rise. 

4.  Place the Vapore straight on the lid without the measuring cup.  

5.   Check that the steam trays are fitted to one another and the lid is properly fitted so the 

steam cannot escape.


1.   When handling the Vapore steam tray, remember that there is hot water vapour coming out 

of it and fluid in the condensation catcher. Warning - burning risk!

2.  Only hold the inset bowls by the handles.

3.  Remove the condensation catcher carefully.

4.  The condensation catcher is made of plastic and heat resistant to approx. 90 °C.

5.  The Vapore steam tray is not suitable for microwaves, ovens or other heat sources. 

Inserting and removing the memory card   

Insert the supplied SD card into the card slot in the „Yumi“ control module. Make sure the 

contacts on the SD card are pointing upwards. Carefully push the SD card in until you hear it 

click. In order to remove the SD card, push the card in until it is ejected and you can pull the 

card out. 

Switching on and off 

Place the „Yumi“ control module in the recess on the kitchen machine. Press the  

on/ off button (7) and the kitchen machine is ready for use. 

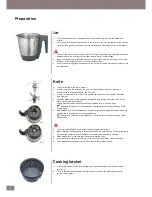
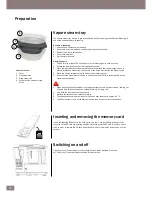
Vapore overview

1. Cover

2.  Flat steam tray 

3.  Deep steam tray

4.   Condensation catcher to trap 

fluids

1

2

3

4

Summary of Contents for SUPERCOOK

Page 1: ...www supercook me www supercook me www supercook me www supercook me Kitchen Master...

Page 2: ...m tray 10 Benefits of steaming 10 Using the Vapore 10 Inserting and removing the memory card 10 Switching on and off 10 Switching the control module on for the first time 11 Menu structure 11 Settings...

Page 3: ...e generates heat and escaping steam during use Proper precautions must be taken to prevent the risk of burns fires or other damage to persons or property Do not touch any moving parts Keep hands and u...

Page 4: ...ponents and accessories which come into contact with food 4 Use a soft slight moistened cloth to clean the jar recess on the kitchen machine 5 The contacts under the jar must be kept clean and dry 6 A...

Page 5: ...from the jar Allow the kitchen machine to cool down for around 20 minutes Kitchen machine not working with the temperature set and speed set over 5 The temperature can only be set for speeds 1 to 4 C...

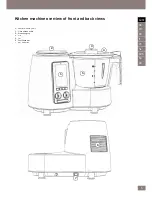
Page 6: ...AUST DE NL RUS ES AR HE IT PT FR Kitchen machine overview of front and back views 1 Control module Yumi 2 Libra kitchen scale 3 Measuring cup 4 Lid 5 Jar 6 Ventilation slot 7 On off button 2 1 3 4 5 7...

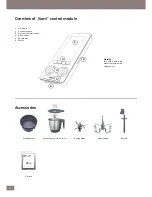
Page 7: ...ontrol buttons 3 Right and left rotary knobs t rotary knobs 4 MENU button 5 SD card slot 6 Socket Spatula Warning Take care to ensure the socket contacts remain clean and dry Measuring cup Lid Knife J...

Page 8: ...60 minutes When you start the function the clock counts backwards with the selected time shown on the display in minutes and seconds with a clock symbol The cooking or processing time can be adjusted...

Page 9: ...in a vertical position Push the lever down anticlockwise to release the knife see Figure 1 3 In order to insert the knife move it into position and push the lever upwards clockwise see Figure 2 4 Cho...

Page 10: ...he top of the jar 3 Turn the lid clockwise until the notch on the bottom of the front part of the lid fits into the relevant slot in the kitchen machine 4 The kitchen machine can only be switched on i...

Page 11: ...is properly fitted so the steam cannot escape 1 When handling the Vapore steam tray remember that there is hot water vapour coming out of it and fluid in the condensation catcher Warning burning risk...

Page 12: ...ry knob to adjust the settings 2 Confirm your setting by pressing the button 1 Use the buttons to navigate buttons to navigate through the menu 2 The dot indicates the current position 3 Confirm your...

Page 13: ...ple 1 minute in Standby mode the display switches off if there is no Screen saver activated see Screen saver How to change the Standby timer 1 In the Setup menu you can navigate with the buttons and s...

Page 14: ...e serial number for all service requests and to register the product at www supercook me Displaying the firmware information 1 In the Setup menu you can navigate with the buttons and select FW buttons...

Page 15: ...word to Login How to FREE download existing recipes from the library or create your own recipe and save it to SD Card Login to the website as per following link http www supercook me en supercook logi...

Page 16: ...rt time Turbo 15 Use the button to go back one step providing the cooking process is not yet active 3 A circle indicates the current category 4 Use the buttons to navigate and select the recipe you wa...

Page 17: ...e processing time manually by overriding the safety prompt 20 of preset time remaining then the message This step is about to end does not appear However other safety mechanisms as described above do...

Page 18: ...and accessories which come into contact with food Make sure the kitchen machine is fully cooled before you start cleaning it 2 Remove the mains plug from the socket before cleaning 3 The contacts on...

Page 19: ...Power consumption Cooking Mixing 1000 Watts 500 Watts Capacity 2 litres Minimum temperature 40 C Maximum temperature 130 C Speed levels 10 turbo Motor speed 20 000 rpm Beeps Yes Mains voltage Frequen...

Page 20: ...www supercook me Cat No BTMKM800X Nov 2014 Kitchen Master...

Reviews: