background image

UsInG tHe HoB

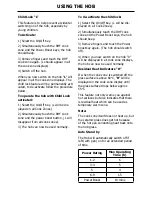
timer auto switch off

The timer can be set to automatically turn 

off a cooking zone.
All four cook zones can be simultaneously 

timed to turn off automatically.
cook zones can be set for a maximum 

time of 99 minutes.

Warning!

Never leave the hob unattended when in 

use, even when you have set the timer to 

turn off the cook zone.

to operate.

1) Select the cook zone to be timed, 

ensure power level is already set before 

selecting timer.

2) Select the timer, the flashing indicator 

on the timer display means the timer is 

ready to be set for that particular zone.

3) Set the right hand digit up to 9 minutes 

(Single Minutes Units) and wait a couple 

of seconds.

4) The display will now indicate for you to 

set the left hand digit, up to 90 minutes 

(10 Minute Units), and wait a couple of 

seconds. Skip this step if you want set 

the timer for less than 10 mins, leave the 

timer for a few seconds at it will automati-

cally set and start counting down.

5) The timer indicator in the timer display 

stops flashing and remain lit, the timer is 

now set and begins counting down.

When the time is up

1) The corresponding indicator in the 

timer display will flash, the timer will 

beep, and the cook zone will automatically 

turn off, (The cook zone will display H if 

the surface is hot).
2) Touch any control to stop the beeping.

additional timer information

To modify or cancel a timer setting follow 

steps 1) to 5) above.

To set the timer for additional zones fol-

low steps 1) to 5) above.

If multiple zones have been set for timed 

operation , the timer display will always 

display the time for the cook zone with 

the shortest time remaining.
To check the timer setting for a different 

cook zone, simply select the required cook 

zone, the remaining time will briefly ap

-

pear in the timer display.

Summary of Contents for IH60XL

Page 1: ...Belling IH60XL Part No 082744205 Date 19 03 2013 Users Guide Installation Handbook ...

Page 2: ... your call has been accepted and is being held in a queue Calls are answered in strict rotation as our Customer care representatives become available Alternatively general information spares and service information is available from our website The address is located on the back page of this book Warranty Your new appliance comes with our 12 month guarantee protecting you against electrical and me...

Page 3: ...hey have been given supervision or instruction concerning the use of the appliance in a safe way and understand the hazards involved Children shall not play with the appliance Cleaning and user maintenance shall not be made by children without supervision WARNING Unattended cooking on a hob with fat or oil can be dangerous and may result in fire NEVER try to extinguish a fire with water but switch...

Page 4: ... the vicinity of this appliance WARNING Do not modify this appliance WARNING Do not operate the appliance without the glass panel correctly fitted WARNING There is a risk of electric shock so always make sure you have turned off and unplugged your appliance before starting Always allow the product to cool down before you change a bulb WARNING Do not modify the outer panels of this appliance in any...

Page 5: ...nsure you switch off the appropriate cook zone individually or by the central on off key if touch control when you have finished cooking do not rely upon the automatic pan detection system as your means of switching off the appliance This induction hob complies with the applicable EMC and EMF standards Therefore it should not interfere with other electronic units Persons fitted with a pacemaker or...

Page 6: ...e the kitchen even if you think it will only be for a moment while you answer the door or phone If you use a griddle plate ensure it is completely cool before attempting to lift it from the hob as residual heat may cause burns Always use oven gloves to protect your hands The appliance has a glass hob top make sure you do not drag pans across the ceramic surface as this will lead to scratches and d...

Page 7: ... with water but switch off the appliance and then cover flame e g with a lid or a fire blanket WARNING If a pan catches fire Do not move it it is likely to be extremely hot Turn off the heat if it s safe to do so but never lean over a pan to reach the controls If you have a fire blanket put it over the pan If you have put the fire out leave the pan to cool completely Deep fat frying presents more ...

Page 8: ...oint for the recycling of electrical and electronic equipment You will by ensuring the appliance is cor rectly disposed of help prevent potential negative consequences for the environ ment and human health For additional details regarding the recy cling of this product please contact your local government office your household waste disposal service or the retailer where you purchased the product ...

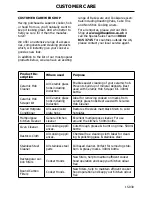
Page 9: ...nc tion Auto Heat Up Automatically heats up then turns down power to a lower setting Power Boost Temporarily boost the power to a cook zone by a massive 60 Minute Minder Yes Need to time an egg use this function Timer Auto Switch Off 4 zones Yes All four cook zones can be simultaneously timed to turn off automatically Griddle Zone Allows the LH cook zones to be linked creating one large oval cook ...

Page 10: ...ook zone or timer by touching the display again Always ensure the control area is clean dry and free from of any objects e g utensils tea towels and cloths spillages and water may make the controls difficult to operate Basic Hob Function Turning on the hob 1 Turn on the hob Using the on off button Note a CL cleared in the timer display means the timer is not set b If you do not select a cooking zo...

Page 11: ...ie Holds the temperature of the pan to approx 65o C To Operate 1 Turn on the hob 2 Select the required cook zone 3 Select power setting U in between power setting 0 and 1 Pause key Warning Don t leave pans on the hob when you re not around take them off the heat if you have to leave the kitchen even if you think it will only be for a moment while you answer the door or phone or you can use the Pau...

Page 12: ...ables 1 2 2 5 3 4 4 Rice Potatoes Pasta 5 5 7 6 Frying Fish Fingers Pancakes Steaks 2 7 3 8 4 9 N A N A Boost N A N A Average Auto Heat up time is 3 minutes To Operate 1 Select a cooking zone 2 Select heat setting 9 3 Remove finger and retouch setting 9 position A and setting 9 will flash alter nately in the cook zone display 4 Adjust the power setting to the desired lower setting that you want th...

Page 13: ...ermal control this means the power boost will deactivate automatically if the product is hot this is to protect the internal electronic components of the hob or to prevent the cookware from over heating To Operate 1 Select the required cook zone 2 Select the Power boost key Letter P appears in cook zone display Minute Minder The minute minder buzzes when the time set has expired Does not switch of...

Page 14: ...of seconds Skip this step if you want set the timer for less than 10 mins leave the timer for a few seconds at it will automati cally set and start counting down 5 The timer indicator in the timer display stops flashing and remain lit the timer is now set and begins counting down When the time is up 1 The corresponding indicator in the timer display will flash the timer will beep and the cook zone...

Page 15: ... plates can be placed across the two zones To Operate 1 Simultaneously select the LHF LHR cook zones n will appear in the LHR cook zone display 2 The power setting is controlled via LHF cook zone 0 9 3 To cancel the bridge function simulta neously select the LHF LHR cook zones n will disappear from the LHR cook zone display The LHF LHR zones can now be operated independently Keep Warm The Keep War...

Page 16: ...a larger pan or a pan of a different construction Solid cast iron pans give the best performance Induction Cook Zone Smallest Recco mended Diameter mm LHF 150 LHR 150 RHR 150 RHF 120 Pans unsuitable for Induction Pans made of copper stainless steel alu minium oven proof glass wood ceramic and terracotta Overheat pan protection The hob is equipped with additional safety systems that help to prevent...

Page 17: ...hild lock 1 Select the On Off Key L will be dis played on all Cook Zones 2 Simultaneously touch the RHF cook zone and the Power Boost keys the hob should beep 3 Remove fingers and touch the Power boost key again The hob should switch off 4 When you now switch on the hob 0 will be displayed in all cook zone displays the hob can now be used normally Residual Heat Indicators H If when the cook zone i...

Page 18: ...to cool power boost will be avail able when the appliance is cool ER21 Hob cuts off after programme setting The appliances has overheated allow to cool U400 Appliance not working Cable connection fault Check mains cable connection terminal at the terminal block are wired correctly E2 Induction coil overheating hot pan Remove pans and allow to cool E8 Fan blocked to appliance Check installation all...

Page 19: ...pillage as soon as pos sible Clean the hob top as regularly as possible this will prevent any build up of grease which may be a fire hazard Solid plate hobs Prime and Season this helps main tain the finish of the elements Use a damp clean cloth to wipe the solid plate making sure that you follow the circular grooves and avoid damaging the red spots Make sure that you allow the hotplate to dry befo...

Page 20: ...en to ensure this appliance has no burrs or sharp edges we recommend that you wear protective gloves when install ing and moving this appliance This will prevent injury The hob should not be fitted above a washing machine a fridge or a freezer Wall surfaces above the work surface and in the immediate vicinity of the cooking hob must be heat resistant Laminated surfaces and the adhesive used for fi...

Page 21: ...ob and appliance should the work surface be less than 38mm deep In the case of a pyrolytic oven If installing the hob above a pyrolytic oven additional provision for air circulation ventilation may be required Due to the excessive temperatures at tained during pyrolysis using the hob at the same time may cause the thermal safety device within the hob to operate ...

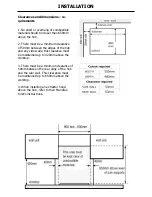
Page 22: ...nce of 50mm between the edges of the hob and any side walls this clearance must be maintained up to 420mm above the worktop 3 There must be a minimum clearance of 50mm between the rear edge of the hob and the rear wall This clearance must be maintained up to 650mm above the worktop 4 When installing an extractor hood above the hob refer to their Manufac turer s instructions ...

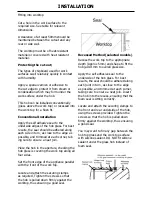
Page 23: ...hob in the aperture checking the hob glass is covering the work top along all four sides Set the front edge of the appliance parallel with the front of the work top Locate and attach the securing clamps as required Tighten the screws so that the hob is pulled down firmly against the worktop thus ensuring a good seal Recessed Method selected models Recess the work top to the appropriate depth Appro...

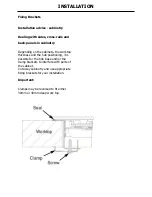
Page 24: ... Depending on the cabinets the worktop thickness and the hob positioning it is possible for the hob base and or the clamp brackets to interfere with parts of the cabinet Cut away cabinetry and use appropriate fixing brackets for your installation Important Clamps may be reversed to fit either 30mm or 40mm deep work top ...

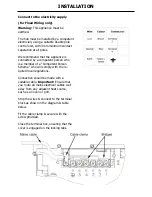
Page 25: ... a competent person who is a member of a Competent Person Scheme who will comply with the re quired local regulations Connection should be made with a suitable cable Important Ensure that you route all mains electrical cables well away from any adjacent heat source such as an oven or grill Strip the wires connect to the terminal block as shown in the diagram table below Fit the cable clamp secure ...

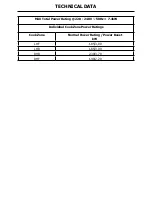
Page 26: ...technical data MAX Total Power Rating 220 240V 50Hz 7 4kW Individual Cook Zone Power Ratings Cook Zone Normal Power Rating Power Boost kW LHF 1 85 3 00 LHR 1 85 3 00 RHR 2 30 3 70 RHF 1 40 2 20 ...

Page 27: ...s build up of mineral deposits Best used with Ceramic Hob Scraper Kit 300ml bottle Ceramic Hob Scraper kit All Ceramic glass hobs including Induction Ideal for removing cooked on marks from ceramic glass hobs Best used with Ceramic Hob Cleaner Sealed Hotplate Conditioner All sealed solid plate hobs Restores the sleek matt black finish to solid hotplates Multipurpose Kitchen Cleaner General kitchen...

Page 28: ...available when you call These can be found on the silver data label on your product which is located Ovens Open the door adjacent to the oven cavity High level grill products Inside the base compartment Hobs On the underside of the product Enter appliance numbers here for future reference Model No Serial No SERVICE RECORD Date of purchase Installed by Installation Date Place of purchase Date Part ...

Reviews: