background image

USING THE MINUTE MINDER 

34

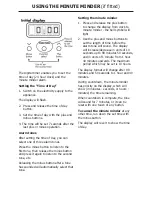
The digital timer enables you to set the 
time of day (24 hour clock) and the 
minute minder alarm.

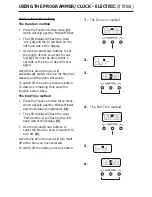
Setting the “Time of Day”

1.  Switch on the electricity supply to the 

appliance.

" &

2.  Press and release the time of day 

button.

3.  Set the time of day with the plus and 

minus buttons.

4. The time will be set 7 seconds after the 

last plus or minus operation.

Alarm tones

After setting the time of day, you can 
select one of three alarm tones.

Press the minus button to listen to the 
!  
and press it again to listen to the second 
tone, etc.

Releasing the minus button after a tone 
has sounded will automatically select that 
tone.

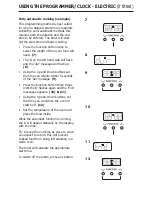
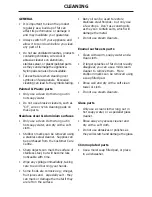
Setting the minute minder

1.  Press and release the plus button 

to change the display from clock to 
minute minder - the bell symbol will 
light.

2.  Use the plus and minus buttons to 

set the length of time before the 
alarm tone will sound. The display 
will increase/decrease in units of 10 
seconds up to 99 minutes 50 seconds, 
and in units of 1 minute from 1 hour 
40 minutes upwards. The maximum 
period which may be set is 10 hours.

The display format will change after 99 
minutes and 50 seconds to 1 hour and 40 
minutes.

During countdown, the minute minder 
has priority on the display, which will 
show (in minutes : seconds, or hours : 
minutes) the time remaining.

When countdown is complete, the tone 
will sound for 7 minutes, or it can be 
reset with one touch of any button.

To cancel the minute minder

 at any 

other time, run down the set time with 
the minus button.

The display will revert to show the time 
of day.

Summary of Contents for FSE 54 DO

Page 1: ...1 BELLING FSE 54 DO SERVICE MANUAL ...

Page 2: ...E 4 34 INSTALLATION INSTRUCTIONS 35 38 WIRING DIAGRAMS 39 39 CUSTOMER CARE 40 45 CONTACT US 46 46 PARTS LIST FSE 54DO 47 58 REPAIR AND MAINTAINANCE DISASSEMBLY PROCEDURES 59 65 COMPONANT REMOVAL 66 71 TECHNICAL SPECIFICATIONS 72 72 FAULTFINDING GUIDES 73 74 THIS MANUAL COVERS THE FOLLOWING MODELS FSE54DO AU ...

Page 3: ...4 4 4 0 0 2 8 PRODUCT IDENTIFICATION CODE It is important that during all service calls the model and serial numbers are recorded on all paper work Appliance rating plate location The appliance rating plate is located on the right hand side of the front frame and also on the rear service panel ...

Page 4: ...Belling Freestanding Electric AU 082746903 19 10 2010 ...

Page 5: ...n Before Using Safety Using the Hob Using the Grill Using the Ovens Programmer clock Cleaning Installation Technical Customer Care Please keep this handbook for future reference or for anyone else who may use the appliance ...

Page 6: ...surface temperatures becoming hot and gas operated parts not working ef switched off to keep the front of the appliance and the controls cool until the appliance has naturally cooled itself If your appliance is covered by the warranty and guarantee you will not be billed for work undertaken should your appliance be faulty terms and condi tions do apply so please read through the literature careful...

Page 7: ...ll on for a short while This will burn off any residues left from manufacturing There may be a smell which accompanies this process but this is nothing to worry about and is harmless oven shelves baking tray grillpan and hot soapy water This will remove the protective oil coating BEFORE USING THE PRODUCT ...

Page 8: ...r mental capabilities or lack of experience and knowledge unless they have been given supervision or instruction concerning use of the appliance by a person responsible for their safety WARNING Servicing should be carried out only by authorised personnel disconnected from the mains supply during use as this will seriously affect the safety and performance particularly in relation to surface temper...

Page 9: ... on top of the highest runner as this is not stable and can lead to spillage or injury 9 Always use the Minute Minder if unattended this reduces the risk of food burning 8 Do not place items on the door while it is open 8 Do not wrap foil around the oven 8 Do not drape tea towels near the oven hazard 8 Do not pull heavy items such as turkeys or large joints of meat out from the oven on the shelf a...

Page 10: ...ob Never leave them close to or on top of the hob Never leave any cook zone on without hazard Do not use the hob surface as a chopping board or food preparation area as this may lead to it becoming damaged Do not put metal cooking utensils cutlery knives or other metal objects on the hob They could become hot if they are near a cooking area which is in use If the appliance has solidplate elements ...

Page 11: ...r home and call the Fire Brigade 1 Don t move it it is likely to be extremely hot 2 Turn off the heat if it s safe to do so but never lean over a pan to reach the controls the pan J pan to cool completely Deep fat frying presents more dangers in your kitchen K Q fryer more than one third full of oil X Y of oil the force of the extinguisher kitchen 1 Pull the plug out or switch off the power at the...

Page 12: ...ol knob to the power setting you wish to use knob to the off position Notes on use not indicate any set temperature and cannot be used to judge one element against another cycle on and off This is to prevent the hob from overheating The hot hob light will come on when one of the hotplates is switched on It will remain on for a short time after the last element has been switched off to serve as a r...

Page 13: ...damage if they are spilled onto the hob during cooking causing the hotplate to cycle on and off rapidly which slows down cooking it being covered by a pan as this can cause overheating Energy Saving elements need the boil reduce the heat setting to a simmer possible _ your element size simmering and stewing in smaller pans while the larger elements are ideal for frying and boiling the cooking zone...

Page 14: ...ing has a faster response time To switch off return the control knob to the off position Using the hob Do not operate the hotplate elements without a pan on or leave them running after removing a pan The electric hob uses a sealed hob system where heat is transferred by conduction Decorative covers should not be used over the hotplates as these can trap moisture and cause intense heat check that a...

Page 15: ...he grill pan under the grill when grilling If cleaning the grill pan when it is hot use oven gloves to move it Do not use the handle to pour hot fats from the grill pan Food for grilling should be positioned centrally on the trivet Aluminium foil Using aluminium foil to cover the grill pan or putting items wrapped in foil q the grill element The cooling fan When the grill is switched on you will h...

Page 16: ...switch off return the control knob to the off position the centre economy grill can be utilised the full grill can be utilised When using the grill in the top oven the speed of grilling can be controlled by adjusting the grill setting or by selecting a higher or lower shelf position For toasting and for grilling foods such as bacon sausages or steaks use a higher shelf position For thicker foods s...

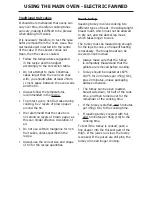
Page 17: ...ing The oven must be preheated when cooking frozen or chilled foods and we recommend preheating for yeast sponges Preheat the oven until the indicator light take up to 20 minutes depending on the temperature selected If you are not preheating the oven the cooking times in the following guide may need to be extended as they are based on a preheated oven Shelf positions There are 2 shelf positions w...

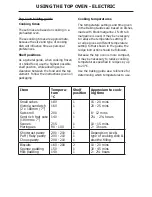
Page 18: ...rgarine is used it may be necessary to reduce the temperature setting If a recipe gives a different temperature setting to that shown in the guide the recipe instruction should be followed Because the top oven is more compact it may be necessary to reduce cooking to 20 C Use the baking guide as a reference for determining which temperatures to use Item Tempera ture C Shelf position Approxiamte coo...

Page 19: ...s of cooking a pre heat may Manual Operation The programmer must be set to manual operation before the main oven can be used If A Auto is on the programmer display return the oven to manual by pressing the up and down buttons simultaneously Any programme which has been set is cancelled The cooling fan The cooling fan may operate when the main oven is on and may continue to operate for a period aft...

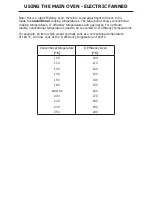
Page 20: ... than a conventional oven so conventional recipe temperature may have to be reduced Please refer to the conversion chart Preheating is generally not necessary as a oven which means you can cook strong time as mild foods eg milk puddings When batch baking foods that will rise during cooking eg bread always ensure that enough space has been left between the shelves to allow for the rise Notes When 2...

Page 21: ...gle layer will reduce the thawing time A medium sized casserole or stew will take approximately 3 4 hours A 1 kg 3lb oven ready chicken will take approximately 5 hours remove the giblets as soon as possible Be safe Do not defrost stuffed poultry using this method Do not defrost larger joints of meat and poultry over 2kg 4lb using this method Never place uncooked food for defrosting next to cooked ...

Page 22: ...oking temperatures The table below shows conventional Y Y For example an item which would normally cook at a conventional temperature K Y K Conventional temperature 2 Y 2 100 110 130 140 150 160 180 190 200 220 230 250 100 110 120 130 140 150 160 170 180 190 200 ...

Page 23: ...rich fruit cake 205mm 8 Christmas cake 205mm 8 Dundee cake 205mm 8 160 160 170 160 160 160 130 depending on recipe 130 15 25 mins 15 20 mins 10 12 mins 20 30 mins 20 25 mins 1 1 hours 1 1 hours 2 3 hours depending on recipe 2 2 hours Pastry Flaky Puff Shortcrust Choux Plate tarts 2 x 180mm 7 180 170 170 170 depending on recipe and type Biscuits Shortbread rounds Nut brownies Brandy snaps Flapjacks...

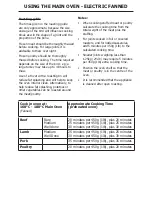
Page 24: ...fective circulation of air recipe q Roast turkey Roasting turkey involves cooking two different types of meat the delicate light breast meat which must not be allowed to dry out and the darker leg meat which takes longer to cook The turkey must be roasted long enough is necessary The breast meat can be covered once browned is completely thawed and that the giblets are removed before cooking K 180 ...

Page 25: ...splashing potatoes or other vegetables can be roasted around the meat poultry Notes calculate the cooking time from the total weight of the meat plus the roasters and for lidded casseroles add 5 minutes per 450g 1lb to the calculated cooking time K X X per 450g 1lb extra cooking time meat or poultry is in the centre of the oven is cleaned after open roasting Cook in oven at 3 2 4 2 5 Fanned Approx...

Page 26: ...on is cancelled This message and A symbol appear when you are asked to set the length automatically for Using the Up and Down buttons adjusts this accordingly This message and A symbol appear when you are asked to enter in an end time or when you would like the oven to switch itself off Symbol Symbol What is it Down Used to decrease cook end time remove minutes from the minute minder and adjust th...

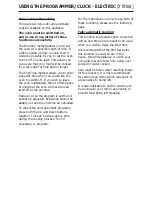
Page 27: ...e other timer functions This ensures that the time will remain correct To select an alarm tone There are three tones to choose from again to listen to the second tone etc tone has sounded will automatically select that tone Setting the minute minder Function button once The bell symbol the time must be set within this time frame has been done the Minute Minder is set counted down the alarm will so...

Page 28: ...ted Extra time cannot be added nor can the end time be extended To cancel the semi automatic programs press both the Up and Down buttons together This can be done at any time during the cooking process Then if necessary re program For the instructions on how to use both of these functions please see the following page Fully automatic cooking This function incorporates both a duration and an end ti...

Page 29: ...en will automatically switch off once the time has elapsed and the alarm will sound To switch off the alarm press any button To view any remaining time press the function button twice The End Time method which will skip past the Minute Minder and the Duration programmer hand side of the display turn off Once this is done the oven will turn itself off at the time you have selected To switch off the...

Page 30: ...r message messages appears the time you would like the oven to switch off 1 place the food inside While the automatic function is running the A will appear statically on the display with the time Try to keep the end time as close to when you expect to return this will prevent cooked food from being left standing in a warm oven The timer will calculate the appropriate start time To switch off the a...

Page 31: ...ress and release the plus button to change the display from clock to minute minder the bell symbol will light 2 Use the plus and minus buttons to set the length of time before the alarm tone will sound The display will increase decrease in units of 10 seconds up to 99 minutes 50 seconds and in units of 1 minute from 1 hour 40 minutes upwards The maximum period which may be set is 10 hours The disp...

Page 32: ... surfaces hot soapy water and dry with a soft cloth 1 a stainless steel cleaner Supplies can be purchased from the Customer Care Centre 1 B stainless steel but will become less noticeable with time care to avoid burning your hands 1 G fruit juices and especially salt they can mark or damage the metal if they are left on the surface J K a few drops Don t use cooking oils as they can contain salts w...

Page 33: ... of toughened glass This ensures that in the unlikely event that a panel breaks it does so into small fragments to minimise the risk of injury Please take care when handling using or cleaning all glass panels as any damage to the surfaces or edges may result in the glass breaking without warning or apparent cause at a later date Should any glass panel be damaged we strongly recommend that it is re...

Page 34: ...e hobs 1 K the solid plate making sure that you follow the circular grooves and avoid damaging the red spots Make sure that you allow the hotplate to dry before use by switching on the elements at a low heat V a solid plate cleaner but take care to avoid the red spots on elements To prime Switch on each element in turn for a short while with no pan on it at a medium high setting This will harden a...

Page 35: ...age Important Ensure that you route all mains cables well clear of any adjacent heat source Clearances units However for models with side opening doors we recommend a side clearance of 60mm between the cooker and any side wall to allow the door to be opened fully The cooker should not be placed on a base No shelf or overhang or cooker hood shall be closer than a minimum of 650mm but check with coo...

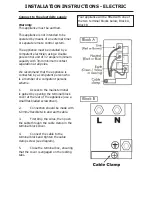
Page 36: ...ll poles We recommend that the appliance is connected by a competent person who is a member of a competent persons scheme 1 Access to the mains terminal is gained by opening the terminal block cover at the rear of the appliance use a K 4 2 Connection should be made with 3 First strip the wires then push the cable through the cable clamp in the terminal block cover 4 Connect the cable to the termin...

Page 37: ...he weight of the cooker Warning in order to prevent accidental tipping of the appliance for example by a child climbing onto the open oven door the stabilising means must be 0 1 1 personal burn injuries and damage to the appliance a hole on each side of the cupboards pass the chains through the holes and anchor the chains within each cupboard 2 3 40 1 0 WARNING IN ORDER TO PREVENT TIPPING OF THE A...

Page 38: ...CHNICAL DATA ELECTRIC PRODUCTS Electrical supply load 240V 50Hz 10665W Countries of destination Warning This appliance must be earthed Databadge is located at the bottom of the front frame behind the door ...

Page 39: ......

Page 40: ...ion on the doors L air meeting a cooler surface i e the 4 V it but you can minimise it when it happens by doing the following o Pre heat the oven at a high temperature before putting food in the oven and cover the food you are cooking wherever possible o Whenever you can cook wet foods at higher temperatures o Don t leave food in the oven to cool down produce condensation when the oven is cooling ...

Page 41: ...t is a Multifunction oven features which are explained fully earlier in this The neon on my appliance keep going out and coming back on again is this right V off to show that oven is maintaining your tem perature choice ...

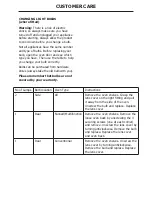
Page 42: ...stores always take the old bulb with you Please remember that bulbs are not No of Lamps Bulb location Oven Type Instructions 2 Side All Remove the oven shelves Grasp the it away from the side of the oven Unscrew the bulb and replace Replace the lens cover 1 Rear Fanned Multifunction Remove the oven shelves Remove the loose oven back by unscrewing the 4 securing screws one at each corner and remove...

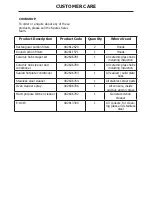
Page 43: ... All ceramic glass hobs including induction Sealed hotplate conditioner 082606783 1 All sealed solid plate hobs Stainless steel cleaner 082606764 1 All stainless steel parts Oven cleaner spray 082606786 1 All cookers inside cavities and on glass Multi purpose kitchen cleaner 082606782 1 General kitchen cleaner E cloth 082813300 1 All cookers for clean ing glass and stainless steel COOKSHOP product...

Page 44: ...Please keep this handbook for future reference or for anyone else who may use the appliance ...

Page 45: ...Please keep this handbook for future reference or for anyone else who may use the appliance ...

Page 46: ...ion An annual maintenance is recommended Always check the instruction book before calling a service agent to make sure you have not missed anything Glen Dimplex Australia Pty Ltd Customer Care Glen Dimplex Australia Unit 2 205 Abbotts Road Dandenong South Victoria 3175 Australia e mail sales glendimplex com au web www glendimplex com au 3 4 7 7 7 8 9 7 7 Before you contact a service agent make sur...

Page 47: ......

Page 48: ... ARE REPRESENTATIVE ONLY AND MAY VARY VISUALLY THIS DRAWING IS GENERIC AND PARTS SHOWN MAY NOT BE ON ALL MODELS 319 ALTERNATIVE METAL FASCIA 917 879 878 319 113 525 114 32 299 300 878 879 905 124 FACIA FREESTANDING 527 DF ONLY ...

Page 49: ......

Page 50: ......

Page 51: ...NTATIVE ONLY AND MAY VARY VISUALLY THIS DRAWING IS GENERIC AND PARTS SHOWN MAY NOT BE ON ALL MODELS ALTERNATIVE GRILL ELEMENT SWITCHES ALTERNATIVE EV_OVEN_MAIN_E 287 210 294 448 287 734 467 293 912 878 544 880 791 315 637 881 705 108 A180 ...

Page 52: ...G ARE REPRESENTATIVE ONLY AND MAY VARY VISUALLY THIS DRAWING IS GENERIC AND PARTS SHOWN MAY NOT BE ON ALL MODELS FURNITURE MAIN OVEN ALTERNATIVE SHELF GUIDES KEY NUMBER FOR OPPOSITE HAND 421 427 749 422 422 422 410 421 411 967 ...

Page 53: ...RE REPRESENTATIVE ONLY AND MAY VARY VISUALLY THIS DRAWING IS GENERIC AND PARTS SHOWN MAY NOT BE ON ALL MODELS EV TOP DOOR GLASS ALTERNATIVE HANDLE DESIGN 304 790 309 428 256 454 835 713 397 303 057 432 428 244 TOP DOOR LOWER DOOR ...

Page 54: ...THE PARTS ON THIS DRAWING ARE REPRESENTATIVE ONLY AND MAY VARY VISUALLY THIS DRAWING IS GENERIC AND PARTS SHOWN MAY NOT BE ON ALL MODELS EV_OVEN_TOP_E 705 733 448 287 734 467 293 912 876 544 791 108 ...

Page 55: ...G ARE REPRESENTATIVE ONLY AND MAY VARY VISUALLY THIS DRAWING IS GENERIC AND PARTS SHOWN MAY NOT BE ON ALL MODELS FURNITURE TOP OVEN ALTERNATIVE SHELF GUIDES KEY NUMBER FOR OPPOSITE HAND 420 410 427 967 411 749 419 419 419 420 ...

Page 56: ...PRESCOT MERSEYSIDE L35 2XW PART NAME SIDE PANELS APPLIANCE NAME BEL FSE 60 DO DRG N 073107500 DRAWN PRM 18 08 09 TCO ISSUE MODIFICATION NAME DATE 0585 ...

Page 57: ...ation 1 322 703090900 FACIA bel e552 whi blk 1 349 81830501 FOOT levelling long 4 358 602925406 FRONTFRAME 55 std mot 1 393 82945211 GLASS inner fs 55 main 1 397 82945214 GLASS inner fs 55 top 1 411 602517700 GRILLPAN std mot 1 420 82917304 GUIDE shelf large lh 1978 1 420 82917300 GUIDE shelf small lh 1974 1 421 82917305 GUIDE shelf large rh 1979 1 421 82917301 GUIDE shelf small rh 1975 1 424 8274...

Page 58: ...2575600 WASHER door handle 19mm dia 2 1042 281114900 BOX junction hylec PA223 3S 1 Supersed ed 1051 82057901 BRACKET stability 1 1062 81557600 BUFFER door hard 4000 2 1180 81367340 CLIP phial probe CAC091 Blk 2 1209 602129300 COVER element grill 55 60 mot 1 1273 502098000 EARTHTAB phial 1 Obsolete 1418 82340500 GUARD fan REF FG12 1390 1 1436 82964400 HARNESS wiring 1 1510 82848702 INSULATION set 5...

Page 59: ...1 B BELLING FSE 54 DO REPAIR AND MAINTAINANCE PROCEDURES ...

Page 60: ...2 IMPORTANT BEFORE CARRYING OUT ANY SERVICING WORK ALWAYS DISCONNECT FROM THE ELECTRICAL SUPPLY ...

Page 61: ...ND LIFT TO REMOVE DOOR AND HINGE WHEN REPLACING ENSURE THAT HINGES ARE FULLY EN GAGED IN THE HINGE BUSH 2 REMOVING THE TOP OVEN DOOR OPEN THE DOOR FULLY RELEASE THE 2 CLIPS AND PUSH FULLY BACK INTO POSITION SHOWN CLOSE DOOR TO REST POSITION AND LIFT TO REMOVE DOOR AND HINGE WHEN REPLACING ENSURE THAT HINGES ARE FULLY ENGAGED IN THE HINGE BUSH ...

Page 62: ... SCREWS AS INDICATED PULL THE HINGE OUT OF THE DOOR EXTRUSION 3 HOTPLATE REMOVAL REMOVE 4X SCREWS FROM SIDE OF HOTPLATE SLOWLY LIFT THE HOTPLATE AWAY FROM THE APPLIANCE AND SLIDE OUT THE HOB HOT NEON FROM THE BRACKET ON THE UNDERSIDE OF THE HOTPLATE ...

Page 63: ...5 4 REMOVAL OF SIDE PANELS REMOVE 2X SCREWS AT REAR OF APPLIANCE REMOVE 2X SCREWS FROM FRONT OF APPLIANCE REMOVE SIDE PANEL ...

Page 64: ... 2 X HOLDING SCREWS AND REMOVE THE FACIA PANEL TAKE CARE NOT TO DAMAGE THE NEONS ON REMOVAL 6 REMOVING THE REAR SERVICE PANEL REMOVE SECURING SCREWS X6 REMOVE REAR SERVICE PANEL WITH CARE SO AS NOT TO DISCONNECT ANY OF THE WIRES CONNECTED TO THE TERMINAL BLOCK ...

Page 65: ...ECURED IN THE GAP BETWEEN THE CAVITY AND FRONTFRAME AND REQUIRES NO OTHER FIXING TO REFIT PUSH IN ALWAYS ENSURE THAT DOOR SEAL LIP IS FACING THE CORRECT WAY REAR SERVICE PANEL REMOVED COOLING FAN GRILL ELEMENT LOWER OVEN ELEMENT MAIN OVEN ELEMENT MAIN OVEN STIR FAN ...

Page 66: ... 7KW CERAMIC ELEMENT 1 2 KW CERAMIC ELEMENT 1 2 KW CERAMIC ELEMENT 1 7 KW TEMPERATURE LIMITER 550 C TEMPERATURE LIMITERS 550 C FOLLOW STEP 3 AND REMOVE THE HOB TOP RELEASE THE CERAMIC ELEMENT FROM THE CROSS MEMBER BY SQUEEZING THE CLIP AND REMOVING FROM HOLDING TAB ...

Page 67: ...CLIPS ARE FITTED ON THE NEW ELEMENT IN THE SAME POSITION ALL POSITIONS ARE NUMBERED B CERAMIC ELEMENT SWITCHES FOLLOW STEP 3 AND REMOVE THE HOBTOP REMOVE THE SECURING SCREWS WHICH CAN ALL BE ACCESSED BY REMOVING THE CONTROL KNOBS REMOVE SWITCH SWITCHPACK ...

Page 68: ...SCREWS POSITIONS INDICATED AND SLIDING OFF REMOVE THE 2 SCREWS SECURING THE ELEMENT BRACKET TO THE CAVITY AND PULL THE ELEMENT FORWARD TO REMOVE D THERMOSTATS FOLLOW STEP 3 AND REMOVE THE HOB TOP PULL THE T STAT FROM THE SWITCH HOUSING REMOVE THE T STAT PHIAL FROM THE RELEVANT OVEN CAVITY AND PULL THROUGH T O T STAT M O T STAT ...

Page 69: ...LOWER ELEMENT REMOVE INSULATION AT THE BACK OF THE TOP OVEN CAVITY REMOVE SCREW FROM INSIDE TOP OVEN CAVITY AS INDICATED PULL ELEMENT FROM REAR OF APPLIANCE ALWAYS ENSURE WHEN REPLACING INSULATION TO USE CORRECT TAPE ...

Page 70: ... ELEMENT FOLLOW STEP 6 AND REMOVE THE REAR SERVICE PANEL REMOVE 4 X REAR FAN COVER SECURING SCREWS AND REMOVE FAN COVER DISCONNECT WIRING REMOVE THE 2 ELEMENT SECURING SCREWS AND PULL ELEMENT FORWARD INTO THE CAVITY ...

Page 71: ...O TURNED CLOCKWISE TO REMOVE DISCONNECT WIRING FROM FAN REMOVE 3 X STIR FAN SECURING SCREWS AND REMOVE FAN FROM THE REAR OF THE APPLIANCE I MAIN OVEN LIGHT FITTING FOLLOW STEP 6 REMOVING REAR SERVICE PANEL REMOVE GLASS LAMP COVER BY UNSCREWING REMOVE THE EARTH LEAD RELEASE 4 XCLIPS HOLDING LIGHT FITTING IN PLACE REMOVE BY PULLING LIGHT FITTING FORWARD INTO CAVITY ...

Page 72: ...ECIFICATIONS NOMINAL RESISTANCES AT 20oC CERAMIC ELEMENTS LARGE 1 7 KW SMALL 1 2 KW 5 0 17 11 5 287 5 723 29 1 2 5 0 17 0 1 29 1 1 0 17 0 1 29 1 67 5 1 22 1 1 N THERMAL CUT OUTS TOP L120 C REAR L150 C FAN RUN ON F60 C ...

Page 73: ...15 BELLING FSE 54 DO FAULTFINDING GUIDES ...

Page 74: ... clock set to manual Advise customer on setting the timer Is there a neon on the facia Does oven Stir fan run Send engineer with Thermostat Appliance working OK Does the oven heat up Is the Timer working Check fuse or supply turned on Send engineer with Fan motor and switch Send engineer with element Is the neon on No ...

Reviews: