BellCount S715
WE PROVIDE GENUINE SECURITY
USER'S MANUAL
Page 1: ...BellCount S715 WE PROVIDE GENUINE SECURITY USER S MANUAL ...
Page 2: ...BellCount S715 USER S MANUAL Rev 2015 12 21 Page 2 of 36 ...
Page 3: ...COUNTING 17 3 12 SORTING MODES 18 3 12 1 Definition of the Sorting Modes 18 3 13 PRINTING FUNCTION 19 3 14 ERROR HANDLING 20 3 14 1 How to Clear an Error Message 20 3 14 2 Error Messages 21 4 SETTING UP S715 22 4 1 HOW TO VERIFY AND ADJUST THE BASIC SETTINGS 22 4 2 SOUND SETTINGS 23 4 2 1 Key Tone Settings 23 4 2 2 Alarm Settings 24 4 2 3 Suspicious Note Alarm Settings 24 4 3 BANKNOTE SECURITY FEA...
Page 4: ...l Serial Bus 1 2 Important Notes and Safety Instructions BellCount S715 is exclusively for indoor usages do not use it outdoors Do not disassemble S715 If there are any problems with operations please contact the BellCon authorized distributor Do not expose S715 to liquids extreme humidity or moisture Avoid operating S715 in environments with strong magnetic and or electromagnetic fields For examp...
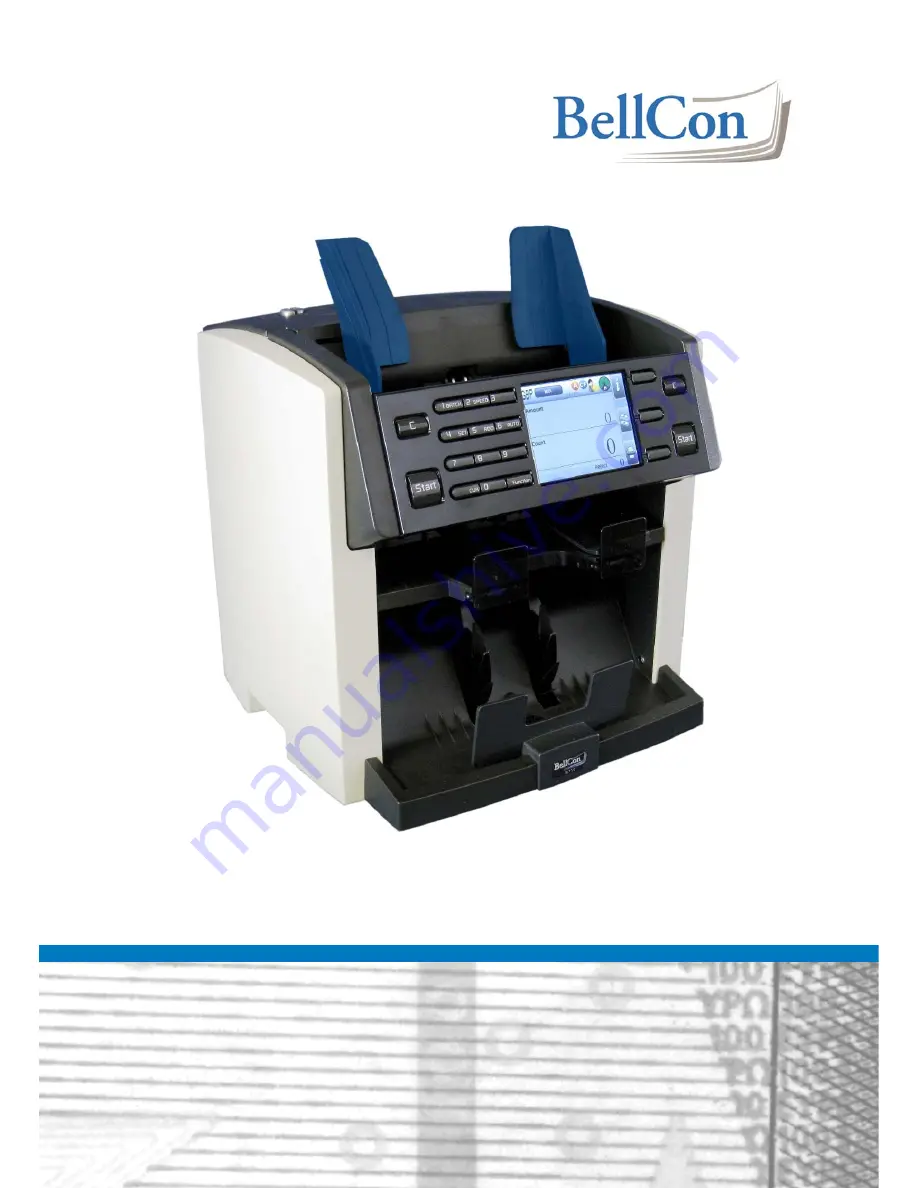
Page 5: ...view 2 1 S715 at a Glance Reject Pocket Stacker Pocket 3 5 Color TFT LCD Display Upper Note Path Opening Hopper Guide Remote Display Socket SD Card Upgrade Slot Power Socket Power Switch PC Connection Socket USB Printer Serial Ports RS232 Lower Note Path Door Control Panel Hopper ...
Page 6: ...BellCount S715 USER S MANUAL Rev 2015 12 21 Page 6 of 36 2 2 Control Panel Overview 3 5 Color TFT LCD Display Multifunction Keys Function Keys F1 F2 F3 ...
Page 7: ...BellCount S715 USER S MANUAL Rev 2015 12 21 Page 7 of 36 2 3 Display Overview Currency Selection Counting Result Counting Information ...
Page 8: ... power switch button to turn the machine off 3 2 How to Handle and Place Banknotes in S715 To count banknotes smoothly please follow the following guidelines 1 Avoid counting wet excessively dirty or spoiled notes 2 Check for foreign matters mixed with the notes i e paper chips rubber bands clips dust etc which will jam the note path or even damage the sensors 3 Remove folds or curls from the note...
Page 9: ...de to select User 1 Confirm and or cancel all the banknote processing functions by using the and of the left side 3 Right Press the on the right side to select User 2 Confirm and or cancel all the banknotes processing functions by using the and of the right side 4 Clearing the counting results Press of the current user or For and all the functions of banknote processing are separate and individual...
Page 10: ...old All the available currencies are listed in the display scroll list Use and to highlight the desired currency Press to confirm the selection 3 CNT Count Mode S715 counts notes without banknote security features detection The display shows the number of counted banknotes Press F2 to select between four different note size tolerances The note size is defined by the first note of a processed batch...
Page 11: ...nformation available the value quantity and subtotal of accepted notes 2 Grand Total only available when Add Mode is activated All the confirmed transactions are accumulated into the Grand Total list Press to see the Grand Total lists of different counted currencies 3 Day Total only available when Add Mode is activated All the confirmed transactions in one day are accumulated into the Day Total li...
Page 12: ... shown on the bottom line of the display Definition of reject reasons Double Double feeding error Skew A note skews during the processing Unknow Image Unknown banknote image Chain Banknotes chain in the note path Note Gate Gap between two notes is too narrow IR Error Infrared security feature error MG Error Magnetism feature error IMG Error Image detection error Other Error Various errors Unknown ...
Page 13: ...of the display 2 Current shows the current counting result 3 Press F3 Print to confirm the counting result 4 Press F3 again under Print Mode to confirm the transaction 5 The current transaction is accumulated to the Total Amount and pieces The saved transaction is accumulated to Grand Total and Day Total see section 3 7 and 3 8 Hold and press to deactivate the Add Mode When Add Mode is turned off ...
Page 14: ...Total 1 After counting press F3 2 Press F3 again for confirming the transaction 3 The current transaction is accumulated to the Total Amount and pieces 4 Press F3 again to go to the Print Mode The following options appear Print the current transaction Print the Grand Total Clear the Grand Total Exit the Print Mode How to check the Grand Total list 1 Press F1 two times ...
Page 15: ... printed 4 Exit Grand Total menu Toggle F1 until the Main menu appears 3 8 Day Total The Day Total accumulates the confirmed transactions of each day 1 Press F1 three times 2 The total of all the confirmed transactions of one day are listed Use and to switch to another date 3 Press F3 to print the Day Total receipts Print the Day Total of all days Print the Day Total of one day Exit 4 Exit Day Tot...
Page 16: ...unting Start Mode With activated Automatic Start Mode S715 starts counting as soon as banknotes are detected in the hopper With activated Manual Start Mode S715 starts counting when pressing 3 10 Counting Speed How to adjust the Counting Speed 1 Hold and toggle to select the desired Counting Speed 2 Three different Counting Speeds are shown in the top line of the display 600 notes minute 800 notes...
Page 17: ... to perform Batch Counting by pieces Input the desired banknote pieces batch value When counting the machine stops once the counted banknotes reach the preset batch quantity How to perform Batch Counting by amount Input the desired banknote amount batch value When counting the machine stops once the preset batch amount is reached Unnecessary values and suspicious notes are delivered to the Reject ...
Page 18: ...banknotes with a deviating denomination are delivered to the reject pocket Face Sorting Mode Counts banknotes with the face of the first detected genuine note Delivers banknotes with different faces and suspicious notes to the reject pocket NOTE Further sorting functions for the Face Sorting Mode can be set under the Settings Mode menu Please refer to section 4 5 1 Orientation Sorting Mode Counts ...
Page 19: ...s at the rear of S715 2 Press the F3 key 3 Follow the instructions in the display to proceed Press or to select one or two copies of the receipt Press to start the printing job Press to confirm the transaction into the Grand Total and Day Total memory Press to cancel the operation 4 Receipt contents The receipt lists the currency code the quantity by denominations the subtotals and the total quant...
Page 20: ...u open the Upper Note Path and close it again an error message window will appear You can clear the error message by following the below procedure 1 Press to clear error message 2 The motor runs shortly at medium speed to clear the Note Path Remaining notes etc will be ejected to the Reject Pocket 3 The machine works normally again ...
Page 21: ...anknotes Please remove the banknotes from the Hopper and replace them Please remove the banknotes from the Reject Pocket After removal the operation continues The Reject Pocket is full Please remove the banknotes from the Reject Pocket Please remove the banknotes from the Stacker After removal the operation continues The Stacker is full Please remove the banknotes from the Stacker The counted quan...
Page 22: ...Navigation Keys Up Down Left Right Use the Navigation Keys to highlight the desired icon 3 Confirming the selection After highlighting the desired icon press to confirm the selection 4 Escape Settings menu and go back to main menu Press Sub menus in the Settings menu Set up S715 s acoustic alarms Switch the banknote security features detection on off Set up the printer parameters bit rate and pape...
Page 23: ...rm the selection with 4 2 1 Key Tone Settings How to turn on off the key activation Key Tone Default ON 1 Highlight the icon 2 Confirm the selection with 3 Turn Key Sound on or off Use and or and to highlight your selection 4 Confirm the setting Press to confirm the setting and go back to the Settings menu ...
Page 24: ...se and or and for highlighting 5 Confirm the setting Press to confirm the setting and go back to the Sound menu 4 2 3 Suspicious Note Alarm Settings How to turn on off the error messages alarm Default OFF 1 Highlight the icon 2 Confirm the selection with 3 Turn the Suspicious Note Alarm on or off When the Alarm is turned on S715 sounds an acoustic alarm when a suspicious note is detected 4 Selecti...
Page 25: ...with 3 Select the Detection setting S715 verifies the banknote security features while counting Suspicious banknotes are delivered to the Reject Pocket S715 discriminates the banknotes by denomination No checking of security features is performed 4 Selecting a desired mode Use and or and for highlighting 5 Confirm the selection Press to confirm and go back to the Settings menu 6 When the Detection...
Page 26: ...w to select the paper size of the connected printer Default W 79 5 1 Highlight the icon 2 Confirm the selection with 3 Check the paper size width of the connected printer 2 inches paper 3 inches paper 4 Select the paper size of the connected printer Use and or and for highlighting 5 Confirm the selection Press to confirm and go back to the Printer Port menu ...
Page 27: ...nected printer Default 115 200 1 Highlight the icon 2 Confirm the selection with 3 Find the desired bit rate refer to your printer s manual 9 600 bps 38 400 bps 115 200 bps 4 Select the bit rate of the connected printer Use and or and for highlighting 5 Confirm the selection Press to confirm and go back to the Printer Port menu ...
Page 28: ...ng Default FACE Only 1 Highlight the icon 2 Confirm the selection with 3 Find a desired mode for face sorting Face Sorting only Face Sorting with Denomination Detection Face Sorting with Issue Sorting Face Sorting with Denomination Detection and Issue Sorting functions 4 Select the desired mode Use and or and for highlighting 5 Confirm the setting Press to confirm and go back to the Sorting Mode m...
Page 29: ...he selection with 3 Find the desired mode for Orientation Sorting Orientation Sorting only Orientation Sorting with Denomination Detection Orientation Sorting with Issue Sorting Orientation Sorting with Denomination Detection and Issue Sorting functions 4 Select the desired mode Use and or and for highlighting 5 Confirm the setting Press to confirm and go back to the Sorting Mode menu ...
Page 30: ...ission Sorting Issue Sorting only Issue Sorting with Denomination Detection Issue Sorting with Face Sorting Issue Sorting with Orientation Sorting Issue Sorting with Denomination Detection and Face Sorting functions Issue Sorting with Denomination Detection and Orientation Sorting functions 4 Select the desired mode Use and or and for highlighting 5 Confirm the setting Press to confirm and go back...
Page 31: ...p date and time 1 Highlight the icon 2 Confirm the selection with 3 Change the date and time settings Use and to highlight the desired value to modify 4 Press to select and confirm the value to modify The colour of the selected value will change from pink to red 5 Use the numerical keys to change the value and then confirm with 6 Press to go back to the Set up Device menu ...
Page 32: ...s 1 Highlight the icon 2 Confirm the selection with 3 Default settings on or off The device will always turn on with the factory settings The device will always turn on with the user defined settings 4 Selecting the desired mode Use and or and for highlighting 5 Confirm the setting Press to confirm and to go back to the Set up Device menu ...
Page 33: ...BellCount S715 USER S MANUAL Rev 2015 12 21 Page 33 of 36 5 Maintenance 5 1 Note Path Access How to access the Upper Note Path How to access the Lower Note Path ...
Page 34: ... detergent 6 Rinse the sponge with clean running water 7 Wipe the cover with the clean sponge 8 Wipe the surface again with a dry soft lint free cloth 9 Wait for the surface to dry completely and remove any fibres How to clean the Note Path of S715 1 Open the Upper Note Path 2 Gently wipe or dust the Note Path with a small soft brush or a dry soft lint free cloth 3 If stains remain moisten a soft ...
Page 35: ... Detection Full width IR and visible light optical inspection with image processing Magnetism sensor thread value code and print Thickness and width height sensors 3D UV sensors Display 3 5 colour TFT LCD Currency Capacity Up to 5 currencies can be installed Dimensions 272 Depth 272 Width 317 Height mm Weight Approximately 8 2 kg Counting Speed 600 800 1000 notes minute selectable Interfaces USB p...
Page 36: ......