background image


DESCRIPTION 

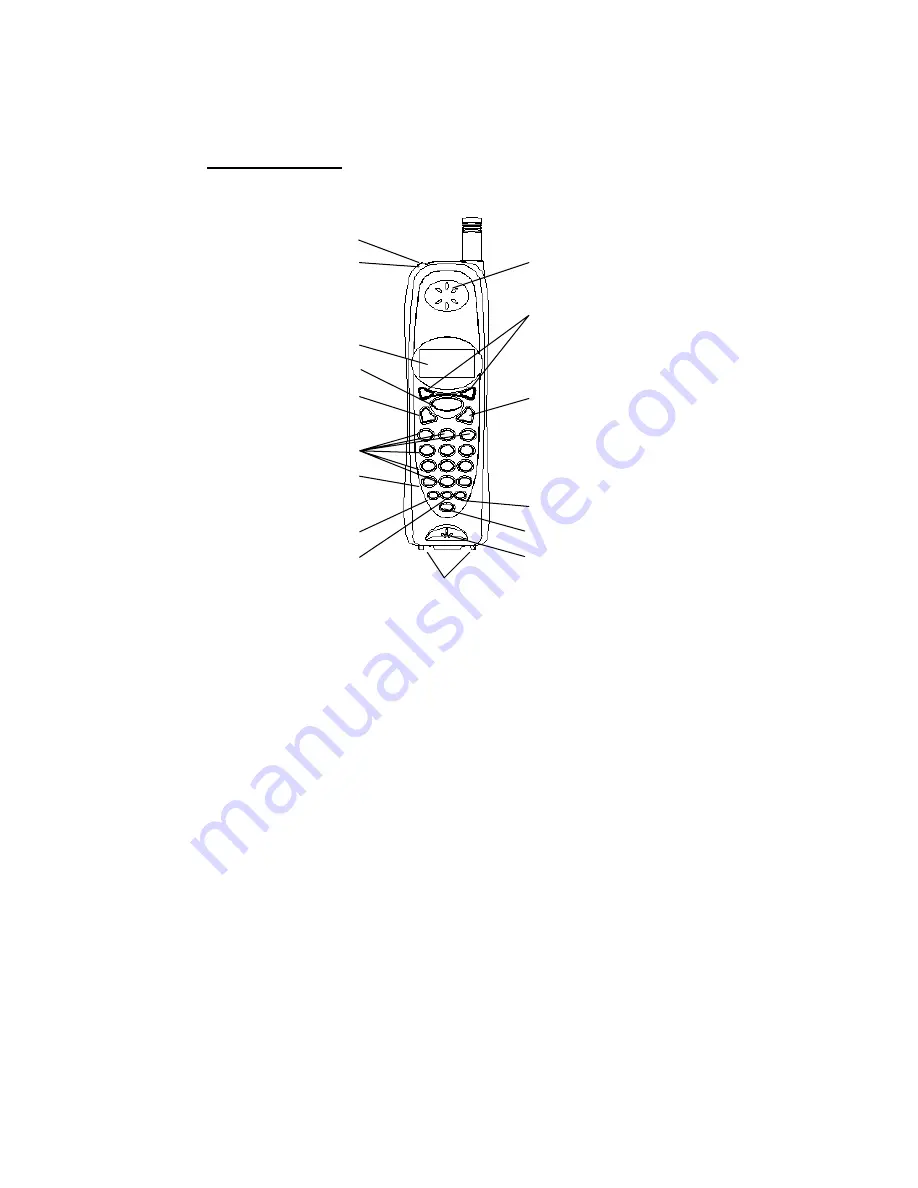
CONTROLS' LOCATION AND FUNCTION 


15 


16


13 


3


10 


11 


6


7


12 


14 

                                                           (Figure 1) 

HANDSET CONTROLS 

1.  

LCD Display:

 Shows call information, phone status, prompts and Phonebook items.


2.  

TALK Button:

 Press this button to answer an incoming call, place a call or end a call. 

3.  

Int./Format Button:

 Press this button to page other handset or change CID number 

format on screen. 

4.  

Up/Down Button:

 Press this button to review CID log, phonebook navigation, or change 

receiver volume.


5.  

Menu/Hold Button:

 Press this button to access phone setup options menu or hold the 

line.


6.  

Mute/Del.:

 Press this button to temporarily disable the microphone during Talk / Intercom / 

Conference mode or to delete record/character.


7.  

Redial/Pause:

 Press this button to redial the last number you have dialed, or to insert 

pause while dialing.


8.  

Mem./Back:

 Press this button to go into phonebook mode or to go back to previous menu 

during menu mode. 

9.  

Flash/Remote:

 Press this button during off hook mode to send a timed line break to 

phone line to access custom calling features such as Call Waiting or three-way calling 
provided by your local phone company, or to remote TAD during Standby mode, or to 
perform call screen when TAD is taking message.


10.  

TAD Remote Buttons:

 Used during TAD remote mode, to playback message, skip to 

next, back to previous, erase message, turn TAD off on, and play the voice menu. 

11.  

Ring Off Button:

 Press this button during ringing to temporarily disable the ringer, or set 

ringer to off if pressed during Standby mode, or to engage TAD PIN change during TAD 
remote mode. 

12.  

Microphone:

 Used for speaking with callers. 

13.  

Receiver:

 Allows you to hear calls.


14.  

Charge Contacts:

 Used for charging the handset battery.


15.  

Headset Jack:

 A jack located on the top of the handset used for connecting your headset 

Summary of Contents for Excursion 35818

Page 1: ...ital answerer like all Genuine BELL products has been designed to give you many years of continuous service and represents the best value for your money This phone is built on the state of the art Frequency Hopping Digital Spread Spectrum radio communication technology for high quality voice communication and high level of conversation privacy It requires little maintenance and is easy to setup an...

Page 2: ...www nwbphones com for technical support and information on our other products WARNING To prevent fire or shock hazard do not expose this product to rain or any type of excess moisture If accidentally dropped into water the adapter should immediately be unplugged from the wall along with the telephone line cord CAUTION To maintain compliance with the FCC s RF exposure guidelines place the base unit...

Page 3: ... EXTRA CHARGE CRADLE with adapter attached RECHARGEABLE BELT CLIP x2 Ni MH BATTERY PACK x2 ADAPTER ADAPTER LONG PHONE DC9V 850mA DC9V 300mA LINE CORD attached to cradle USER S MANUAL WARRANTY CARD ACCESSORY ORDER FORM GX2411ci BELL Phones ...

Page 4: ...ot locate this product where the cord will be abused by persons walking on it 10 Do not overload wall outlets and extension cords as this can result in the risk of fire or electric shock 11 Never push objects of any kind into this product through cabinet slots as they may touch dangerous voltage points or short out parts that could result in a risk of fire or electric shock Never spill liquid of a...

Page 5: ...ng burns or irritation to eyes or skin 7 When inserting the batteries into this product the proper polarity or direction must be observed Reverse insertion of batteries can cause charging that may result in leakage or explosion 8 Remove the batteries from this product if the product will not be used for a long period of time several months or more since during this time the battery could leak in t...

Page 6: ...equipment from the network until the problem has been corrected or you are sure that the equipment is not malfunctioning 8 This equipment may not be used on coin service provided by the telephone company Connection to party line service is subject to state tariffs Contact your state public utility commission or corporation commission for information 9 WARNING Changes or modifications to this unit ...

Page 7: ...RS 15 PHONEBOOK 16 MIXED MODE DIALING 16 PAUSE FLASH FUNCTION 16 FLASH FUNCTION 16 OUT OF RANGE WARNING 17 LOW BATTERY WARNING 17 CALLER ID OPERATION INTRODUCTION FO CALLER ID ON CALL WAITING 17 RECEIVING NEW CALL 18 VIEWING THE CALLER ID LIST 18 CALLER ID DISPLAY 18 CALL WAITING 19 MESSAGE WAITING 19 PLACING A CALL FROM THE CALLER LIST 20 SAVING THE NAME AND NUMBER FROM THE CALLER LIST INTO THE P...

Page 8: ... while dialing 8 Mem Back Press this button to go into phonebook mode or to go back to previous menu during menu mode 9 Flash Remote Press this button during off hook mode to send a timed line break to phone line to access custom calling features such as Call Waiting or three way calling provided by your local phone company or to remote TAD during Standby mode or to perform call screen when TAD is...

Page 9: ... TAD Msg LED Indicator It blinks to indicate there is new message s stored in the TAD 8 Vol Buttons Allows you to increase or decrease the speaker volume during TAD mode Talk Intercom Conference mode 9 Up Down Buttons Press this button to review CID log phonebook navigation or change speaker volume 10 Int Format Button Press this button to page handset or change CID number format on screen 11 Mem ...

Page 10: ...to operate the answer to playback message skip to next message repeat current message back to previous message erase current message erase all old message s record welcome message and record memo message 1 2 Figure 3 EXTRA CHARGE CRADLE CONTROLS 1 Charge LED Indicator Lights up steadily when the handset is being charged on the charge cradle It will turn off when the handset is removed from the cra...

Page 11: ...iver and microphone are disabled when the headset is connected Headset Jack Figure 6 Press the TALK button to answer or place a call using the headset Refer to the manufacturer s headset manual for more details You can purchase a suitable headset through service center or retailer shop For servicing or replacement please contact us for suitable headset Headset Plug 2 5mm ...

Page 12: ...TION CAUTION Use only the Nickel Metal Hydride Ni MH battery type included with this unit Use of other battery types may cause injuries or damage Ensure to insert the correct battery polarity as shown on the battery compartment during the battery installation 1 Remove the battery compartment cover of the handset by pressing the top of the cover and sliding it down 2 Connect the rechargeable Ni MH ...

Page 13: ...NU button 3 Press UP or DOWN button to select the language you desire English is the preset language 4 Press MENU button to save the setting 5 Press BACK button to go back to Standby mode RINGER VOLUME This telephone offers 4 ringer options for user to select they are level high medium low off 1 During Standby mode press MENU button 2 Press DOWN button until RINGER VOLUME option is pointed by the ...

Page 14: ...multi tap input max 15characters 8 Press MENU button to save the input NOTE for the operation of multi tap input please refer to Telephone Keypad Characters section for more detail NOTE if you found communication problem with the base in more than one handset please try to deregister all handsets using the following procedures and register those handsets one by one using the procedure described in...

Page 15: ...N button until EDIT USERNAME option is pointed by the pointer 3 Press MENU button 4 Press numeric keypad to enter username by multi tap input max 15characters 5 Press MENU button to save the input 6 Press BACK button to go back to Standby mode NOTE for the operation of multi tap input please refer to Telephone Keypad Characters section for more detail TAD RING COUNT applicable to base unit only Th...

Page 16: ...ELETE VMWI applicable to base unit only This telephone allows you to force the VMWI indicator to off stop blinking only not to turn off VMWI feature if desired 1 During Standby mode press MENU button 2 Press DOWN button until DELETE VMWI option is pointed by the pointer 3 Press MENU button to confirm 4 The screen shows VMWI DELETED and the VMWI indicator will stops blinking immediately 5 Press BAC...

Page 17: ...auto answer ON mode If the unit is set to auto answer OFF mode press the TALK button See AUTO ANSWER ON OFF for details of setup The LCD display will shows TALK 2 Start your conversation 3 To end your conversation either press the TALK button or place the handset on the base charge cradle The handset LED indicator will turns off B IF THE HANDSET IS OUT OF THE BASE UNIT 1 When the phone rings press...

Page 18: ...tension user does not answer the call within 30 sec source extension will be ring back for another 30 sec TRANSFER CALL AFTER INTERCOM 1 During a call the user can press the INT button followed by destination handset extension number 0 4 extension 0 is the base unit extension 1 4 is the handsets 2 If destination extension user presses the INT button to answer the intercom request Intercom mode is ...

Page 19: ...g multi tap input when entering names Press the appropriate KEYPAD button consecutively to get the following characters Keypad Button Multi tap Characters 1 Spc _ 2 A B C 3 D E F 4 G H I 5 J K L 6 M N O 7 P Q R S 8 T U V 9 W X Y Z Multi tap example If you want to enter the character C press the 2 KEYPAD button the first character displayed will be A Press the 2 button again within 1 second to disp...

Page 20: ...E KEYPAD buttons 0 9 to re enter the name by multi tap input up to 15 characters 5 Press the MENU button once 6 Use DEL button to erase existing digits one by one and use the TELEPHONE KEYPAD buttons 0 9 to re enter the number up to 24 digits 7 Press the MENU button to confirm and save the change IMPORTANT It is not advisable to save a telephone number without the corresponding name in the Phonebo...

Page 21: ...ion and Answer table QUESTIONS ANSWERS What is Caller ID Caller ID is a device that identifies the calling party before you answer a call This device can be used to screen unwanted calls and eliminate harassment from annoying calls What is CID on Call Waiting CID on Call Waiting is a device that can also identifies call waiting party before you answer a call How Does Caller ID on Call Waiting work...

Page 22: ...OWN button within 60seconds after back to Standby mode it will resume to the previous record in the Caller list this will ease the slow user to go through the caller list without scrolling back to previous record by too many key strokes CALLER ID DISPLAY 12 35AM 11 30 CALL 07 123 845 3892 JOHN SMITH LCD display shows name and number time and date of the call 12 35AM 11 30 CALL 07 123 845 3892 LCD ...

Page 23: ...ly muted The LCD will automatically shows the name and number of the second caller Press the FLASH button to answer the second caller The first caller s name and number will be displayed When you have finished press the FLASH button to continue with your conversation with the first caller MESSAGE WAITING If you have subscribed to Voice Mail message service and if you have requested Visual Message ...

Page 24: ...digits numeric buttons to select location 01 20 only 5 Screen will back to Standby mode NOTE If you press the FORMAT button to change the display format before saving to phonebook the final displayed number on screen will be stored to the phonebook location SELECTIVE DELETING IN THE CALLER LIST 1 Press the UP DOWN button 2 Press the UP or DOWN button to scroll to the call record you wish to delete...

Page 25: ...ld the OGM button to record your own OGM the answerer will prompts Please record announcement after the tone 2 Then release the button and start speak to the microphone when a beep tone is heard The 7 segment LEDs will shows the countdown time of the OGM recording 29 28 27 3 Press the STOP button when OGM recording is completed The updated OGM will be played back from the speaker immediately for y...

Page 26: ...ts code which is required for taking remote to the answer when calling from remote telephone The default PIN code is 777 1 During Standby mode press the handset REMOTE button to enter handset remote mode 2 Press the button to enter PIN setup screen the LCD screen shows ENTER TAD PIN and the current PIN is shown on the LCD screen 3 Press 3 digits from 0 9 new code to enter your new code 4 Press REM...

Page 27: ...message press 3 To skip to the previous press 1 To delete press 0 5 During remote mode you can press 4 to turn answer on off and hear the voice prompt Answer on or Answer off for indication 6 During remote mode you can press 7 to hear the voice menu again LINE REMOTE MODE You can call to your answerer from a remote tone telephone Answerer will answer the call after the preset ring count either 3 5...

Page 28: ...ed away from heat sources such as radiators heaters stoves or any other appliance that produces heat 2 Use a slightly damp cloth to clean the plastic cabinet A mild soap will help to remove grease or oil Never use polish solvents abrasives or strong detergents since these can damage the finish TROUBLESHOOTING A TELEPHONE UNIT TROUBLESHOOTING TABLE Symptoms Possible Solution Cause No dial tone Chec...

Page 29: ...our telephone line connections Make sure all connections are secure and connected If you pick up the phone before the second ring the caller information will not be correctly received If you have telephone answering device TAD connected with the unit set the TAD to answer after two rings or more If it is a blocked call or an out of area call the caller s name and or phone number will not appear on...

Page 30: ...n kinds of electric equipment such as light dimmers fluorescent bulbs motors and fans also generate noise pulses Because radio frequencies are susceptible to these noise pulses you may occasionally hear them in your handset Generally they are minor annoyances and should not be interpreted as defects in your system RANGE Because radio frequencies are used location of the base unit can affect operat...

Reviews: