background image

13

12

I N STA L L AT I O N

I N STA L L AT I O N

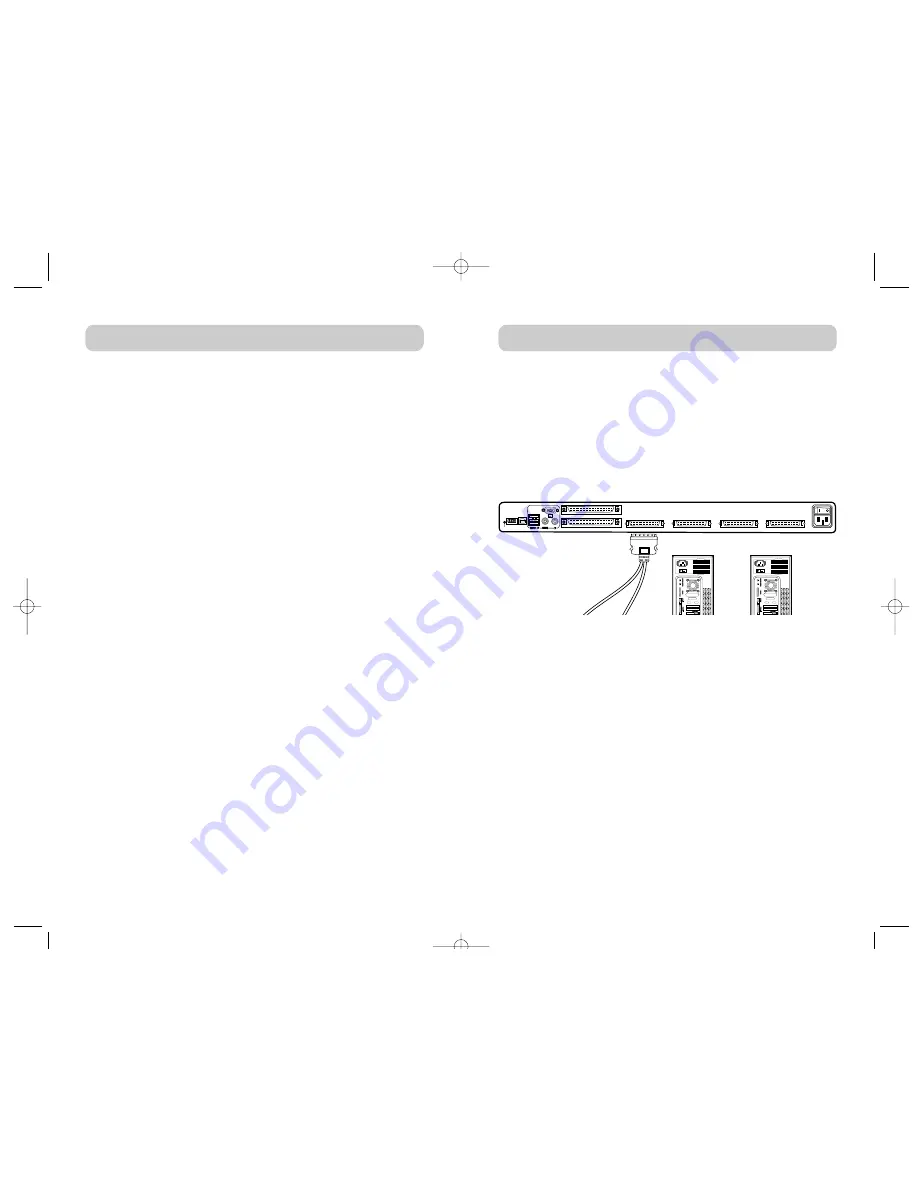
Connecting Computers to the KVM Switch (USB Connection)

Note: Early versions of Windows operating system do not 
automatically install HID devices. Manual installation of the 
HID driver may be required.

1. Using the OmniView ENTERPRISE Series Dual-Port USB Style KVM

cable (F1D9401-XX), connect the high-density, 50-pin, SCSI 2-style
connector to the next free KVM port, starting with the port for the first
two computers (for best results screw the connectors into the KVM
Switch and the computer, when possible).

2. Connect the USB connector of your KVM cable to the computer. If

your computer is running Windows Me or later, skip to step 6.
Otherwise, continue with step 3.

3. Boot up the computer you wish to connect via USB, as you would

normally, with the keyboard, mouse, and monitor connected directly
to the computer.

4. Take the USB cable attached to the KVM Switch and connect it to an

available USB port on your computer.

5. Your computer should detect and identify the KVM Switch as a

generic mouse and keyboard. Manually install the HID device driver
by selecting “Next” through the Windows Hardware Wizard until the
HID devices are completely installed (the KVM Switch will install
four devices if not previously installed on your system: a HID
keyboard, a HID mouse, a generic keyboard, and a generic mouse).
The driver installation only needs to be done once for each computer;
the KVM Switch will be enumerated automatically in the future.
When driver installation is complete, power down the computer and
disconnect the keyboard, mouse, and monitor.

6. Connect the male VGA HDDB15 connector located on one end of

the KVM cable to the VGA port on the computer.

7. Repeat steps 1 through 6 for each additional computer you wish to

connect to the KVM Switch via USB.

Note: For USB Installation
We recommend you attach the KVM cable directly to a free USB port on
your computer, not through a USB hub.

console

USB

flash

bank

select

reset

PS/2

daisy chain OUT

daisy chain IN

CPU 01/02

CPU 03/04

CPU 05/06

CPU 07/08

90-264 VAC. 47-63 Hz

1   2  3   4

USB connection

P74042_F1DE108E_man.qxd  5/6/02  10:06 AM  Page 12

Summary of Contents for OMNIVIEW F1DE108B

Page 1: ...13 OmniView 8 Port KVM Switch with Quad Bus Video Technology ENTERPRISE Series F1DE108B P74042_F1DE108E_man qxd 5 6 02 10 06 AM Page 1...

Page 2: ...itch designed to outperform any other switch on the market The KVM Switch is engineered to work with the most advanced server room and laboratory environments offering PS 2 and USB mix and match suppo...

Page 3: ...or input device BANK The address of a KVM when used in a daisy chain configuration BANK numbers range from 0 to 15 typically set by adjusting the DIP Switch to the appropriate setting Console The keyb...

Page 4: ...o use either USB or PS 2 type keyboard and mouse to control computers via either their USB or PS 2 interfaces Video Resolution The KVM Switch offers support for video resolutions up to 2048x1536 85Hz...

Page 5: ...quires a specialized Belkin ENTERPRISE Series Dual Port KVM Cable One Dual Port KVM Cable connects two servers per KVM port OmniView ENTERPRISE Series Dual Port KVM Cables F1D9400 XX PS 2 style 6 10 1...

Page 6: ...direct access port selectors The lengths of the cables attached to your keyboard monitor and mouse The location of your computers in relation to your console and The lengths of the cables you use to...

Page 7: ...erver you wish to connect INSTALLATION SPECIFICATIONS Part No F1DE108B Power 100 240VAC 47 63Hz single phase Daisy Chain Maximum of 16 BANKs Max Number of PCs 8 per BANK F1DE108B 128 total Keyboard Em...

Page 8: ...er should detect and identify the KVM Switch as a generic mouse and keyboard Manually install the HID device driver by selecting Next through the Windows Hardware Wizard until the HID devices are comp...

Page 9: ...up to four consoles When daisy chained together each unit is referred to as a BANK and is assigned an address The KVM Switch that the Console keyboard mouse and monitor is connected to is referred to...

Page 10: ...nits Cautions and Warnings Never connect Daisy Chain IN to Daisy Chain IN or Daisy Chain OUT to Daisy Chain OUT This may produce unpredictable results and may cause damage to the KVM Switch console US...

Page 11: ...ictable interactions caused by connecting an improperly configured BANK 00 to a daisy chain POWERING UP THE SYSTEMS Once all cables have been connected power up the connected computers All computers c...

Page 12: ...sition from Static to Select mode but the port selection LEDs and the 7 segment LEDs will change to indicate the transition 2 If the AutoScan button is pressed the KVM Switch will beep and enter AutoS...

Page 13: ...lected port and the 7 segment LED will indicate AF Access Failure On a daisy chained KVM Switch pressing any button on the front panel will exit AutoScan mode and return to Select mode AutoScan mode w...

Page 14: ...e line The scroll wheel on the mouse can also be used to perform this function The up down double arrows to the right of the computer list scroll the list up and down one page at a time The Page Up an...

Page 15: ...e status of the current mouse connection and is updated in real time If the connection to the computer is via a PS 2 cable a small mouse icon is displayed If the mouse connection to the computer is vi...

Page 16: ...e is arbitrary text purely for organizational purposes The group name can be up to eight alphanumeric characters and is assigned by the KVM administrator The default group name of a computer is Group...

Page 17: ...telliView which will present the user with the login dialog box The User accounts defined in the KVM Switch can be used by individuals or groups of individuals the names of the users are fixed Group C...

Page 18: ...the user after a specified period 1 99 minutes of Console inactivity Generally this will return the KVM Switch to Guest level access but if guest access has been disabled all access rights will be re...

Page 19: ...screens will have the familiar format of title bar and window body which will contain the text of the message There will also be appropriate response controls such as OK and Cancel buttons based on th...

Page 20: ...0 Me NT XP Linux and Mac OS Q What does flash upgradeable mean A With flash upgrade capability you can update your KVM Switch at any time through a simple parallel connection Internet upgrade capabili...

Page 21: ...elkin dealer agent or employee is authorized to make any modification extension or addition to this warranty BELKIN IS NOT RESPONSIBLE FOR SPECIAL INCIDENTAL OR CONSEQUENTIAL DAMAGES RESULTING FROM AN...

Page 22: ...elkin Components 501 West Walnut Street Compton CA 90220 USA Tel 310 898 1100 Fax 310 898 1111 2002 Belkin Components All rights reserved All trade names are registered trademarks of respective manufa...

Reviews: