background image

Hardware Installation  

(continued)

11.

You can now power up all of your computers simultaneously. The first computer 

will show up on the monitor. Check to see if the keyboard and mouse work, as 
well as the image displayed on the screen. If this is okay, press the SELECT 
button and check the functionality of the other computers. If you find any errors, 
double-check all of the cable connections.

NOTE: Avoid pressing any keys on the keyboard or moving the mouse if the currently
selected port has a computer that is in the process of booting up.   This may cause the
computer to not detect, or initialize the keyboard or mouse drivers properly.
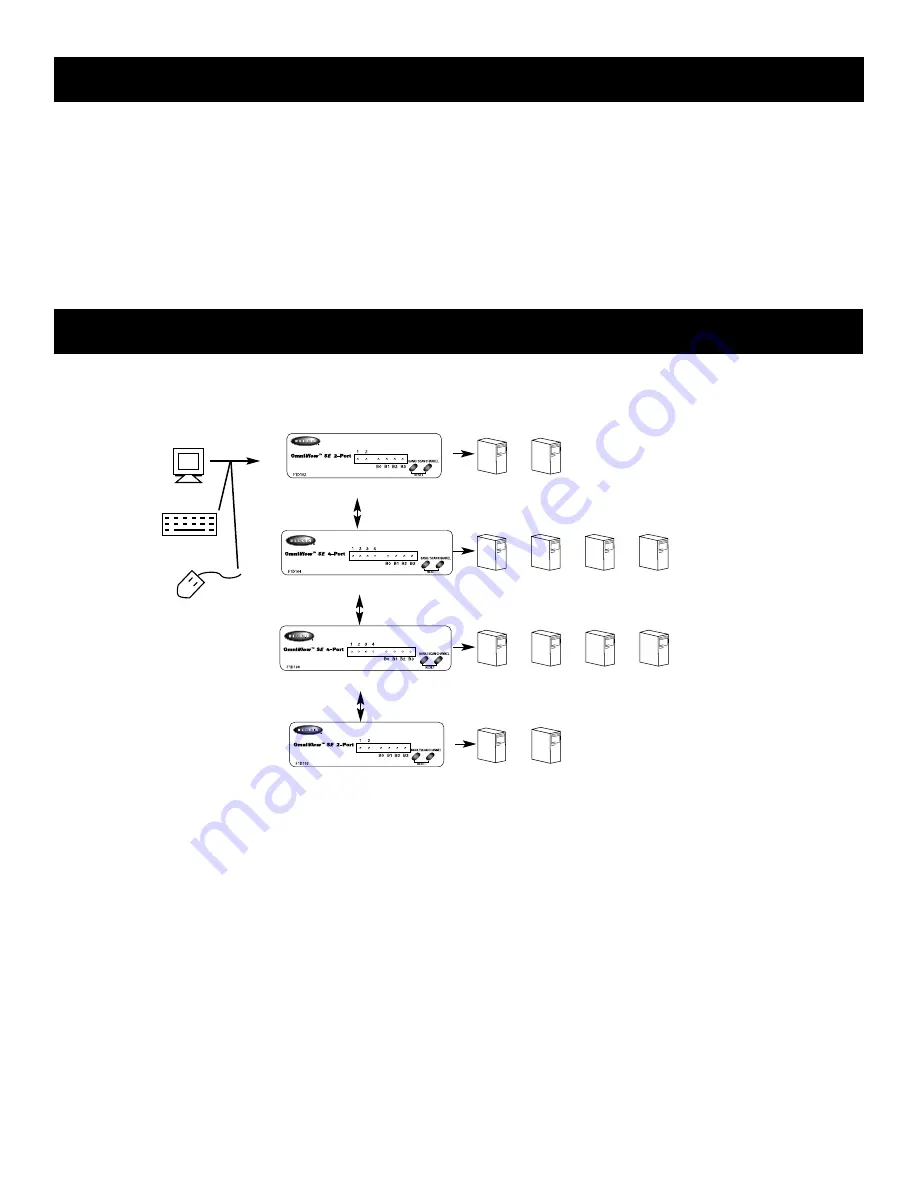
The 

Omni

View

SE has the capability to be daisy-chained to additional units for

control over more computers. Up to four 

Omni

View

SE units can be daisy chained

together, whether 2-Port, 4-Port, or a mixture of both. The example above shows two

Omni

View

SE 2-Port units and two 

Omni

View

SE 4-Port units daisy chained

together. 

Each 

Omni

View

SE unit is defined as a "BANK." See diagram above for more

information.  BANK numbers range from 0 to 3 for a total of 4 BANKs. BANK 0 is the
MASTER bank, while banks 1 through 3 are slave banks. The MASTER bank is the unit
that connects to the console keyboard, mouse, and monitor.  

The DIP switches must be set correctly for proper identification and usage. See 
page 6 for the actual settings. 

If you are using the OmniView

SE in a single-unit

configuration, it must be set as the MASTER (BANK 0).  If it is to be used as a slave
unit, then it must be set to any unused unique bank number from 1 through 3.

CONSOLE

Keyboard, mouse

and monitor

Bank 0 (Master)

Bank 1 (slave)

Bank 2 (slave)

Bank 3 (slave)

1

2

3

4

5

6

7

8

9

10

11

12

(SKIP IF YOU HAVE ONLY ONE Omni

View

SE)

Daisy-Chained Operation

8

Summary of Contents for OmniView F1D104

Page 1: ...The OmniView SE 4 Port User Manual P72464 F1D104 The OmniView SE 4 Port User Manual...

Page 2: ...r to control four computers from one keyboard mouse and monitor Integrated Mouse Conversion Technology allows connection of AT style computers that have serial mouse ports while using a PS 2 mouse onl...

Page 3: ...HDDB15 female Computer Port Connectors Keyboard 6 pin Mini DIN female Mouse 6 pin Mini DIN female for PS 2 mouse DB9 male for serial mouse Monitor HDDB15 male Dimensions Width 9 5 237 mm Height 2 3 58...

Page 4: ...serial mouse connector CONSOLE connectors Keyboard connector PS 2 mouse connector VGA monitor connector PC PORT connectors Serial mouse output Keyboard output PS 2 mouse output VGA signal output FRONT...

Page 5: ...female with thumbscrews Part F2N025 XX T Serial extension cable for serial mouse DB9 male female with thumbscrews Part F2N209 XX T AT keyboard cable for AT style keyboard port 5 pin DIN male male Par...

Page 6: ...be held responsible for damage caused Hardware Installation 3 Connect the monitor to the OmniView SE Using the attached cable or the one included with your monitor connect it to the HDDB15 female por...

Page 7: ...computer s VGA cable to the OmniView SE Using the VGA cable Belkin Part F2N025 XX T or A3H981 XX connect the male end of the cable to the VGA port on the computer and the female end on the PC1 VGA por...

Page 8: ...keyboard port on the computer and the other end to the PC1 keyboard port on the back of the OmniView SE If your computer has an AT style keyboard port you will need a PS 2 AT keyboard adapter Belkin...

Page 9: ...can be daisy chained together whether 2 Port 4 Port or a mixture of both The example above shows two OmniView SE 2 Port units and two OmniView SE 4 Port units daisy chained together Each OmniView SE...

Page 10: ...is used as MASTER all of the other OmniView units in the chain will benefit from the On Screen Display of the MASTER OmniView PRO When the OmniView PRO is used as the MASTER unit 15 more OmniView unit...

Page 11: ...other end of the cable connects to the Master Input Slave Output port of the MASTER such as cable 1 in the diagram above If the previous unit is a slave then the other end goes to the Slave Input port...

Page 12: ...Cable 1 Cable 2 Cable 3 MASTER Bank 0 slave Bank 2 slave Bank 3 Daisy Chaining the OmniView SE slave Bank 1 11 Daisy Chained Operation continued...

Page 13: ...t Y on BANK X x 0 3 y 1 4 Selecting which computer to operate can be done either by the SELECT button or through keyboard Hot key commands You will notice that after the OmniView SE switches to anothe...

Page 14: ...ching to the next Set DIP switches 1 2 using the table below according to a SCAN_TIME interval you prefer If there are slave units present the SCAN_TIME setting is set on the MASTER unit only and need...

Page 15: ...r switch is on RESET the OmniView SE by simultaneously pressing the BANK SCAN and CHANNEL buttons on the front panel Do not press any keys on the keyboard while the selected computer is booting up Thi...

Page 16: ...e generic PS 2 mouse drivers Non standard mice often use non PS 2 proprietary mouse protocol Make sure you do not have any mouse drivers loaded in your config sys or autoexec bat files Avoid moving th...

Page 17: ...Avoid moving the mouse or pressing the mouse buttons when switching ports Reset the mouse to resume proper mouse movement simply by unplugging the mouse from the OmniView SE for about 2 3 seconds and...

Page 18: ...lkin will at its option repair or replace the product at no charge provided it is returned during the warranty period with transportation charges prepaid to the authorized Belkin dealer from whom you...

Reviews: