P75193ec
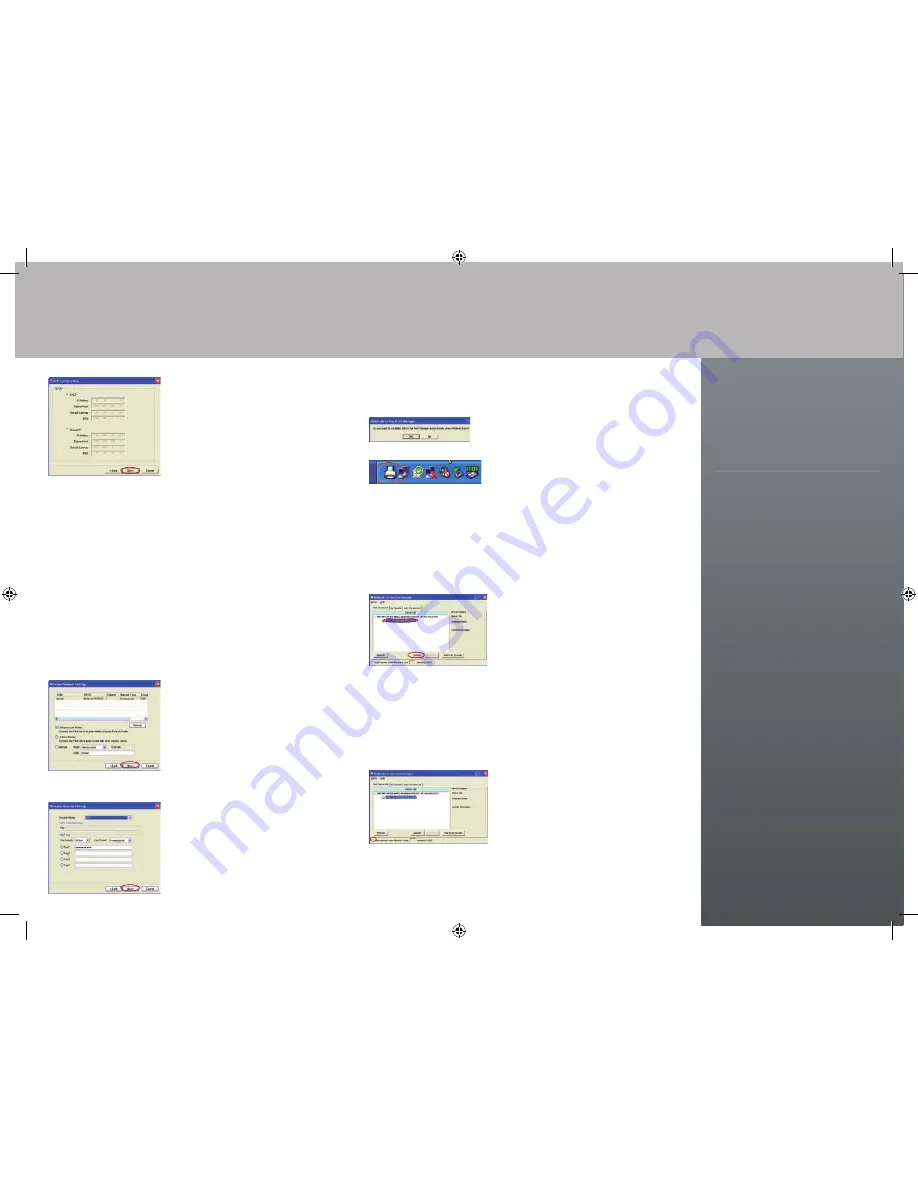
2.9 Click “Next” to set up the IP address of
the Print Server.
NOTE: In “DHCP” mode, the Print Server
will be assigned an IP address if you use
a Belkin Router as your Dynamic Host
Configuration Protocol (DHCP) server.
The newly assigned TCP/IP settings
will be displayed in the “TCP/IP
Configuration” window; click “Next”
again to continue. If the DHCP server is
unavailable or not found, the user will
be prompted to configure the TCP/IP
settings of the Print Server manually.
Unless changed, the default IP address
of the Print Server in the “Manual IP”
mode will be “192.168.2.253”.
Step 3. Configure
Configure your Wireless Settings
3.1 The default wireless setting is “Auto”
mode. The Print Server will detect a
connection to a wired LAN network
through the attached Ethernet cable. If
the Print Server is connected to a wired
network, it will work in that network.
To enable wireless mode, disconnect
the Ethernet cable upon completion of
the configuration process. Please note,
however, that the Ethernet cable must
stay plugged in during setup.
3.2 The “Wireless Network Settings” screen
of the Print Server will automatically scan
the wireless networks nearby. Select the
wireless network to which you would like
to connect and click “Next”. Alternatively,
you can manually enter the wireless
network information (“Manual” mode).
The default wireless settings are
as follows:
Mode: Infrastructure
SSID: Default
Channel: 11
3.3 If you choose to connect to an encrypted
network, the “Wireless Security
Settings” screen will appear. Select
“Security Mode” and enter the security
settings of your wireless network.
You can select one of several security
settings: “None”, “WEP”, or “WPA” with
cipher mode “TKIP” or “AES”.
3.4 The configurations are now finished. Click
“Finish” to confirm your new settings.
3.5 Click “Finish” to complete the installation.
3.6 Indicate whether or not you want to run
the Belkin All-In-One Print Manager utility
automatically when Windows starts. We
recommend that you do this.
You will now start seeing the Print Server logo on
your computer’s system tray.
Now, to enable the wireless functionality of your
Print Server, disconnect the Ethernet cable
between your Print Server and your router.
Step 4. Install Print Drivers
Install MFP or Standard-Printer Drivers
When the Print Server installation is complete, the “All-In-One Print Manager” window
will appear. It displays a list of All-In-One Print Servers. Once an MFP or standard printer
is connected to the Print Server via a USB cable, the All-In-One Print Manager will
automatically display its name in the Server List.
4.1 Click on the printer and click “Connect”.
Follow the instructions on your screen to
install the drivers for your MFP or to bind the
already-installed MFP drivers/utilities with
the Print Server. You may need to insert your
MFP or standard-printer driver CD. For more
information, please refer to the “Installing
the MFP Drivers/Utilities” section of your
Wireless G All-In-One Printer Server User
Manual (on the included CD-ROM).
NOTE: Before connecting an MFP or standard
printer via a USB cable, please read the
printer’s user manual. Some MFPs and
standard printers require users to install
drivers/utilities
before connecting the printer
to the computer. Some MFPs and standard
printers require users to connect the MFP to
the computer
during installation.
4.2 After the MFP or standard-printer driver
installation is complete, please check the
“Auto release when idle time is over” option
in the Belkin All-In-One Print Manager
screen with a 5-minute idle time-out setting.
Congratulations. You are now ready to start sharing the print, scan, card-reader, and fax
functionality of your all-in-one printer.
part#: F1UP0002
© 2006 Belkin Corporation. All rights reserved.
All trade names are registered trademarks of
respective manufacturers listed. Windows is
either a registered trademark or trademark of
Microsoft Corporation in the United States and/or
other countries.
United Kingdom
http://www.belkin.com/uk/
Click on Support Centre
> Networking Support
0845 – 607 77 87
Support
Belkin provides free technical support via
phone and the Web. However, we encourage
you to attempt Steps 1 and 2 before contacting
us. The Setup Assistant has built-in intelligence
to help diagnose and fix common problems.
If you’re still having trouble, please contact
Belkin Support.


