


9
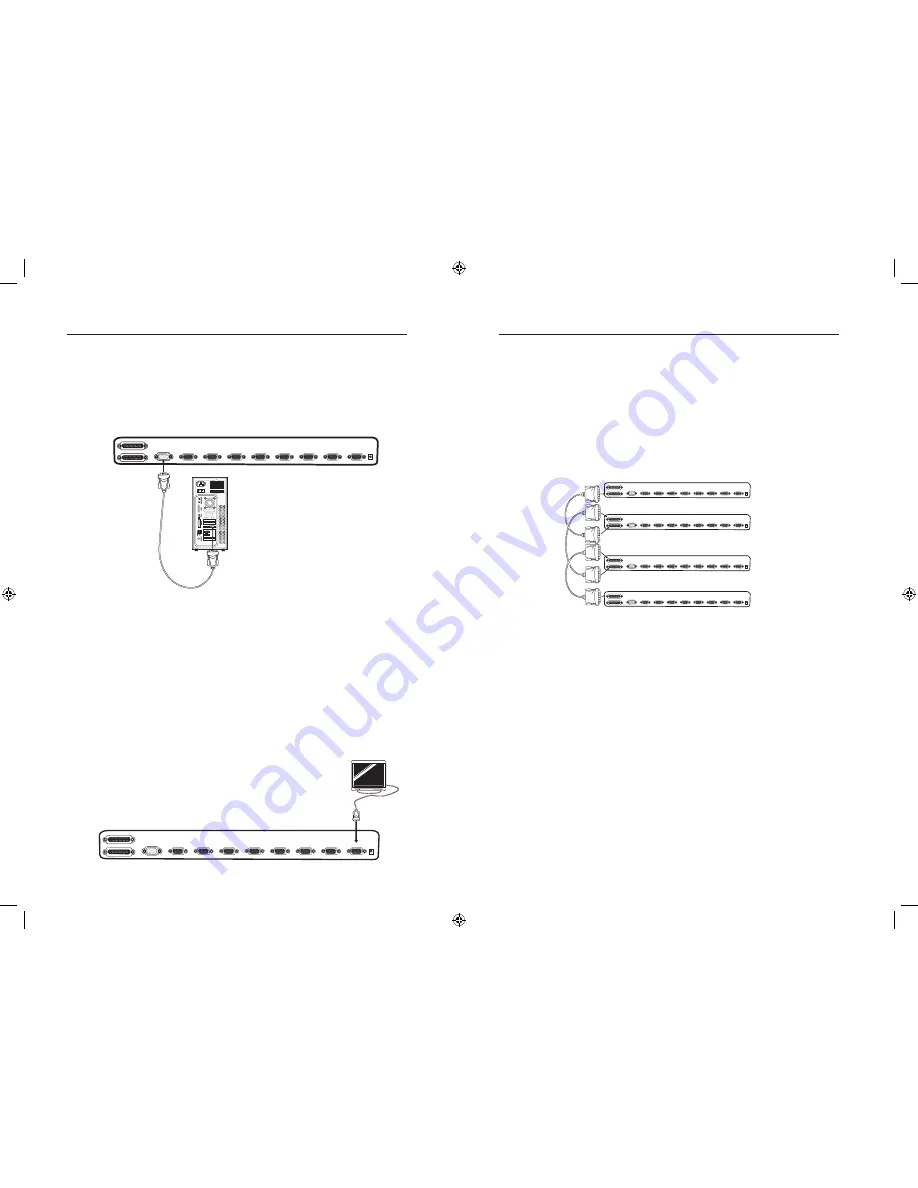
Multiple Splitters – Installation
You can daisy-chain up to four Splitters together, giving you the ability to
view a maximum of 32 monitors. When daisy-chained together, the master
Splitter will control all reset and power functions.
Note: A daisy-chain cable (F1D108-CBL) is required to daisy-chain each
Splitter and is available through your Belkin reseller or online at belkin.com.
Example of Daisy-Chain Configuration
Before you begin:
1.
Make sure all monitors are powered off.
2.
Place all primary and secondary splitters in the desired locations.
3.
Connect the power supplies to the Splitters being used.
4.
Connect the monitors to the Splitters as previously described for a
standalone configuration.
Connecting the Daisy-Chain Cable
5.
Using the daisy-chain cable (F1D108-CBL), connect one end to the
“VIDEO OUT” port on the first Splitter.
6.
Connect the other end of the daisy-chain cable to the “VIDEO IN” port
on the second Splitter.
**** Caution and Warning ****
Never connect “VIDEO IN” to “VIDEO IN” or “VIDEO OUT” to “VIDEO
OUT”. This may produce unpredictable results and may cause damage to
the Splitter.
Connecting the Computer to the Splitter
1.
Make sure your computer is powered off.
2.
Using the OmniView Video Extension Cable (F1D9003-XX), connect the
HDDB15 male type connector to the video card on your computer.
3.
Connect the HDDB15 female type connector to the input port on
your Splitter.
4.
Boot up your computer.
Connecting Monitors to the Splitter
1.
Make sure your monitor is powered off.
2.
Connect the HDDB15 male type connector of your monitor to the
HDDB15 female type connector output port on your Splitter.
3.
Turn on your monitor.
Repeat steps 1-3 for each additional monitor you wish to connect.
VGA 7
VGA 6
VGA 5
VGA 4
VGA 3
VGA 2
VGA 1
VGA IN
VIDEO IN
VIDEO OUT
VGA 8
VGA 4
VGA 3
VGA 2
VGA 1
VIDEO IN
VIDEO IN
VIDEO OUT
VGA 7
VGA 6
VGA 5
VGA 4
VGA 3
VGA 2
VGA 1
VGA IN
VIDEO IN
VIDEO OUT
VGA 8
VGA 4
VGA 3
VGA 2
VGA 1
VIDEO IN
VIDEO IN
VIDEO OUT
8
VGA 7
VGA 6
VGA 5
VGA 4
VGA 3
VGA 2
VGA 1
VGA IN
VIDEO IN
VIDEO OUT
VGA 8
VGA 7
VGA 6
VGA 5
VGA 4
VGA 3
VGA 2
VGA 1
VGA IN
VIDEO IN
VIDEO OUT
VGA 8
VGA 7
VGA 6
VGA 5
VGA 4
VGA 3
VGA 2
VGA 1
VGA IN
VIDEO IN
VIDEO OUT
VGA 8
VGA 7
VGA 6
VGA 5
VGA 4
VGA 3
VGA 2
VGA 1
VGA IN
VIDEO IN
VIDEO OUT
VGA 8
VGA 4
VGA 3
VGA 2
VGA 1
VIDEO IN
VIDEO IN
VIDEO OUT
VGA 4
VGA 3
VGA 2
VGA 1
VIDEO IN
VIDEO IN
VIDEO OUT
VGA 4
VGA 3
VGA 2
VGA 1
VIDEO IN
VIDEO IN
VIDEO OUT
VGA 4
VGA 3
VGA 2
VGA 1
VIDEO IN
VIDEO IN
VIDEO OUT
Installation
Installation
8-9
15/11/04 3:02:58 pm


