


10
- Belinea 10 18 30
DEUTSCH
TECHNISCHE DATEN
LCD-Panel
18,1 Zoll Bilddiagonale (45,97 cm sichtbar),
strahlungsarm nach TCO 99, Antireflexbeschichtung,
Kontrastverhältnis 350:1 (typisch),
Sichtwinkel vertikal 160
°
, horizontal 160
° (
typisch bei Kontrastverhältnis 10:1)
Eingangssignal
DSUB (15-polig) und DVI-D / DVI-I
Bildschirmfarben
16,7 Mio. Farben
Synchronisierung
30 - 82 kHz horizontal
56 - 76 Hz vertikal
Bandbreite
135 MHz
Auflösung
max. 1280 x 1024 Punkte
Lautsprecherleistung
Verstärker:
2 Watt bei 8 Ohm / 1 KHz - 15 KHz
Lautsprecher: 1 Watt Dauerbelastung, 2 Watt Spitzenleistung
Netzanschluß
100 - 240 V~, 50 - 60 Hz
Leistungsaufnahme
max. 60 W (Off-Status: < 2 W)
Stromsparfunktionen nach EPA
Abmessungen
Breite 402 mm, Höhe 424 mm, Tiefe 184 mm (netto)
Gewicht
9,0 kg (netto)
Umgebungsbedingungen
Betrieb: 0 bis 40
°
C, r. L. 20 - 95 % (nicht kondensierend)
Lagerung: -20 bis 60
°
C, r. L. 20 - 95 % (nicht kondensierend)
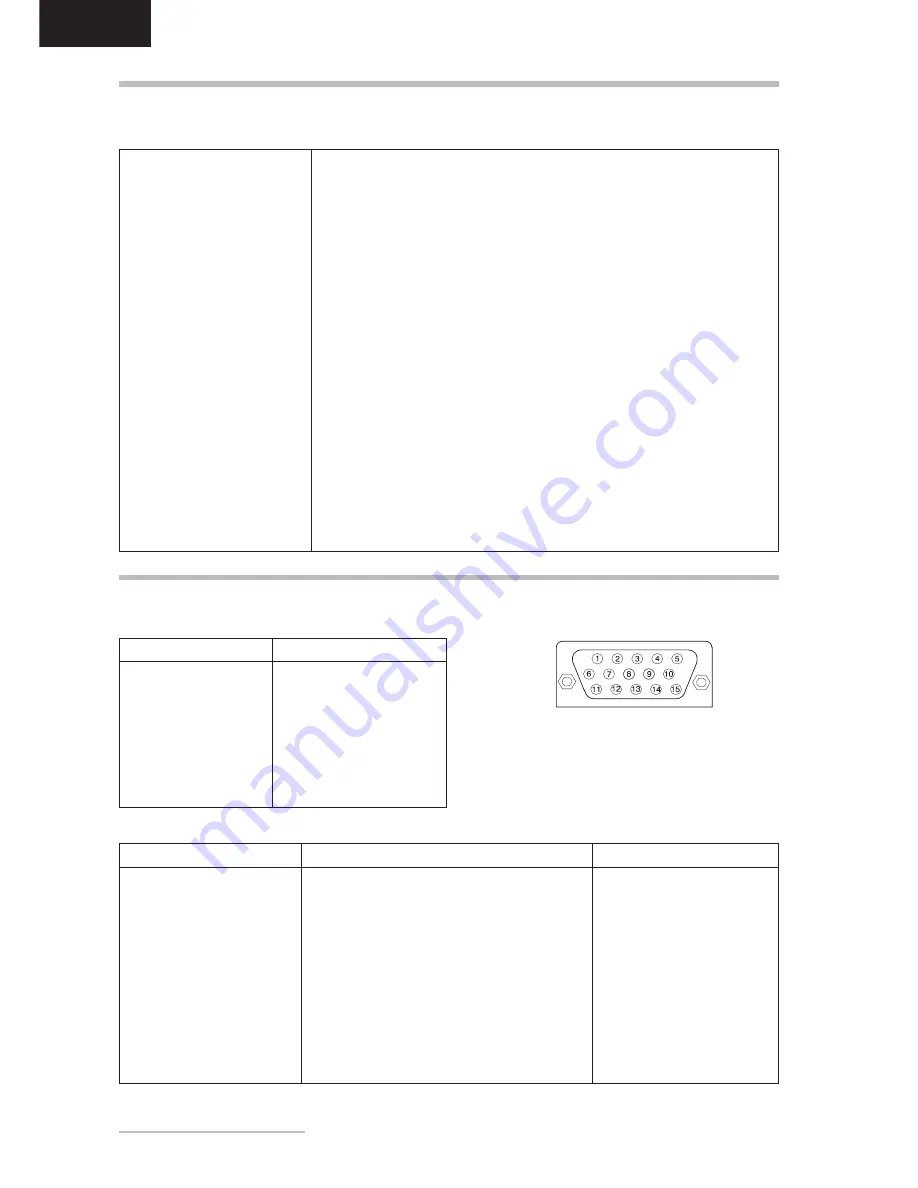
STIFTBELEGUNG DES SIGNALSTECKERS
15poliger D-SUB-Stecker
Stift Belegung
1
Rot
2
Grün
3
Blau
4
Masse
5
Nicht belegt
6
Masse Rot
7
Masse Grün
8
Masse Blau
Stift Belegung
9
+ 5V DDC
10
Masse
11
Masse
12
SDA (DDC Data)
13
Hor. Synch.
14
Vert. Synch.
15
SCL (DDC Clock)
Stift Belegung
1
TMDS data2-
2
TMDS data2+
3
TMDS data2/4 shield
4
TMDS data4-
5
TMDS data4+
6
DDC Clock
7
DDC Data
8
Analog Vertical Sync.
9
TMDS data1-
10
TMDS data1+
11
TMDS data1/3 shield
12
TMDS data3-
24poliger DVI-Stecker
Stift Belegung
13
TMDS data3+
14
+ 5V Power
15
Masse (Return für + 5V und H/V sync)
16
Hot plug detect
17
TMDS data0-
18
TMDS data0+
19
TMDS data0/5 shield
20
TMDS data5-
21
TMDS data5+
22
TMDS clock shield
23
TMDS clock+
24
TMDS clock-
Stift Belegung
C1
Analog Red
C2
Analog Green
C3
Analog Green
C4
Analog Hor. Sync.
C5
Analog Vert. Sync.


