


DCX XCONNECT CABINET: SYSTEM
PX106864 - EN REV A
Page 40 of 48
INSTALLATION GUIDE
9.DCX Horizontal Rear Channel kit installation
Before proceeding with the installation of the Rear Channel Kit, make sure to install (or determine the position of) the DCX Housings that will be
used into the Cabinet. For more information concerning on how to install the Housing, refer to the Quick Start Guide document
PX106856
or visit
our website at:
www.belden.com/dcx
1
.
Depending on the cable flow of the Cabinet used, select the required Rear Channel Kit:
● For the left to right Cabinet (
LR
), the Rear Channel Kit to install is
DCX-HRRC-LR01
● For the right to left Cabinet (
RL
), the Rear Channel Kit to install is
DCX-HRRC-RL01
2
.
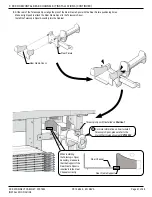
On the Housing installed determine the position to place the Rear Channel.
Place the Rear Channel to the associated position and secure the Rear Channel with the (3) provided screws.
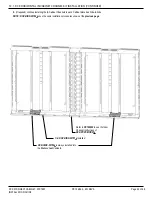
R
ear view of an
LR
Cabinet, Housings are not shown on this image.
Position 1
(chosen for this example)
to install Rear Channel
Position 2
to install Rear Channel
Position 3
to install Rear Channel
Position 4
to install Rear Channel
Position 5
to install Rear Channel
Position 6
to install Rear Channel
Position 7
to install Rear Channel
Position 8
to install Rear Channel
Position to tighten the screws
provided