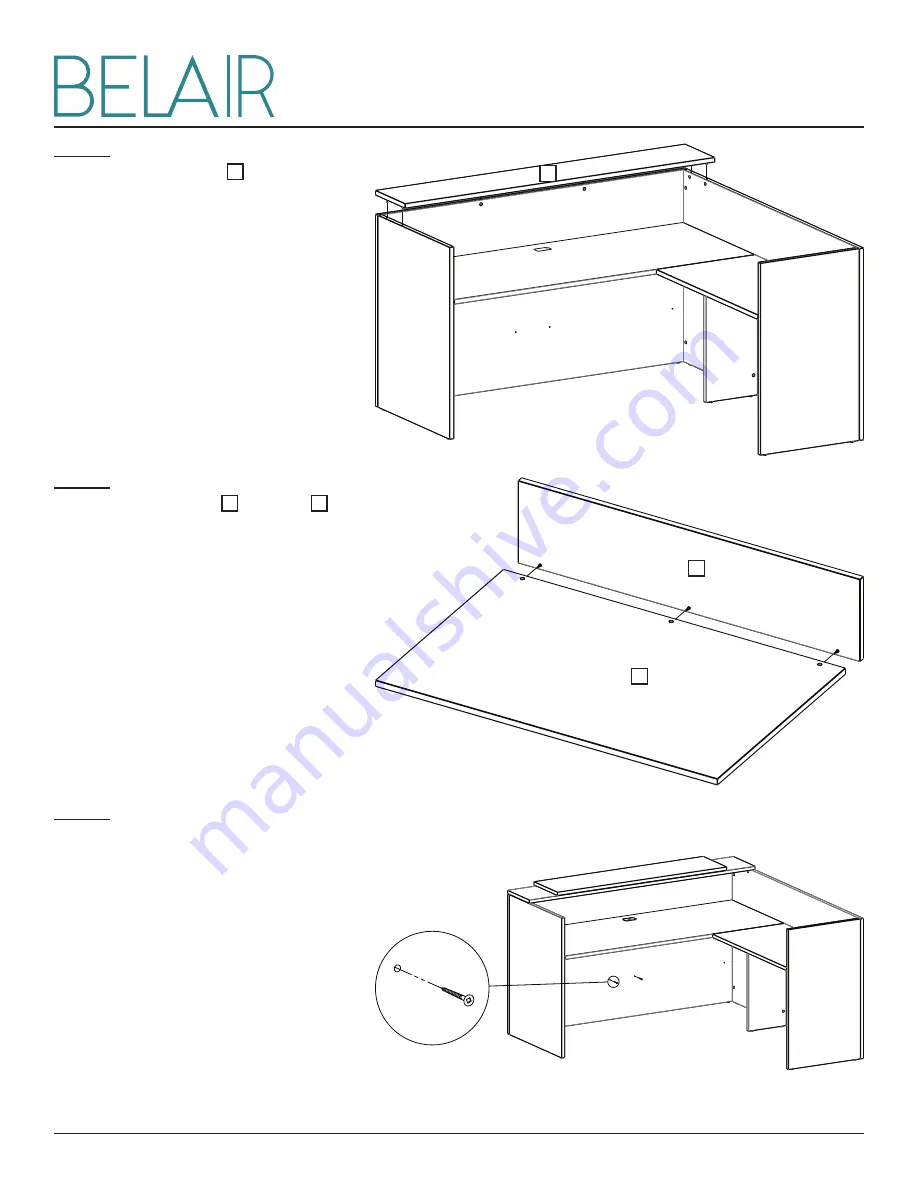
Belair W-01L Assembly Instructions Manual Download Page 4

W-01L

4

STEP 7

Attach transaction top  F  to desk back. 
Fasten pins and cams.

STEP 8

Connect waterfall top  I  and back  J  as 
shown. Fasten pins and cams.

STEP 9

Place waterfall on center of transaction 
top and secure with screws through 
large back.

F

J

I

Summary of Contents for W-01L

Page 1: ... provided and tools recommended to avoid any product faults Always assemble product on a clean soft surface to avoid scratching PARTS INCLUDED HARDWARE INCLUDED TOOLS REQUIRED 33X 33X 27X 4X 12X 3X 2X 1X 2 Phillips Screwdriver 2 Robertson screwdriver ASSEMBLY INSTRUCTIONS A B C D E F G H I J ...

Page 2: ...mbly Attach desk top A and left gable C as shown Fasten pins and cams STEP 2 Lay desk back B flat and lower top and gable onto back as shown Fasten pins and cams Flip desk right side up and proceed to return assembly STEP 3 Attach return top G and right gable E as shown Fasten pins and cams A C B G E ...

Page 3: ...ck D flat and lower top and gables onto back Fasten pins and cams and flip unit right side up STEP 6 To connect the desk and return insert green lockdowels into the edge of the desk top Line lockdowels with the slots in the return back Slide the return back into the desk back Fasten pins and cams H D ...

Page 4: ...transaction top F to desk back Fasten pins and cams STEP 8 Connect waterfall top I and back J as shown Fasten pins and cams STEP 9 Place waterfall on center of transaction top and secure with screws through large back F J I ...

Page 5: ...W 01L 5 STEP 10 Secure desk return top to desk top with connecting flat brackets as shown STEP 11 Use cover caps to cover any visible cams and screws ...

Page 6: ... provided and tools recommended to avoid any product faults Always assemble product on a clean soft surface to avoid scratching PARTS INCLUDED HARDWARE INCLUDED TOOLS REQUIRED 33X 33X 27X 4X 12X 3X 2X 1X 2 Phillips Screwdriver 2 Robertson screwdriver ASSEMBLY INSTRUCTIONS A B C D E F G H I J ...

Page 7: ...mbly Attach desk top A and right gable C as shown Fasten pins and cams STEP 2 Lay desk back B flat and lower top and gable onto back as shown Fasten pins and cams Flip desk right side up and proceed to return assembly STEP 3 Attach return top G and left gable E as shown Fasten pins and cams A C B G E ...

Page 8: ...ck D flat and lower top and gables onto back Fasten pins and cams and flip unit right side up STEP 6 To connect the desk and return insert green lockdowels into the edge of the desk top Line lockdowels with the slots in the return back Slide the return back into the desk back Fasten pins and cams H D ...

Page 9: ...transaction top F to desk back Fasten pins and cams STEP 8 Connect waterfall top I and back J as shown Fasten pins and cams STEP 9 Place waterfall on center of transaction top and secure with screws through large back F J I ...

Page 10: ...W 01L 5 STEP 10 Secure return top to desk top with connecting flat brackets as shown STEP 11 Use cover caps to cover any visible cams and screws ...

Reviews: