background image

13 / 17  EN

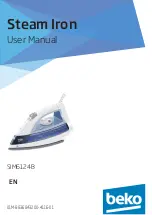
Steam Iron / User Manual

A

W A R N I N G : 

During ironing if the 

thermostat indicator 

light (11) turns on, 

before proceeding 

with the shock steam 

process wait for the 

light to turn off.

A

WARNING:

 Never 

direct this steam to 

people or pets.

3.9 Spraying water

1. Fill the water reservoir (see. 3.3).

2. Set the temperature (see. 3.5).

3. Press the water spraying button 

(10) to spray water.

C

You can easily 

remove creases 

using the water 

spraying feature.

3.10 Dry ironing

In order to make dry ironing, set 

the steam setting button (8) to the 

OFF “ ” position.

C

Having water in the 

appliance would be 

advantageous; you 

may use the water 

spraying button (10) 

when necessary.

3.11 Automatic 

Shutdown (Auto-Off)


If the appliance is stationary for 

30 seconds while in horizontal 

position, it will be automatically 

turned off.


If the appliance is stationary for 

7-10 minutes while in upright 

position, it will be automatically 

turned off.


If the appliance is stationary for 

30 seconds while in a leaned 

(right or left) position, it will be 

automatically turned off.

C

In case of automatic 

turn off the auto-off 

light (11) flashes.


If the appliance is moved in a 

horizontal position it will turn on. 

C

It may take 60 seconds 

for the soleplate (5) to 

reach the previously 

set temperature.

3

 Operation

Summary of Contents for SIM6124B

Page 1: ...SIM6124B 01M 8836843200 4116 01 Steam Iron User Manual EN ...

Page 2: ...as a reference for future use If you handover the product to someone else give the user manual as well Follow all warnings and information in the user manual Meanings of the symbols Following symbols are used in the various section of this manual C Important information and useful hints about usage A WARNING Warnings for dangerous situations concerning the safety of life and property WARNING Warni...

Page 3: ... 9 2 2 Technical data 9 3 Operation 10 13 3 1 Intended use 10 3 2 Initial use 10 3 3 Refilling the water reservoir 10 3 4 Setting the temperature 10 3 5 Temperature and steam settings table 11 3 6 Steam ironing 11 3 7 Shock steam 12 3 8 Vertical steam 12 3 9 Spraying water 13 3 10 Dry ironing 13 3 11 Automatic Shutdown Auto Off 13 4 Cleaning and maintenance 14 15 4 1 Cleaning 14 4 2 Lime removal S...

Page 4: ...ppliance can be used by children aged from 8 years and above and persons with reducedphysical sensory ormentalcapabilities or lack of experience and knowledge if they have been given supervision or instruction concerning use of the appliance in a safe way and understand the hazards involved Children should not play with the appliance Cleaning and user maintenance procedures should not be performed...

Page 5: ...eapplianceifthepowercableorthe applianceitselfisdamaged Contactanauthorised servicecentre If the appliance is dropped or leaks water or has other failures contact an authorised service centre Donotusetheapplianceuntilitisrepaired When the appliance is not in use or left to cool down keep the appliance and power cable out of reachofchildrenunder8yearsold Theapplianceisnotsuitableforusingoutdoors On...

Page 6: ...utlet only Donotusetheappliancewithanextensioncord Do not pull the power cable when unplugging the appliance Unplug the appliance before cleaning it Do not wrap the cable around the appliance Do not touch the appliance or its plug with wet ordamphandswhentheapplianceispluggedin The soleplate and its surrounding area can be extremely hot Contacting hot surfaces may cause burns Therefore while or ju...

Page 7: ...er wastes at the end of its service life Take it to the collection center for the recycling of electrical and electronic equipment Please consult your local authorities to learn about these collection centers 1 3 Compliance with RoHS Directive The product you have purchased complies with EU RoHS Directive 2011 65 EU It does not contain harmful and prohibited materials specified in the Directive 1 ...

Page 8: ...ed Colour of the replacement fuse cover must be the same colour as that visible on the pin face of the plug Fuse covers are availabe from any good electrical store Fiting a different plug As the colours of the wires in the mains lead of this appliance may not correspond with the coloured markings identifying the terminals on your plug proceed as follows Brown cable L Live Blue cable N Neutral Gree...

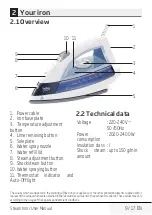
Page 9: ...y according to the usage of the appliance and ambient conditions 2 Your iron 1 Power cable 2 Iron base plate 3 Temperature adjustment button 4 Lime removing button 5 Soleplate 6 Water spray nozzle 7 Water refill lid 8 Steam adjustment button 9 Shock steam button 10 Water spraying button 11 Thermostat indicator and Auto Off light 2 2 Technical data Voltage 220 240V 50 60Hz Power consumption 2020 24...

Page 10: ... may form within the water reservoir this is normal 3 3 Refilling the water reservoir 1 Unplug the appliance 2 Steam setting button 8 off Set to position 3 Fill the water cup provided with the appliance 4 Open the water refill lid 7 and fill the appliance with water up to MAX level 5 Close the water refill lid 7 C Your appliance is designed for use with tap water If your tap water is excessively h...

Page 11: ...first check the label of the garment C If you don t know the fabric of your garment first iron an invisible part of your garment and determine a correct ironing temperature for it C In order to prevent bright stains that may form on synthetic fabrics such as silk iron on the reverse side of the fabric Do not use the water spraying feature in order to prevent the stain formation 3 6 Steam ironing 1...

Page 12: ...ter the thermostat indicator light 11 turns off you can iron the garments with the powerful steam by pressing the shock steam button 9 A WARNING If this process is maintained for a prolongedtimewater may come through the soleplate 5 together with steam C In order to maintain ideal shock steam quality set the steam setting button 8 to the OFF position A WARNING In order to use the shock steam featu...

Page 13: ... OFF position C Having water in the appliance would be advantageous you may use the water spraying button 10 when necessary 3 11 Automatic Shutdown Auto Off If the appliance is stationary for 30 seconds while in horizontal position it will be automatically turned off If the appliance is stationary for 7 10 minutes while in upright position it will be automatically turned off If the appliance is st...

Page 14: ...e removal Self Clean Lime removal function cleans the lime particles accumulated in the steam generator reservoir of the appliance Use this function once in every 2 to 3 weeks If the tap water is very hard if lime particles come out of the soleplate 5 of the appliance usethelimeremovalfunctionmore frequently 1 Unplug the appliance 2 Refill the appliance with water see 3 3 3 Steam setting button 8 ...

Page 15: ...ng time store it carefully Before lifting the appliance unplug it and then let it cool completely Empty the water reservoir Keep the appliance and its accessories in their original packages Store it in a cool dry place Alwayskeeptheapplianceoutof the reach of children 4 4 Handling and transportation During handling and transportation carry the appliance in its original packaging The packaging of t...

Page 16: ... the temperature setting button 3 in the clockwise direction up to the steam sign Seat the appliance in a vertical position and wait for the soleplate to heat up Waterdropsfalldownontothefabricduringironing You may not have securely closed the water refill lid 7 Close the water refill lid securely You may be using the shock steam at temperature level or Increase the temperature level see 3 7 Durin...

Page 17: ...ited Kingdom or Republic of Ireland Any parts removed during repair work or any product that has been replaced becomes our property The guarantee is not transferrable if the product is resold The Guarantee does not cover Transit installation or delivery damage Accidental damage Misuse or abuse Replacement of any consumable item or accessories These include but are not limited to plugs cables light...

Page 18: ......

Page 19: ......

Page 20: ...www beko co uk ...

Reviews: