background image

12 

I

EN

6.3.1-Switching the locations of the 

stored channels

Select the program you would like to 

relocate by pressing the 

Up/Down


or 

Left/Right

 navigation buttons. 

Press the 

“GREEN”

 button. The 

program you selected will appear in 

red. Highlight the program number 

you would like to relocate by 

pressing the 

Up/down

 or 

Right/

left

 navigation buttons. Finish the 

relocation process by pressing 

the 

“RED”

 button. To cancel 

relocating the channels, press the 

“GREEN”

 button. When you press 

“RED”

 button, the channel in the 

first program number you selected 

has been moved to your second 

selected program number and the channels 

between both program numbers have been 

shifted to the initially selected program 

number. After setting is complete, press 

EXIT

 button to exit the menu.

6.3.2-Deleting a stored channel

Select the program you would like 

to delete by pressing the 

up/down


or 

right/left

 navigation buttons. 

Press the 

“BLUE”

 button. You 

may perform the deletion process 

by pressing the 

“RED”

 button 

or you may abort the deletion 

process by pressing the 

“GREEN”


button. Once you pres the 

“RED”

 button, 

the selected program is deleted and all the 

following channels are transferred to previous 
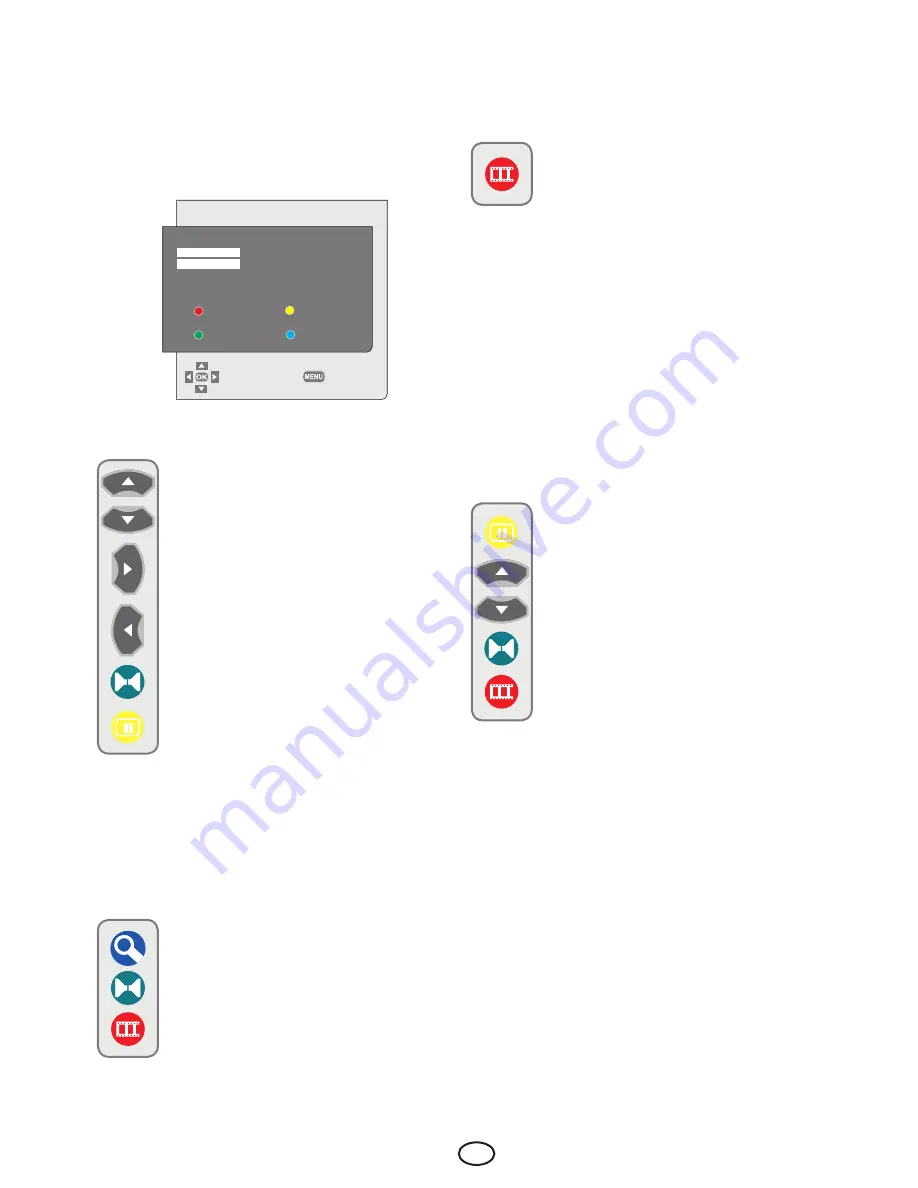
6.3-Program Table

Press the 

M

 button. Move to the 

PROGRAM 

TABLE

 tab by pressing the 

Down

 navigation 

button in Main Menu and confirm your 

selection with the 

OK

 button. Program Table 

menu will be displayed.

PROGRAM TABLE

00 

05 

10

01 CHANNEL

  06 

11

02 CHANNEL

  07 

12

03 

08 

13

04 

09 

14

SKIP

MOVE

NAME

DELETE

SELECT

BACK

program number. After setting is complete, 

press 

EXIT

 button to exit the menu.

6.3.3-Skipping a stored channel

In the event that you do not wish 

to see certain programs while 

navigating through the channels 

using the 

PR+/PR-

 buttons, then 

you can use this function. Select the program 

that will be hidden by pressing the 

up/down


or 

right/left

 navigation buttons. Press the 

“RED”

 button. The name of the program 

to be skipped will appear in red. You may 

perform this procedure for more than one 

programme. To view the skipped program, 

directly enter the program number using the 

numeric buttons. To cancel the program 

skipping process, press again the 

“RED”

” 

button. After setting is complete, press 

EXIT


button to exit the menu.

6.3.4-To name the channels

You can assign your program or 

programs of choice the names that 

have a maximum of five characters. 

Select the program you would like 

to name from the Program Table 

by pressing the 

up/down

 or 

right/

left

 navigation buttons. Press the 

“YELLOW”

 button. An empty 

space appears beside the channel 

for which you would like to specify 

name information. Here, choose 

the desired letter, number or sign 

using the 

up/down

 navigation buttons. 

For the second character, press the 

right


navigation button and then select the desired 

letter, number or sign again with the 

up/

down

 navigation buttons. After entering all 

the characters, store the name you have 

written in the memory by pressing the 

“RED”

 button. To write names for any of the 

other programmes, simply repeat the above 

procedure. To cancel the program naming 

process, press the 

“GREEN”

 button. If you 

want to exit the menu, simply press the 

EXIT


button. If the program is not named, then 

the channel number of that program will be 

displayed automatically.

Summary of Contents for LCD panel

Page 1: ... initial use 6 4 3 Batteries 6 5 Your new television 7 5 1 TV Control Panel 7 5 2 Rear and Side External Connections 7 5 3 Remote Control 8 6 Performing the initial power on settings 9 6 1 TV controls 9 6 2 Turning on the TV and Setting the Channels 10 6 3 Program Table 12 7 Settings of Your New Television 13 7 1 Sound Menu Settings 13 7 2 Picture Menu Settings 13 7 3 Features Menu Settings 15 8 T...

Page 2: ...t clean with a soft and dry cloth We recommend that you do not use patented polishes or solvents to clean the screen or cabinet since they may cause damage 1 2 Disposing of your TV at the end of service life The cold cathode fluorescent lamp found in your LCD screen contains a very small amount of mercury Once your TV set has completed its physical life please dispose of it in accordance with loca...

Page 3: ...pness feature and picture resolution LTI in black white transitions A clearer Picture made possible with a Digital Comb Filter DNR Noise reduction Manual fine tuning 100 Program memory Returning to the last viewed program by single button SWAP Infrared remote control equipped with all functions Feature of viewing the NTSC broadcast via scart input Easy performance of the processes with the advance...

Page 4: ...n the device The screen glass may break and cause serious injuries if something hits it 7 To ensure adequate ventilation please leave a clearance area of at least 10 cm around the television This clearance prevents the TV from overheating and consequently causing damage Using the device in dusty environments should also be avoided Never block the slots and openings by placing the TV on a bed sofa ...

Page 5: ...s of the lighter cable in a car then use the cable supplied with the product or another cable with equivalent properties Using an unsuitable cable may damage your appliance Lighter cable input is optional and is not available on all models Cable is an option It is not supplied with every model If your product does not contain a cable you can use a cable approved according to UL 2089 Note 2 If your...

Page 6: ...atteries in accordance with the local laws and regulations in order to protect our environment 21 Do not dispose of your TV with regular household waste Observe local laws and regulations for disposal Note 1 This is a Class A product During operation the device can cause radio interference In this case the user may have to remedy this Please contact your specialist dealer Note 2 Electromagnetic fi...

Page 7: ...e TV controls and making the channel settings 4 3 Batteries Open the lid of the battery compartment and make sure that you have placed the batteries in the correct direction For this remote control UM 4 IEC R03 or AAA 1 5 V batteries are suitable Do not throw your old batteries into the fire discard them in a dedicated waste area for this purpose Do not mix used batteries with new ones or differen...

Page 8: ...al Connections 1 Power input 2 Scart S VHS input 3 VGA PC COMB connection input 4 PC COMB audio input 5 Video input CINCH connector 6 Sound input CINCH connector Right R 7 Sound input CINCH connector Left L 8 HDMI input 9 Antenna input 10 Headphone input Important Note DC power input is for models with an adaptor only Note 1 RGB input via Scart offers the best picture quality Note 2 Above drawing ...

Page 9: ...navigation buttons Right Left navigation buttons Enter menu button Teletext Question Answer button Reveal Source Menu button Teletext page enlarge button Double Return to previous menu button TV Teletext selection button Exit menu button Red Teletext button Green Teletext button Yellow Teletext button Blue Teletext button Information display button Teletext index button Teletext page stop button S...

Page 10: ... not going to use your television for a long time unplug its power cable from the socket 6 1 2 Channel Selection You may select whichever program number you would like by pressing the PR PR buttons located on your television and your remote control To select the programs that are above 9 you can use the Numerical buttons You may enter the number of the programme you would like to select using the ...

Page 11: ...any antenna broadcast for a period of 5 minutes it automatically switches to the stand by position The countdown OSD is displayed on the screen during the last 1 minute SETUP SELECT BACK SYSTEM BG CHANNEL S06 FINE TUNE 0 SEARCH PROGRAM NO P13 STORE AUTOPROGRAM COUNTRY SELECTION BELGIUM CZECH REP DANMARK DEUTSCHLAND ELLADA ESPANA FRANCE HUNGARY IRELAND ITALIA NETHERLANDS NORGE ÖSTERREICH POLSKA POR...

Page 12: ...r Press the M button Move to the SETUP menu by pressing the down navigation button in Main Menu and confirm your selection with OK button The Setup menu is displayed Select the system in which you would like to make the search from the SYSTEM tab Move into CHANNEL tab by pressing the down navigation button Press OK on your remote control to select S for cable channels and C for channels received v...

Page 13: ...r setting is complete press EXIT button to exit the menu 6 3 3 Skipping a stored channel In the event that you do not wish to see certain programs while navigating through the channels using the PR PR buttons then you can use this function Select the program that will be hidden by pressing the up down or right left navigation buttons Press the RED button The name of the program to be skipped will ...

Page 14: ...ur selection is SPATIAL or SURROUND the BALANCE and SOUND TYPE options in the menu will be deactivated and cannot be changed by the user 7 2 Picture Menu Settings 7 2 1 Picture Menu You can perform other picture settings by entering the Picture menu For this press the M button on your remote control Select PICTURE by pressing the Up Down navigation buttons from the main menu and press the OK butto...

Page 15: ...cart you may make Hue settings The tint option is not seen in the menu when you have not input this type of a video When a NTSC video is connected via the Scart this option becomes active and appears in the menu 7 2 6 Picture Format With this option you can view the broadcast you watch in a format of your choice You may view broadcastings in either AUTO 16 9 14 9 4 3 LETTERBOX or SUBTITLE formats ...

Page 16: ...tive on for an analog decoder or recorder device that will be connected via its socket then switch to the channel to be recorder and set the DECODER option to ON from the FEATURES menu by means of right left navigation buttons This value should be stored separately for each channel FEATURES LANGUAGE ENGLISH SLEEP TIMER OFF PANEL LOCK OFF DECODER OFF CHANGE BACK You can select the titles for which ...

Page 17: ... would like on the screen type in the number of that page using the numerical keys You can see the number you have entered on the left side of the upper title tab When you would like to turn the pages one by one you can go to the next page pressing the up button and to the previous page pressing the down button Press the I button to return to the Index page 8 3 Page enlarge button DOUBLE Using thi...

Page 18: ...r the fastext feature When you select any page the titles on various subjects may appear on the screen in four different colours or inside coloured frames red green yellow and blue By pressing the button pertaining to the relevant colour on the remote control you can access the subject of your choice without waiting Note The fastext feature is not available for all teletext broadcasts It is determ...

Page 19: ...nal source input to which you connected your device 9 1 Connecting external equipment via Scart connection Rear view of the TV or or VCR DVD SATALLITE RECEIVER GAME CONSOLE SCART To watch the picture of the broadcast device connected to Scart select Scart from the Source menu and press OK button You can watch via this Scart if the connected device has a RGB output S Video To watch the picture of t...

Page 20: ... option from the Source menu and press the OK button to display the picture Your TV will switch to the selected source 9 2 Connecting external equipment via AV connection Side view of the TV CAMERA DVD SATALLITE RECEIVER GAME CONSOLE AV To watch the picture of the broadcast device connected using the RCA Cinch input select AV option from the Source menu and press OK button Your TV will switch to t...

Page 21: ... computer must be equipped with a HDMI graphic card You may display the resolution information by pressing the I button 9 4 1 HDCP Your TV supports HDCP feature To use this feature you must set up a connection to your TV set s HDMI video port and select HDMI by pressing the AV key on your remote control NOTE In HDMI mode some resolutions are supported when a DVI to HDMI converter cable from a PC i...

Page 22: ...ting Enter into the Setup menu from the Main Menu by pressing the M button in the PC mode In order to make the necessary settings in this menu you can select the headings with the Up Down buttons on your remote control to perform the following monitor related settings 9 5 4 AUTOCONFIGURATION The most suitable geometric settings in accordance with the entry mode are configured by this function For ...

Page 23: ... to turn on the TV No colour Colour intensity level is at the lowest setting Lighten the colour Broadcast system setting if setting choice is available Select the broadcast system Problem in channel broadcasting Test with another channel No or defective teletext Television channel no teletext or antenna system Test another channel for fine tuning and shadowy pictures Very weak signal Check the ant...

Page 24: ...ard VGA COMB input Standard Standard Standard Standard PC COMB Audio input Standard Standard Standard Standard General technical specifications Power supply AC 220 240 V 50 60 Hz Power supply DC 12V Program memory 100 RF Aerial input 75 Ohm Co axial Loudspeaker impedance 16 Ohm Sound systems Mono AV Stereo Batteries 2xUM 4 IEC R03 or AAA 1 5V Channels received VHF Band I Channel 2 4 VHF Band III C...

Reviews: