background image

8

Dishwasher / User’s Manual

/44 EN

Dishwasher

Technical specifications

Compliance to standards and test data / EC declaration of conformity

This product complies with the following EU directives;

Development, production and sales stages of this product comply with the safety 

rules included in all pertaining European Community regulations.

2014/35/EU, 2014/30/EU, 93/68/EC, IEC 60436/DIN 44990, EN 50242 

Power input

220-240 V, 50 Hz (see rating label)

Total power consumption

1800-2100  W (see rating label)

Heater power consumption

1800 W (see rating label)

Total current (depends on the model)

10 A (see rating label)

Drain pump power consumption

30 W (see rating label)

Water pressure

0.3 –10 bar (= 3 – 100 N/cm² = 0.01-1.0 

Mpa)

C

Technical specifications may be changed without prior notice to improve the 

quality of the product.

C

Figures in this manual are schematic and may not match the product exactly.

C

Values stated on the markings of the product or in the printed documents 

accompanying the product are obtained in the laboratory on basis of the 

relevant standards. Depending on operational and environmental conditions of 

the product, these values may vary.

Note for test institutions:

Data required for performance tests shall be provided upon request. Requests can be 

e-mailed to the following address:

[email protected] 

Do not forget to provide the code, stock and serial numbers of the product to be tested in 

your request e-mail along with your contact information. Code, stock and serial numbers of 

the product may be found on the type label attached to the side wall of the door.

Fan drying system

(depends on model)

Fan drying system ensures efficient drying of your dishes.

It is normal to hear a different sound than that of washing cycle during fan operation.

Summary of Contents for DFN26424W

Page 1: ...15 9524 0100_AB_BEKO_D1_EN 11 03 20 8 19 Dishwasher User s Manual EN ...

Page 2: ... local authorities Please read this user manual first Dear Customer We hope that you get the best results from your product which has been manufactured with high quality and state of the art technology Therefore please read this entire user manual and all other accompanying documents carefully before using the product and keep it as a reference for future use If you handover the product to someone...

Page 3: ...ery basket 21 Cutlery basket 21 Collapsible lower basket tines 22 Collapsible lower basket tines 22 Tray Wash Supports 23 SoftTouch Accessory 23 Lower Basket Glass Holder 23 Lower basket multipurpose height adjustable service rack 24 Lower basket bottle wire 25 Upper basket height adjustable rack 25 Upper basket multipurpose service rack 25 Adjusting the height of the upper basket 26 Collapsible u...

Page 4: ...nd remain undamaged Unplug the product when not in use Never wash the product by spreading or pouring water onto it There is the risk of electric shock Never touch the plug with wet hands Never unplug by pulling on the cable always pull out by grabbing the plug The product must be unplugged during installation maintenance cleaning and repairing procedures Always have the installation and repairing...

Page 5: ...n a safe way and understand the hazards involved Children shall not play with the appliance Cleaning and user maintenance shall not be made by children without supervision Children s safety Electrical products are dangerous for the children Keep children away from the product when it is in use Do not let them to tamper with the product Do not forget to close the door of the product when leaving th...

Page 6: ...pose of the waste product with normal domestic and other wastes at the end of its service life Take it to the collection center for the recycling of electrical and electronic equipment Please consult your local authorities to learn about these collection centers Compliance with RoHS Directive The product you have purchased complies with EU RoHS Directive 2011 65 EU It does not contain harmful and ...

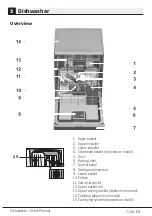
Page 7: ...Lower impeller 4 Silverware basket depends on model 5 Door 6 Rating Label 7 Control panel 8 Detergent dispenser 9 Lower basket 10 Filters 11 Salt reservoir lid 12 Upper basket rail 13 Upper cutlery basket depends on model 14 Tabletop depends on model 15 Fan drying system depends on model 15 ...

Page 8: ...the quality of the product C Figures in this manual are schematic and may not match the product exactly C Values stated on the markings of the product or in the printed documents accompanying the product are obtained in the laboratory on basis of the relevant standards Depending on operational and environmental conditions of the product these values may vary Note for test institutions Data require...

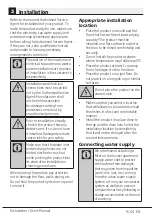
Page 9: ...cing the product pay attention not to damage the floor walls piping etc Do not hold the product by its door or panel to move it Appropriate installation location Place the product on a solid and flat floor that has sufficient load carrying capacity The product must be installed on a flat surface in order for the door to be closed comfortably and securely Do not install the product at places where ...

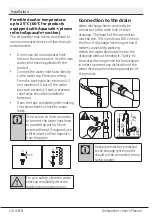
Page 10: ...s C Use a screw on hose connector to connect the water inlet hose to a water tap with a inch external thread If required use a filter insert to filter deposits from the pipes A For your safety close the water inlet tap completely after the washing programme is over Connection to the drain Water discharge hose can directly be connected to the drain hole or sink s drainage The length of this connect...

Page 11: ...f your dishwasher is equipped with internal illumination lamp should only be replaced by the Authorised Service Agent in case of failures that may occur on the lamp B If the product has a failure it should not be operated unless it is repaired by the Authorised Service Agent There is the risk of electric shock Aquasafe depends on model The Aquasafe system protects against water leaks that may occu...

Page 12: ...afety instructions and Installation To prepare the product to do the dishes perform first operation in the shortest programme with detergent while the machine is empty During the initial use fill the salt reservoir with 1 litre of water prior to filling it with salt A There might be a small amount of water left in the product after factory quality control tests This has no harm on the product ...

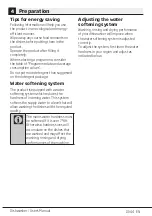
Page 13: ...ystem The product is equipped with a water softening system which reduces the hardness of incoming water This system softens the supply water to a level that will allow washing the dishes with the required quality C The mains water hardness must be softened if it is over 7 dH Otherwise hardness ions will accumulate on the dishes that are washed and may affect the washing rinsing and drying perform...

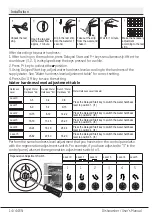
Page 14: ... English Water Hardness dE German Water Hardness dH French Water Hardness dF Water Hardness Level Indicator Level 0 0 5 0 4 0 8 Press the Delayed Start key to switch the water hardness level to position 1 r1 Level 1 6 9 5 7 9 13 Level 2 10 15 8 12 14 22 Press the Delayed Start key to switch the water hardness level to position 2 r2 Level 3 16 19 13 15 23 27 Press the Delayed Start key to switch th...

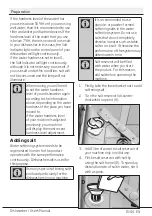
Page 15: ...ed to use filter and water purification devices If the hardness level of the water that you use is below 7 dH there is no need to use salt in your dishwasher In this case the Salt Indicator light on the control panel of your dishwasher will light continuously If the water hardness is set to level 1 the Salt Indicator will light continuously although it is not necessary to use salt If you use salt ...

Page 16: ...ace the lid and tighten it when the reservoir is full C You need to add salt right before starting the machine Thus the overflowing salty water will be flushed immediately preventing the risk of corrosion in machine In cases where you would not start washing immediately run your machine empty in the shortest program C Since different salt brands in the market have different particle sizes and sinc...

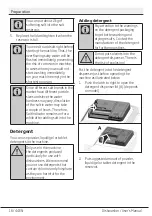
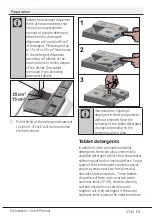
Page 17: ...ctors These tablets show their effects up to a certain water hardness level 21 dH Water softening salt and rinse aid must also be used together with the detergent if the water hardness level is above the mentioned level C Inside the detergent dispenser there are level markings that help you use appropriate amount of powder detergent When brimful detergent dispenser will contain 45 cm of detergent ...

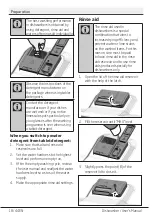
Page 18: ... and rinse aid reservoirs are full 2 Set the water hardness to the highest level and perform an empty run 3 After the empty washing cycle review the user manual and readjust the water hardness level so as to suit the water supply 4 Make the appropriate rinse aid settings Rinse aid C The rinse aid used in dishwashers is a special combination that aims to increase drying efficiency and prevent water...

Page 19: ...in the dishwasher just as it happens in handwashing as well Some delicate glass types and crystals may become dull in time We strongly recommend you to check if the tableware you are going to purchase is suitable for washing especially in the dishwasher Placing the dishes into the dishwasher You can use your dishwasher in the optimum way with respect to energy consumption and washing and drying pe...

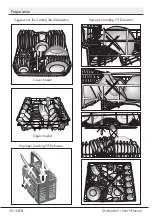
Page 20: ...20 Dishwasher User s Manual 44 EN Preparation Suggestions for loading the dishwasher Lower basket Upper basket Improper Loading Of Dishware Improper Loading Of Dishware ...

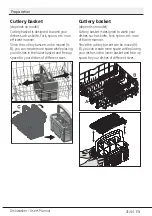
Page 21: ...ou can create more space while placing your dishes in the lower basket and free up space for your dishes of different sizes Cutlery basket depends on model Cutlery basket is designed to wash your dishes such as knife fork spoon etc in an efficient manner Since the cutlery basket can be moved A B you can create more space while placing your dishes in the lower basket and free up space for your dish...

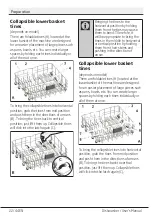
Page 22: ...he tines to the horizontal position by holding them from the tips may cause them to bend Therefore it will be appropriate to bring the tines in the middle to horizontal or vertical position by holding them from their stems and pushing in the direction of arrow Collapsible lower basket tines depends on model There are foldable tines A located at the lower basket of the machine are designed for an e...

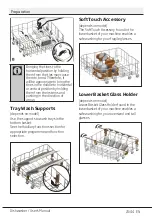
Page 23: ...e them to bend Therefore it will be appropriate to bring the tines in the middle to horizontal or vertical position by holding them from their stems and pushing in the direction of arrow SoftTouch Accessory depends on model The SoftTouch Accessory found in the lower basket of your machine enables a safe washing for your fragile glasses Lower Basket Glass Holder depends on model Lower Basket Glass ...

Page 24: ...by moving them to lower or upper position or close them to create a wider space in your lower basket A Make sure that the impeller does not touch the dishes you placed on the racks To close the racks 1 Fold the rack A 2 Slide the rack up B 3 Put the rack in vertical position C 4 Slide the rack down and lock it by the tabs D C You may open the racks in the same process in reverse order To adjust th...

Page 25: ...per basket multipurpose service rack again you can easily attach it to the side section of your upper basket Upper basket height adjustable rack depends on model Use the lower and upper parts of the height adjustable racks in the upper basket of the machine by sliding them down or up according to the heights of the glasses cups or etc A B C Lower basket bottle wire depends on model The bottle wire...

Page 26: ...stment mechanism has the same positions on the right and left sides of the upper basket Adjusting the height of the upper basket depends on model The upper basket height adjustment mechanism has been designed for you to create large spaces in the lower or upper sections of your machine depending on your needs by adjusting the height in the upper or lower direction while your basket is empty or loa...

Page 27: ... the correct position Collapsible upper basket wires depends on model You can use collapsible wires when you need a larger space for your dishes in the upper basket of your machine To bring the collapsible wires into horizontal position grab the wire from the middle position and push them in the direction of arrow in the figure Place your larger dishes into the area created To bring the wires back...

Page 28: ...rs on the basket 1 In models with partial movement feature pushing the bar 1 on the handle enables the central tray of the basket to get to the lower position and the system gets unlocked Thus right and left side trays can be used as moving parts The free space enabled by the side trays allows long parts to be loaded in the upper basket When the central tray is in the lower position you can load l...

Page 29: ...dicator 9 10 Start Pause indicator 11 Time Delay indicator 5 11 12 13 14 15 16 7 8 9 10 5 Function keys a b c d 6 Programme Selection keys 12 End of Programme indicator 13 Screen information line 14 Child Lock indicator 15 Rinse aid indicator 16 1 2 3 4 5 6 a b c d Half Load function TrayWash Function Fast Function SteamGloss Function Not in use Not in use ...

Page 30: ...pressed to make the time delay settings Preparing the machine 1 Open the door of the dishwasher 2 Place the dishes in accordance with the instructions in the user manual 3 Make sure that the upper and lower impellers rotate freely 4 Put adequate amount of detergent into the detergent dispenser 5 Check if the Salt and Rinse Aid indicators light and add salt and or rinse aid if needed 6 Close the do...

Page 31: ...washing programme for normally soiled dishes in the fastest way Suitable for lightly soiled daily dishes that are scraped or pre cleaned Suitable for removing the remnants on the soiled dishes that will be kept waiting in the machine for a few days and thus for preventing the bad odour buildup Medium Medium to high High Medium Low 75 223 100 180 148 58 30 15 15 2 11 11 6 15 8 17 6 11 4 11 8 4 2 0 ...

Page 32: ...key again Half Load function It is used to operate the machine without loading it completely 1 Load your dishes in the machine as you like 2 Turn the machine on with On Off key 3 Select the desired programme and press the Half Load key While the function is enabled the Half Load indicator will become on in the function selection indicator and on the display 4 Start the programme by pressing Start ...

Page 33: ...e Auto Tablet is a feature which detects the use of combined tablet detergents automatically C Drying performance of these type of detergents is improved by adjusting temperature and duration accordingly Owing to this feature there is no need to press any button in case of a tablet detergent use Feature can be activated if automatic detection is desired To activate to deactivate 1 After turning on...

Page 34: ...ppear on the Display Information Line Start Pause Cancel indicator starts lighting continuously C Your machine performs water softening depending on the hardness level of the supply water Remaining time displayed towards the end in some programmes can be different from the time indicated at the beginning due to this process The total time can also change while the programme is running depending on...

Page 35: ...ations required to cancel the programme C There might be residues of detergent or rinse aid left in the machine and or on the pieces being washed depending on the step the programme you have cancelled was in Salt indicator Please check the salt indicator on the display to see whether there is adequate amount of softening salt in the dishwasher or not You need to refill the salt reservoir with salt...

Page 36: ...nd of programme End of Programme indicator will light up once the washing programme is over 1 Press the On Off button to turn off your machine 2 Close the tap 3 Unplug the machine from the socket C For energy saving the product is automatically turned off following the completion of the programme or if the programme is not started C Leave your dishes in the machine for about 15 minutes to cool dow...

Page 37: ... with or without detergent based on the degree of soil If water has remained in the machine drain the water by performing the procedures under the topic Canceling a programme If the water cannot be discharged remove the filters as specified in the Cleaning the filters section and check if there are any leftover deposits that have accumulated at the bottom of the machine blocking the water path Cle...

Page 38: ...nt of the filters will reduce washing efficiency Cleaning the hose filter Damages on the machine that may be caused by impurities coming from the urban supply water or your own water installation such as sand dirt rust etc can be prevented by means of the filter attached to the water inlet hose Check the filter and the hose regularly and clean them if necessary 1 Turn off the tap and remove the ho...

Page 39: ...if the holes on the lower impeller 1 are clogged If they are clogged remove and clean the impeller You can pull the lower impeller up to remove it Upper impeller Check if the holes on the upper impeller 1 are clogged If they are clogged remove and clean the impeller Turn its nut to left to remove the upper impeller Make sure that the nut is tightened well when installing the upper impeller ...

Page 40: ...filter system is clean Clean the filter system regularly as illustrated in section Cleaning and Care Filters are installed incorrectly Check the filter system and make sure that it is installed correctly Baskets are overloaded Do not overload the baskets in excess of their capacity Detergent is stored under unsuitable conditions If you are using powder detergent do not store the detergent package ...

Page 41: ...h the structure of Teflon Since the surface tensions of Teflon and water are different water droplets will remain as beads on the Teflon surface Tea coffee or lipstick stains remain on dishes Selected programme is unsuitable Select a programme with a higher temperature and cycle time Surface quality of the kitchen utensils is deteriorated Tea and coffee stains or other dye spots may not be cleaned...

Page 42: ...he salt that spilled inside the machine Since the salt granules that will remain under the lid will dissolve during prewash causing the lid loosen check the lid once again at the end of the programme Salty food remnants have remained on dishes for a long time If cutlery soiled with such foods will be kept waiting in machine dirt must be removed by prewash or dishes must be washed without being kep...

Page 43: ...d lustre porcelains are not suitable for washing in the dishwasher Manufacturers of some glassware and porcelain tableware items do not recommend washing such kitchen utensils in the dishwashers either Dishes are scratched C Kitchen utensils that contains or are made of aluminium should not be washed in dishwasher Salt leakage exists Pay attention not to spill salt around the salt filling hole whi...

Page 44: ...er tap water with a tissue paper or fork will be sufficient Rinse aid has spilled into the machine when adding rinse aid Take care that rinse aid is not spilled in the machine when you are filling it Clean any spilled rinse ait with the help of a tissue paper towel Lid of the rinse aid reservoir is left open Make sure that the lid of the rinse aid reservoir is closed after adding rinse aid Kitchen...

Reviews: