background image

7

2

21

1

6

3

16

20

19

2

4

5

4

23

15

180°

11

12

9

8

10

45°

7

18

17

10

2

13

14

19

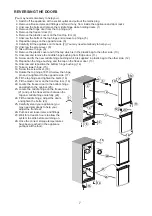
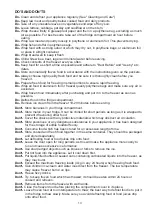
(You may need somebody to help you.)

1- Switch off the appliance at the socket outlet and pull out the mains plug.
2- Remove all loose items and fittings and food, if any, from inside the appliance and door racks.
3- Unscrew the bolts and remove the middle hinge while holding doors. (1)
4- Remove the fridge door from the top hinge. (2)
5- Remove the freezer door. (3)
6- Remove the plastic covers on the front top trim. (4)
7- Unscrew the bolts of the top hinge and remove top hinge. (5)
8- Reposition plugs on the opposite side. (6)
9- Carefully tilt the appliance on its back. (7) (You may need somebody to help you.)

10- Unscrew the screw level. (8)
11- Take off lower hinge. (9)
12- Remove the plastic cover and fit the tap which is in the plastic bag to the other side. (10)
13- Unscrew and remove the middle hinge bushing from fridge door. (11)
14- Screw and fix the new middle hinge bushing which is supplied in plastic bag to the other side. (12)
15- Reposition the hinge bushing and the tap on the freezer door. (13)
16- Unscrew and reposition the bottom hinge bushing. (14)
17- Take on lower hinge. (15)
18- Screw the screw level. (16)
19- Rotate the top hinge 180°. Unscrew the hinge

pin and re-tighten it to the opposite side. (17)

20- Fit the top hinge and tighten the bolts. (18)
21- Fit the plastic cover on the front top trim. (19)
22- Locate the freezer door to the bottom hinge

and attach to the cabinet. (20)

23- Locate the middle hinge on the freezer door

(21) and put the freezer door between the

top and middle hinge carefully. (22)

24- Fit the middle hinge. Adjust the doors

and tighten the bolts. (23)

25- Carefully stand your appliance (you

may need somebody to help you)
adjust the front feet.

26- Put back all, loose items and fittings.
27- Wait for at least 4 hours to allow the

system to settle before switching on.

28- Once the correct storage temperatures

have been reached in the appliance,
put back all the food.

REVERSING THE DOORS

Summary of Contents for CF5713AP

Page 1: ...Model CF5713AP get the be g st from your new refri erator installation operation food storage instructions 9 5 cu ft Frost Free Fridge Freezer ...

Page 2: ...st possible performance and trouble free operation from your appliance it is very important to carefully read these instructions On delivery check to make sure that the product is not damaged and that all the parts and accessories are in perfect condition Ensure that the plug remains readily accesible We do not recommend the use of extension leads and multi way adapters Failure to observe these in...

Page 3: ...SING THE DOOR 7 SUGGESTED ARRANGEMENT OF FOOD IN THE FRIDGE FREEZER 8 TEMPERATURE CONTROL AND ADJUSTMENT 9 BEFORE OPERATING 9 STORING FROZEN FOOD 9 FREEZING FRESH FOOD 10 MAKING ICE CUBES 10 DEFROSTING 10 REPLACING THE INTERIOR LIGHT BULB 11 CLEANING AND CARE 12 DO S AND DON TS 13 ENERGY SAVING TIPS 14 PROBLEM SOLVING 14 GUARANTEE DETAILS 15 HOW TO OBTAIN SERVICE 16 ...

Page 4: ...use Should the fuse need to be replaced an ASTA approved BS 1362 fuse of the same rating must be used Do not forget to refit the fuse cover In the event of losing the fuse cover the plug must not be used until a replacement fuse cover has been fitted Colour of the replacement fuse cover must be the same colour as that visible on the pin face of the plug Fuse covers are available from any good elec...

Page 5: ...jure yourself or damage the appliance Make sure that the mains cable is not caught under the appliance during and after moving as this could damage the cable Do not allow children to play with the appliance or tamper with the controls plc declines to accept any liability should the instructions not be followed Important BEKO This appliance has been designed to operate in ambient temperatures up to...

Page 6: ...re section to prepare your appliance for use Do not connect your appliance to the electricity supply until all the packing and transit protectors have been removed including polystyrene block s inserted between the compressor motor and the cabinet see diagrams Do not remove the plastic drain tray fitted above the compressor motor on models with auto defrost fridge WARNING CONDENSER SPACERS COMPRES...

Page 7: ...3 Cabinet shelves 4 Defrost water collection channel 5 Salad crisper cover 6 Salad crisper 7 Ice Bank ice cube tray 8 Fast Freeze compartment 9 Frozen froods storage drawers 10 Adjustable feet 11 Egg tray 12 Door shelves 13 Bottle shelf 14 Freezer fan GETTING TO KNOW YOUR FROST FREE FRIDGE FREEZER ...

Page 8: ...dge door 11 14 Screw and fix the new middle hinge bushing which is supplied in plastic bag to the other side 12 15 Reposition the hinge bushing and the tap on the freezer door 13 16 Unscrew and reposition the bottom hinge bushing 14 17 Take on lower hinge 15 18 Screw the screw level 16 19 Rotate the top hinge 180 Unscrew the hinge pin and re tighten it to the opposite side 17 20 Fit the top hinge ...

Page 9: ...e lowest shelf Do not allow to come into contact with cooked food to avoid contamination For safety only store raw meat for two to three days 7 Keep the food packed wrapped or covered Allow hot food and beverages to cool before placing them in the fridge Do not store explosive substances High proof alcohol must be stored upright in sealed containers Left over canned food should not be stored in th...

Page 10: ... door open and ensure it is closed immediately after food is put in or removed If the ambient room or garage temperature is between 0 C and 15 C we recommend you set the knob halfway between the min and max setting to reach 18 C in the freezer compartment Lower temperatures may be obtained by adjusting setting knob towards max position Before you start using the appliance check that 1 The feet hav...

Page 11: ...d fresh food Fill the ice cube tray 3 4 full with water and place it in the Ice Bank Loosen frozen trays with the handle of a spoon never use sharp edged objects such as knives forks Store ice cubes in the Ice Bank If freshly made ice cubes are not consumed for several weeks and stored in Ice Bank they will slowly reduce in size and eventually disappear completely The fridge compartment defrosts a...

Page 12: ...ght diffuser cover by inserting the blade in each of the two recesses to prise off each side First check that the bulb hasn t worked loose by ensuring it is screwed securely in the holder Replace the plug and switch on If the bulb works replace the light cover by inserting the rear lug and pushing up to locate the front two lugs If the light still fails to work switch off at the socket outlet and ...

Page 13: ...etroleum based products Subject it to high temperatures in any way Scour rub etc with abrasive material Removal of door tray To remove a door tray remove all the contents and then simply push the door tray upwards from the base Make sure that the special plastic container drain tray at the back of the appliance which collects defrost water is clean at all times If you want to remove the tray to cl...

Page 14: ...the freezer as soon as possible Defrost food in the fridge compartment Remove ice cream from the freezer 10 20 minutes before serving Store bananas in your fridge compartment Store melon in your fridge It can be chilled for short periods as long as it is wrapped to prevent it flavouring other food Cover the shelves with any protective materials which may obstruct air circulation Store poisonous or...

Page 15: ... frozen food acts as an ice pack to assist cooling in the fridge If the appliance does not operate when switched on check whether The plug is inserted properly in the socket and that the power supply is on To check the power supply to the socket plug in another appliance The fuse has blown circuit breaker has tripped main distribution switch has been turned off The temperature control has been set...

Page 16: ...ers Food loss insurance is often included within your household contents insurance policy or may be available separately from your retailer Your Beko product is designed and built for domestic household use only The guarantee will be void if the product is installed or used in commercial or non residential domestic household premises The product must be correctly installed located and operated in ...

Page 17: ... Cookers 0845 6004902 Gas Dual Fuel Cookers 0845 6004905 Washing Machines 0845 6004906 Dishwashers All Refrigeration All Cookers 01 862 3411 Washing Machines Dishwashers If you have purchased an extended guarantee please refer to the instructions contained within the extended guarantee agreement document Otherwise please call the appropriate number above where service can be obtained at a charge S...

Page 18: ...BEKO plc Beko House Caxton Way Watford Hertfordshire WD18 8UF Tel 01923 654650 Fax 01923 819653 e mail service beko co uk website www beko co uk Part no 4578331507 Revision no 00 ...

Reviews: