15
ULTRALINK UL2000B
If you have not stored any of your own frequencies, the frequencies stored in the user preset
(Preset 1) are identical to the frequencies stored in Preset 3.
Loading a preset
1.
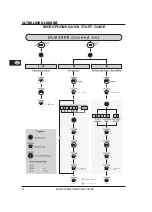
Engage MUTE. The transmitter can now be switched into the programming mode.
2.
Turn the selection switch to 0 and confirm your selection by keeping the POWER button
pressed for 2 seconds. As a confirmation, the LED blinks slowly once and then once again with
medium tempo. The transmitter is now in the programming mode and waits for you to enter a
one-digit number.
3.
Select the desired preset number on the selection switch, e.g. 3 (possible choices: 1 - 4). If a
valid selection is made, the LED blinks once quickly to confirm your selection. This way, you
can be sure that a correct value is entered (in regard to the selection of presets, Mic Gain and
Auto Mute) even before confirming your selection.
Selecting 5 or 6 changes the Mic Gain setting (ch. 3.2.5). Selecting 7 or 8 changes the
Auto Mute settings (ch. 3.2.6). Values 9 and 0 are invalid.
4.
Confirm your selection by briefly pressing the POWER button.
5.
If the selection you made is valid, the LED blinks quickly once again. An invalid selection is
indicated with 5 quick blinks, and the unit is immediately no longer in the programming mode.
In this case, start anew with step 2.
After a brief break, a second blink code is given: The LED blinks according to the value
selected (for example, in this case 3 times) with medium tempo.
If no entry is made for more than 5 seconds (either on the selection switch or by
pressing the POWER button), the LED blinks quickly 5 times, and the programming
mode is aborted.
6.
After a second brief blink break, an additional blink code is given as a confirmation:
Successful loading of a preset is signaled with two slow blinks. The unit leaves the
programming mode.
If the preset could not be loaded, the LED blinks quickly 5 times. In this case, start anew
with step 2.
7.
After setting the desired preset, disengage the MUTE switch.
3.2.5 Mic Gain
You have the option to adjust the ULB2000 to the level of the signal being transmitted. If you talk
very softly into the microphone, we recommend the “High Gain” setting; if the sound is loud, select
“Low Gain.” This way, optimal transmitter drive is achieved.
1.
Engage MUTE. The transmitter can now be switched into the programming mode.
2.
Turn the selection switch to 0 and confirm your selection by keeping the POWER button
pressed for 2 seconds. As a confirmation, the LED blinks slowly once and then once again with
medium tempo. The transmitter is now in the programming mode and waits for you to enter a
one-digit number.
3.
Select one of the following two digits on the selection switch:
Low Gain: select 5
High Gain: select 6
If a valid selection is made, the LED blinks quickly once to confirm your selection. This way,
you can be sure that a correct value is entered (in regard to preset, MicGain and Auto Mute
selection) even before confirming your selection.
Selecting the values 1 thru 4 changes the preset settings (ch. 3.2.4). Selecting 7 or 8
changes the Auto Mute settings (ch. 3.2.6). Values 9 and 0 are invalid.
4.
Confirm your selection by briefly pressing the POWER button.
5.
If the selection you made is valid, the LED blinks quickly once again. An invalid selection is
indicated with 5 quick blinks, and the unit is immediately no longer in the programming mode.
In this case, start anew with step 2.
After a brief break, a second blink code is given: The LED blinks according to the value
selected (for example, in this case 3 times) with medium tempo.
3. ULB2000 TRANSMITTER


