background image

3

RHYTHM DESIGNER RD-9 User Manual

Important Safety 

Instructions

LEGAL DISCLAIMER

LIMITED WARRANTY

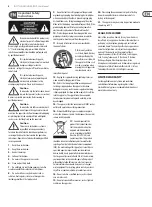
Terminals marked with this symbol carry 

electrical current of sufficient magnitude 
to constitute risk of electric shock. 

Use only high-quality professional speaker cables with 
¼" TS or twist-locking plugs pre-installed. All other 
installation or modification should be performed only 
by qualified personnel.

This symbol, wherever it appears, 

alerts you to the presence of uninsulated 
dangerous voltage inside the 

enclosure - voltage that may be sufficient to constitute a 
risk of shock.

This symbol, wherever it appears, 

alerts you to important operating and 
maintenance instructions in the 

accompanying literature. Please read the manual.

Caution

To reduce the risk of electric shock, do not 
remove the top cover (or the rear section). 

No user serviceable parts inside. Refer servicing to 
qualified personnel.

Caution

To reduce the risk of fire or electric shock, 
do not expose this appliance to rain and 

moisture. The apparatus shall not be exposed to dripping 
or splashing liquids and no objects filled with liquids, 
such as vases, shall be placed on the apparatus.

Caution

These service instructions are for use 
by qualified service personnel only. 

To reduce the risk of electric shock do not perform any 
servicing other than that contained in the operation 
instructions. Repairs have to be performed by qualified 
service personnel.

1. 

Read these instructions.

2. 

Keep these instructions.

3. 

Heed all warnings.

4. 

Follow all instructions.

5. 

Do not use this apparatus near water.

6. 

Clean only with dry cloth.

7. 

Do not block any ventilation openings. Install in 

accordance with the manufacturer’s instructions.

8. 

Do not install near any heat sources such as 

radiators, heat registers, stoves, or other apparatus 
(including amplifiers) that produce heat.

9. 

Do not defeat the safety purpose of the polarized 

or grounding-type plug. A polarized plug has two blades 
with one wider than the other. A grounding-type plug 
has two blades and a third grounding prong. The wide 
blade or the third prong are provided for your safety. If the 
provided plug does not fit into your outlet, consult an 
electrician for replacement of the obsolete outlet.

10.  

Protect the power cord from being walked on or 

pinched particularly at plugs, convenience receptacles, 
and the point where they exit from the apparatus.

11.  

Use only attachments/accessories specified by 

the manufacturer.

12.  

Use only with the 

cart, stand, tripod, bracket, 
or table specified by the 
manufacturer, or sold with 
the apparatus. When a cart 
is used, use caution when 
moving the cart/apparatus 
combination to avoid 

injury from tip-over.

13.  

Unplug this apparatus during lightning storms or 

when unused for long periods of time. 

14.  

Refer all servicing to qualified service personnel. 

Servicing is required when the apparatus has been 
damaged in any way, such as power supply cord or plug 
is damaged, liquid has been spilled or objects have fallen 
into the apparatus, the apparatus has been exposed 
to rain or moisture, does not operate normally, or has 
been dropped.

15.  

The apparatus shall be connected to a MAINS socket 

outlet with a protective earthing connection.

16.  

Where the MAINS plug or an appliance coupler is 

used as the disconnect device, the disconnect device shall 
remain readily operable.

17.  

Correct disposal of this 

product: This symbol indicates 
that this product must not be 
disposed of with household 
waste, according to the WEEE 
Directive (2012/19/EU) and 
your national law. This product 

should be taken to a collection center licensed for the 
recycling of waste electrical and electronic equipment 
(EEE). The mishandling of this type of waste could have 
a possible negative impact on the environment and 
human health due to potentially hazardous substances 
that are generally associated with EEE. At the same time, 
your cooperation in the correct disposal of this product 
will contribute to the efficient use of natural resources. 
For more information about where you can take your 
waste equipment for recycling, please contact your local 
city office, or your household waste collection service.

18.  

Do not install in a confined space, such as a book 

case or similar unit.

19.  

Do not place naked flame sources, such as lighted 

candles, on the apparatus.

20.  

Please keep the environmental aspects of battery 

disposal in mind. Batteries must be disposed-of at a 
battery collection point.

21.  

This apparatus may be used in tropical and moderate 

climates up to 45°C.

Music Tribe accepts no liability for any loss which may 
be suffered by any person who relies either wholly or in 
part upon any description, photograph, or statement 
contained herein. Technical specifications, appearances 
and other information are subject to change without 
notice. All trademarks are the property of their 
respective owners. Midas, Klark Teknik, Lab Gruppen, 
Lake, Tannoy, Turbosound, TC Electronic, TC Helicon, 
Behringer, Bugera, Oberheim, Auratone, Aston 
Microphones and Coolaudio are trademarks or registered 
trademarks of Music Tribe Global Brands Ltd. © Music 
Tribe Global Brands Ltd. 2021 All rights reserved.

For the applicable warranty terms and conditions 
and additional information regarding Music Tribe’s 
Limited Warranty, please see complete details online at 
musictribe.com/warranty. 

Summary of Contents for RD-9

Page 1: ...User Manual RHYTHM DESIGNER RD 9 Classic Analog Digital Drum Machine with 11 Drum Sounds 64 Step Sequencer Wave Designer and Dual Mode Filter V 1 0 ...

Page 2: ...ction 6 3 1 3 Wave Designer 6 3 1 4 Edit Section 7 3 1 5 Mode Section 7 3 1 6 Sync Section 7 3 1 7 Playback Controls 7 3 1 8 Auto Scroll Section 7 3 1 9 Step Note Repeat Section 7 3 1 10 Track Control and Settings 8 3 1 11 Voice Control 8 3 2 Rear Panel connections 9 4 Overview 10 4 1 Connections 10 4 2 Software Setup 10 4 3 Hardware Setup 10 4 4 Voice Section 10 5 Creating a Pattern Step Mode 11 ...

Page 3: ...Whenacart isused usecautionwhen movingthecart apparatus combinationtoavoid injuryfromtip over 13 Unplugthisapparatusduringlightningstormsor whenunusedforlongperiodsoftime 14 Referallservicingtoqualifiedservicepersonnel Servicingisrequiredwhentheapparatushasbeen damagedinanyway suchaspowersupplycordorplug isdamaged liquidhasbeenspilledorobjectshavefallen intotheapparatus theapparatushasbeenexposed ...

Page 4: ...ring playback for unlimited songs and patterns Pattern Mode allows arrangement of patterns into full songs and setting number of repeats per song part Song Mode allows chaining songs together for live sets and expanded compositions Unique Auto Scroll feature enables improvisation in all modes Comprehensive MIDI In Out Thru and USB implementation for synchronization and connection to external devic...

Page 5: ... fresh modern take on a characteristic drum machine the RD 9 gives you the power to harness the phenomenal sound of the original Colossal bass drums through to sizzling hi hats can be manipulated to take your rhythm conception to the next level This is no digital clone it s an analog beat making monster Powerful and Feature Rich Sequencer The RD 9 features what we believe to be one of the most pow...

Page 6: ... automation enhanced production workflows and quality assurance labs with the most sophisticated test equipment available in the world As a result we have one of the lowest product failure rates in the industry and we confidently back it up with a generous warranty program 3 Front and Rear Panel Control Layout 3 1 Top Controls 3 1 1 Volume Section 1 MASTER Controls the main output level 2 PHONES A...

Page 7: ...arameter or shuffle feeling when selected with the DATA encoder 25 negative swing 50 straight to 75 full swing 32 PROB Adjust the probability factor of steps triggering 33 FLAM Adjust the FLAM width 3 1 8 Auto Scroll Section 34 AUTO SCROLL Step Mode Keep play head visible Pattern Mode Advance song when loop expires If Auto Scroll is enabled for a pattern that has more than 16 steps when the play h...

Page 8: ... for the snare toms and controls the frequency of the hats ride and crash 54 ATTACK Controls the Attack portion of the bass drum sound 55 DECAY Changes the decay time of the voice Turn CCW for shorter CW for longer 56 TONE Applies a filter to the voice reducing the high frequencies as you turn CCW 57 SNAPPY Adjust the amount of snap to the snare sound Turning CW increases snap 58 VOICE SELECT Sele...

Page 9: ... INDIVIDUAL OUTPUT Unbalanced output of the Crash 75 HI HAT INDIVIDUAL OUTPUT Unbalanced output of the Hi Hat 76 CLAP INDIVIDUAL OUTPUT Unbalanced output of the Hand Clap 77 RIM SHOT INDIVIDUAL OUTPUT Unbalanced output of the Rim Shot 78 HI TOM INDIVIDUAL OUTPUT Unbalanced output of the High Tom 79 MID TOM INDIVIDUAL OUTPUT Unbalanced output of the Mid Tom 80 LOW TOM INDIVIDUAL OUTPUT Unbalanced o...

Page 10: ... again to remove the step Fixed accents are not affecte d by the accent control The ACCENT control determines the amount of emphasis given to global accents To add a global accent which affects all voices on that step press and hold the TAP HOLD button and press the step you want the global accent on This is displayed in white Turn the level control counterclockwise CCW to reduce the amount of glo...

Page 11: ...wish to restore This only works when you are in Pattern mode and set to manu manual save mode How to save a pattern 1 Once you have created your masterpiece of a pattern 2 Press SAVE 3 Press PATTERN again 4 Select the Step number of the Pattern you wish to save current pattern will be displayed in white after which SAVE will flash Note you can only save to the current pattern position 5 Press the ...

Page 12: ...gth Pattern length can be changed from 1 to 64 steps and on a pattern by pattern basis This adjustable length can be used to create different time signatures For example selecting a pattern length of 12 steps with a step size using 1 16th will create a 3 4 waltz style time signature To change the number of steps in a pattern 1 Press the STEP and RECORD buttons 2 Press LENGTH 3 Use the keys either ...

Page 13: ...n press TRIGGER Note repeat can be added with or without step record on with this method Track Mute This function lets you mute any voice s within a pattern song or globally To mute a voice s 1 While a pattern is playing select track MUTE 2 Select the voice s you wish to mute 3 The muted voice s will be illuminated in red 4 Press track MUTE to exit NOTE All mutes can be cleared by holding HOLD TAP...

Page 14: ...is how seamless playback is created for extended performances You cannot switch songs halfway through playback This can only be done by stopping playback and selecting a different song To chain songs 1 Press the SONG button to enter Song Mode make sure RECORD is disabled USE the STEP BUTTONS 1 16 to choose a song white LED on 2 Press the RECORD button 3 You can now select the next song in the chai...

Page 15: ... turn the control CW When the HPF button is not engaged the CUTOFF knob defaults to a low pass filter LPF which gradually cuts the high frequencies as you turn the control CCW Press the ON button to activate the filter circuit The RESONANCE control adjusts the resonance of the filter Turning CW adds a peak at the cutoff frequency that accents the surrounding frequencies The filter CUTOFF control s...

Page 16: ...re all patterns play at the set tempo even if a different tempo is stored within a pattern or song 2 Song where all patterns within in a song will follow the tempo set within that song even if a different tempo is stored within a pattern 3 Pattern where all patterns will play at the tempo they have been saved with and not be affected by global or song tempo changes Swing Preference Options 1 Globa...

Page 17: ...utton will cause the next selected song to start from the beginning Stop The selected song will run from beginning to end then stop at the end of the last bar Pressing the PLAY PAUSE will cause the next selected song to start from the beginning Note that the above preferences are over ridden when chaining songs see section 8 Filter HPF Preference Set the HPF on off state Globally by Song or by Pat...

Page 18: ...hing has been programmed there you could also fill the last 16 steps for more sonic interest If you don t set your non Poly voices to the nominal pattern length the pattern will only loop the first 16 steps Note Individual voices can have Poly lengths that are longer than the nominal pattern length for extra rhythmic variation POLY mode defaults to be stored per pattern Note With poly mode on Step...

Page 19: ...recorded live in step mode 1 Press RECORD while a pattern is playing in step mode 2 A NOTE REPEAT can be recorded for any voice programmed on that step Note A voice will be programmed on a step in order to use note repeat When a step is removed with Note repeat the repeat will also be removed Note repeat can also be programmed Step 1 enable note repeat and select a repeat number in STEP mode Step ...

Page 20: ...te events This is a number can be set anywhere in between 0 100 range to simulate a human element to patterns 4 FLAM Part of a pattern of RD 9 consisting of a stroke preceded by a grace note Range 0 24 adjust the width of the flam Flam is the simulated effect of a drummer hitting a note with 2 sticks The amount of flam dictates the length of time between the next hit after the first and can be pro...

Page 21: ...adedSong Eachtimeasongisloadedintothesequenceritislogged Whenyoupowerontheunit the lastsongtobeloggedbeforetheunitwaspoweredoffwillbeloadedbackintothesequencer 1 16 LastLoadedPattern Eachtimeapatternisloadedinthesequenceritislogged Whenyoupowerontheunit thelastpatterntobeloggedbeforetheunitwaspoweredofwillbeloadedbackintothe sequencer 1 16 DeviceID EachRDunitinasystemcanhaveitsownuniqueIDnumber 1 ...

Page 22: ...rameterisusedtoenableordisablebythe AnalogFilterontheRD 9 sFXbus 0 Song 1 Global 2 Pattern FilterAutomationPreference ThispreferenceselectswhichFilterAutomationparameterisusedbythesequencer Italso selectswhichsetofFilterStepValuesareusedwhentheautomationisactive 0 Song 1 Global 2 Pattern PolymeterPreference ThispreferenceselectswhichPolymeterparameterisusedbythesequencer 0 Song 1 Global 2 Pattern ...

Page 23: ...odepreferenceisselected 0 Off 1 On GlobalFilterAutomation Turnsfilterautomationon offgloballyifglobalmodepreferenceisselected 0 Inactive 1 Active GlobalFilterStepValues 1 64 Setsthefilterlevelperstepgloballyifglobalmodepreferenceisselected 0 255 GlobalPolymeter Turnpolymeteron offgloballyifglobalmodepreferenceisselected 0 Off 1 On GlobalStepSize SetstheStepsizegloballyifglobalmodepreferenceisselec...

Page 24: ...timetotime newversionsoftheRD 9firmwarewillbereleased Thisfirmware willcontainbothbugfixesandnewfeatures Additionalparametersmaybeaddedtothe SongDatafiletosupportthosenewfeatures TheSongDatafileisthereforeversionedto guaranteecompatibilitybetweenfirmwarereleases ProductVariant TheRD 9ispartofaseriesofBehringerproductsthatsequencesongs Thisparameteris usedtodistinguishbetweenRD 9SongDatafilesandoth...

Page 25: ...erLPForHPF 0 LPF 1 HPF FilterEnable Whetherthefilterison offpersong 0 Off 1 On FilterAutomation Automationofthefilterisstoredpersong 0 Inactive 1 Active FilterStepValues 1 64 Filterstepvaluespersongarestored 0 255 Polymeter Polymeteriseitheron offpersong 0 Off 1 On StepSize Stepsizeisstoredforthesong 0 1 8th 1 1 8th Tr 2 1 16th 3 1 16th Tr 4 1 32nd th AutoAdvance Whetherornotthesongwillautoadvance...

Page 26: ...equencereventstriggeredonthe64stepsoftheLowTomtrack EventsincludeStepOn Off StepProbon off stepflamon off StepRepeaton off Step repeatsize Seedescriptionbelow MidTomStepValues 1 64 Thesequencereventstriggeredonthe64stepsoftheMidTomtrack EventsincludeStepOn Off StepProbon off stepflamon off StepRepeaton offand Steprepeatsize Seedescriptionbelow HiTomStepValues 1 64 Thesequencereventstriggeredonthe6...

Page 27: ...YTE_MASK_FLAM_BIT 1 Step On 0 Step Off Bit 4 STEP_BYTE_MASK_NOTE_REPEAT_ON_OFF_BIT 1 Step On 0 Step Off Bit 5 STEP_BYTE_MASK_NOTE_REPEAT_LS_BIT 00 Repeat 1 01 Repeat 2 10 Repeat 4 11 Repeat 8 Bit 6 STEP_BYTE_MASK_NOTE_REPEAT_MS_BIT 00 Repeat 1 01 Repeat 2 10 Repeat 4 11 Repeat 8 Bit 7 RESERVED PatternLength Thesteplengthofpattern 1 64 PolyLength 1 11 Thesteplengthofeachtracks 1 64 Reserved RandomT...

Page 28: ...rpattern eitherLPForHPF 0 LPF 1 HPF FilterEnable Whetherthefilterison offperpattern 0 Off 1 On FilterAutomation Automationofthefilterisstoredperpattern 0 Inactive 1 Active FilterStepValues 1 64 Filterstepvaluesperpatternarestored 0 255 Polymeter Polymeteriseitheron offperpattern 0 Off 1 On StepSize Stepsizeisstoredforthepattern 0 1 8th 1 1 8th Tr 2 1 16th 3 1 16th Tr 4 1 32nd th AutoAdvance Whethe...

Page 29: ... use Midi Time Code MTC to sync the RD 9 to your project Different DAW packages work in different ways Below is an example how to set up the RD 9 in Logic X Make sure the RD 9 is on its own MIDI channel in order not to trigger other sounds Preferences MIDI SYNC MIDI Sync Project Settings MIDI In the Destination list select the RD 9 Turn the Clock on and select MTC A delay may need to be used depen...

Page 30: ...ESIGNER RD 9 User Manual 15 RD 9 Set up Example Hook Up Example Studio USB out Computer USB in Headphones Power Adaptor Audio Input Mono Audio Output Studio Monitors Audio Output Trigger Output Trigger Input Mixer ...

Page 31: ...RHYTHM DESIGNER RD 9 User Manual Using an External Processor Power Adaptor External Processor Audio Intput Individiual Voice Output To Return Input Mono Input Mono Output Audio Output Studio Monitors Mixer ...

Page 32: ... Manual Using an External Mixer In this example the bass drum snare and mono outputs are connected to a mixer The signals from the bass drum and snare drum are removed from the mono output when a jack is inserted in the individual ...

Page 33: ... USB Class compliant USB 2 0 type B Supported operating systems Windows 7 or higher Mac OS X 10 6 8 or higher Volume controls Master phones Return Input 1 x 1 4 TRS balanced Wave Designer Bus 10 voices independently assignable Controls Attack 15 to 15 dB adjustable Sustain 24 to 24 dB adjustable Send button On off switchable Sig LED Red Analog Filter Type State variable 12 dB slope Cutoff 10 Hz 15...

Page 34: ...mode Chain any of the 16 songs together for full sets Pattern Storage Capacity 16 songs 16 patterns each Steps 64 steps Power Supply Externalpoweradapter 18VDC 1000mA Power consumption 14 4 W typical Environmental Operatingtemperaturerange 5 Cto40 C 41 Fto104 F Physical Dimensions HxWxD 78x477x264mm 3 1x18 8x10 4 Weight 3 0 kg 6 6 lbs ...

Page 35: ...integer related sine waves at varying levels creating different timbres Waveforms other than a pure sinusoidal generate various harmonics which help define the character of the sound Hertz Hz A unit of frequency equal to one cycle of a wave per second High Pass Filter HPF A filter that attenuates lower frequencies from a signal leaving the higher frequencies unaffected Hum Undesirable low frequenc...

Page 36: ...A programmable device or module used to arrange sequence timed events into musical patterns and songs Sig Signal Shows presence of audio Step A step is one stage in a sequence or pattern Solo To isolate a chosen voice in playback Song A collection of patterns played back in a predefined order Sub Bass Frequencies in a signal ranging from 10 Hz to 60 Hz lower than C0 to approximately B1 Sustain act...

Page 37: ...ular installation If this equipment does cause harmful interference to radio or television reception which can be determined by turning the equipment off and on the user is encouraged to try to correct the interference by one or more of the following measures Reorient or relocate the receiving antenna Increase the separation between the equipment and receiver Connect the equipment into an outlet o...

Page 38: ...We Hear You ...
Reviews: