Behlen Country 80900190 Assembly, Operation & Maintenance Instructions Download Page 9

Operating 

Instructions

Start the tractor and set at idle RPM. With the Tiller lifted 
off the ground, engage PTO and slowly advance throttle 
to 540 RPM. 

NOTE: Rotary Tiller is designed to run at 

540 RPM ONLY.

Select a low gear on the tractor and begin to move 
forward. Tractor ground speed is to be controlled by 
gear selection 

ONLY

 and not engine speed. 

Travelling 

at a fast ground speed while using the Tiller could 
damage the unit. 

As the tractor moves forward, slowly 

lower the Tiller down. Allow the tiller tines to gradually 
engage the ground. 
The Tiller is designed to be operated in a forward 
direction 

ONLY

. Running in reverse could damage the 

Tiller and the tractor and void the Tiller warranty.
Adjust the back plate with regulating chain until the 
desired mulching effect is achieved. 

NOTE: NEVER 

ATTEMPT TO ADJUST THE ROTARY TILLER WHILE 
THE TRACTOR IS RUNNING.
Do NOT allow the tractor to engine or Tiller to bog 
down or stall. This causes undue wear and tear on 
the Tiller and the tractor. If this continues to happen, 
reduce ground speed and raise tilling depth of Tiller. 
Never attempt to remove objects from the rotary bar 
until the tractor has been shut down and the Tiller 
tines have completely stopped. 

Never attempt to turn the tractor or travel in reverse 
with the PTO engaged and the Tiller in the ground. 
Always raise the Tiller out of the ground when 
backing up or attempting to turn. Failure to do so 
may cause damage to the Tiller. 
Never attempt to operate the Tiller on sudden steep 
inclines or declines with the PTO engaged. ALWAYS 
raise the Tiller out of the ground when traveling over 
sudden inclines or declines. Failure to do so may 
cause damage to the Tiller.

Transport Safety

• Always comply with all state and local laws 
governing highway safety and movement of farm 
machinery on public roads.
• The use of flashing amber lights is acceptable in 
most localities. However, some localities prohibit 
their use. Local laws should be checked for all 
lighting and marking requirements. Always use 
proper lighting and a Slow Moving Vehicle (SMV) 
sign when on a highway or road. Do NOT exceed 20 
mph. Reduce speed on rough roads.
• Plan your route to avoid heavy traffic.
• Always yield to oncoming traffic at narrow bridges, 
intersections, etc. Watch for traffic when operating 
near or crossing roadways. 
• Take hills and curves only at a low speed and at a 
gradual angle. Make certain that at least 20% of the 
tractor’s weight in the front wheels to maintain safe 
steering. Slow down on rough or uneven surfaces.  
Check the tractor’s manual for proper use on slopes.
• Use extreme care and maintain minimum ground 
contact when operating close to ditches or fences. 
Be careful when turning sharp corners.
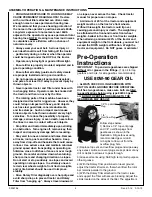
Maintenance

1) Periodically check and maintain proper gear oil levels 
in both top and side gearboxes. Check the vent plugs of 
both gearboxes and make sure they are clean and free 
of dirt or debris to ensure proper airflow.
2) Every 8 hours, grease “out board” hub (below left), 
PTO shaft universal joints (below right), PTO shaft 
safety shield, and PTO telescoping surface. 

Use ONLY 

grade Type ll tube grease.  NOTE: Do NOT grease 
the slip clutch assembly

.

3) Before each use, check to make sure all safety 
shields are installed and working properly.
4) After each use clean the debris from the Tiller tines. 
Inspect for any damaged or worn parts and replace 
before next use. 
5) Periodically check all nuts and bolts to insure they 
are tight and secure.
6) Periodically loosen torque spring bolts and allow 

WARNING

Grease fitting

        Grease 
        (2) fittings
        here

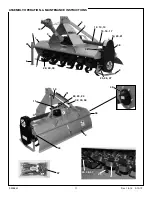
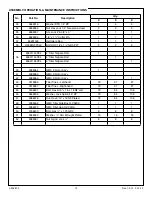
  ASSEMBLY, OPERATION, & MAINTENANCE INSTRUCTIONS

F-20982-1 

Rev. 4-27-12    2-10-12

Summary of Contents for 80900190

Page 1: ...against by mechanical means or product design All operators of this equipment must read and understand this entire manual paying particular attention to safety and operating instructions prior to using Operate lubricate assemble and maintain the equipment in accordance with all instructions and safety procedures in this manual Inspect the equipment prior to each use and replace or repair any parts...

Page 2: ...rm Plates to the front of the Tiller deck using the Category 1 pins washers nuts and 5 8 x 2 hex bolts nuts and washers NOTE Hand tighten all bolts 10 Attach the rounded end one end is flatter than the other of the Rear Braces to the outside of the rear Tiller deck braces using the 5 8 x 2 hex bolts washers and nuts provided ASSEMBLY OPERATION MAINTENANCE INSTRUCTIONS 2 Insert a lift strap through...

Page 3: ...11 Using the 5 8 x 4 hex bolt washer nut and spacer connect the two A Arm Plates as shown using the 2 Spacer 12 Attach the PTO Shield to the inside of the A Arm Plates as shown using the 1 4 x 3 4 bolts and nuts provided 13 Attach the Rear Guard Chain Assembly to the Rear Guard as shown 14 Tighten all bolts ASSEMBLY OPERATION MAINTENANCE INSTRUCTIONS F 21046 2 1 3 14 ...

Page 4: ...rated in this condition Keep all guards in place If guard removal becomes necessary for repairs reinstall the guard prior to use Replace any safety decal that is not legible or is missing The locations of such safety decals are indicated in this manual Never operate this equipment while using alcoholic beverages or drugs that can hinder alertness or coordination Consult your doctor about operating...

Page 5: ...ssness Keep all assistants and bystanders at least 100 from the operating Rotary Tiller The majority of the accidents involve entanglement on the driveline injury of bystanders by the objects thrown by the rotating tines and operators being knocked off the tractor by low hanging limbs and then being run over by the tiller Accidents are most likely to occur with machines that are loaned or rented t...

Page 6: ...urning sharp corners and changing direction on slopes Do not start or stop suddenly on slopes and avoid operating on steep slopes In extremely uneven terrain rear wheels weights front tractor weights and or tire ballast should be used to improve stability Drive Rotary Tiller diagonally over sharp dips and avoid sharp drops to prevent tractor and Rotary Tiller from hanging up Always travel downward...

Page 7: ...lower the Tiller in order to locate the shortest distance between gearbox input shaft and tractor PTO output shaft With the Tiller in the shortest distance position shut down the tractor and secure the tiller in place WARNING If the Tiller is raised up so that the PTO shaft is an an angle sharper than 35 degrees PTO MUST BE STOPPED 2 Pull apart the PTO shaft and attach outer section to tractor PTO...

Page 8: ...he tractor s 3 Point hitch as described in the Tractor s Operator s Manual Set tractor s lift control stop at a position that will prevent the PTO shaft from coming in contact with the front edge of the Tiller when it is at full lift Consult your tractor manual for instructions 2 Apply any multi purpose grease to the outside of the male inner PTO shaft section Assemble PTO shaft and install on Til...

Page 9: ...lways comply with all state and local laws governing highway safety and movement of farm machinery on public roads The use of flashing amber lights is acceptable in most localities However some localities prohibit their use Local laws should be checked for all lighting and marking requirements Always use proper lighting and a Slow Moving Vehicle SMV sign when on a highway or road Do NOT exceed 20 ...

Page 10: ...age may occur Storage Safety Following use or when unhooking the Tiller disengage the PTO stop the tractor set the brakes shut off the engine and remove the ignition keys Store the unit in an area away from human activity Do not park equipment where it can be exposed to direct contact with livestock for long periods of time Damage to Tiller and or livestock injury could result Make sure all safety...

Page 11: ...ls have been damaged removed become illegible or parts have been replaced without decals new decals must be applied New decals are available from the manufacturer Decal sheet 16881080 includes all of the decals shown on this page Call 800 447 2751 or online at www behlencountry com F 20984 1 10 Rev 4 27 12 2 10 12 Decal 9 ...

Page 12: ...4 43 45 46 47 ASSEMBLY OPERATION MAINTENANCE INSTRUCTIONS F 20985 1 11 Rev 1 3 14 2 10 12 1 3 18 9 4 12 13 14 15 16 17 19 20 21 38 8 6 7 5 28 29 30 25 26 27 35 48 31 10 11 22 23 24 32 33 34 36 2 39 49 37 ...

Page 13: ...6 Hex Shaft P P2003 1 1 1 15 2088075 QMC 4 Plastic Tube 17 1 1 1 16 2088076 QMC 5 Plastic Tube 23 1 1 1 17 2088077 QMC 6 Plastic Tube 29 1 1 1 18 1728022 EC PTO AX4 500 736 1 1 1 19 80308040 4 Rotor Tine Gearbox Assembly 1 1 1 20 80308050 5 Rotor Tine Gearbox Assembly 1 1 1 21 80308060 6 Rotor Tine Gearbox Assembly 1 1 1 22 3188116 Screw HHC 1 2 x 1 GR 5 Plated 6 6 6 23 3948002 Washer 1 2 STD Wrou...

Page 14: ...C 4 Rotor Ass y 1 41 2088065 QMC 5 Rotor Ass y 1 42 2088066 QMC 6 Rotor Ass y 1 43 3018386 Tiller Tines Left hand 18 21 27 44 3018387 Tiller Tines Right hand 18 21 27 45 3188401 Bolt Hex 9 16 x 1 5 x 18 NF GR 72 84 108 46 3948209 Washer Lock Split 9 16 ZP 72 84 108 47 2688378 Nut Hex 9 16 x 18 NF Plated 72 84 108 48 2088068 QMC Tiller Side Box H C0200 1 1 1 49 2088070 QMC Tiller Hub H C300 A 1 1 1...

Reviews: