


50
860
76
D
B
-en/
03
35
5.0
00
32
English
⋅
LaserStar T Plus
en
c) Titanium
The parts must be ground appropriately for precise
fitting in order to join titanium. If necessary, make
adapters out of sprues or insert filler metal. Never
anneal or grind the titanium too hot.
Use titanium of a graduation as far as possible.
Extracoronal and intracoronal connecting
elements
Roach ball, Bona anchor and button anchor
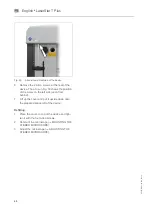
Always weld attachment parts or anchors with base
or backing plates with thin precious-metal welding
wire, as shown in the following figure for a Roach
ball. Set the welding intensity according to the alloy
for the abutment, precious metal or non-precious
metal, taking into account the notes and instructions
in the previous sections.
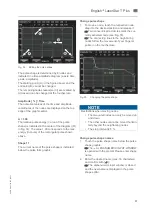
Fig. 45
Welding Bona anchor
Parallel attachment and anchor female parts
Place the female part with its backing plate in
position on the crown in the parallelometer and fix
with wax. Here the attachment parts can first be
fixed at the opposite corners with initial spot welds
without further parallelization. After that complete
the joint on the outer circumference with welding
wire making sure always to weld only short partial
seams on opposite sides (see Fig. 46).
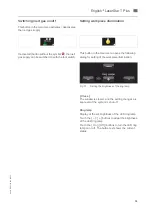
Fig. 46
Welding parallel attachment
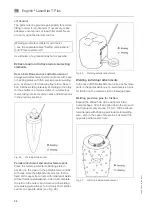
Welding individual attachments
In the case of RSS attachments, locks, anchor male
parts in the partial denture, etc., weld precision pins
for friction on the model as in the following figure.
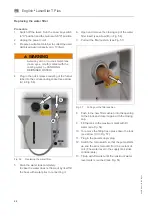
Welding precision pins for friction
Expand the drilled hole at the exit point into a
trumpet shape. Cut off and grind down the pin such
that it projects only around 0.5 mm. Fill the circum-
ferential gap with dripping precious-metal welding
wire - also in the case of steel pins. First weld the
opposite partial seams here.
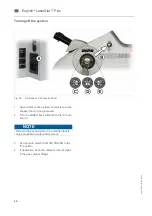
Fig. 47
Welding individual attachment
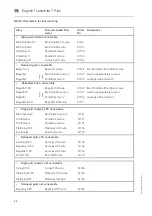
Welding parameters (basis for own tests):
- see the separate tables "Setting combinations"
and "Preset parameters".


