M I D I T H I N G
P O W E R & I N T R O
P O W E R I N G T H E
M O D U L E
U S E R M A N U A L
T H A N K S F O R P U R C H A S I N G A M O D U L E F R O M B E F A C O !
B E F O R E Y O U P L U G T H I S M O D U L E I N . . .
1.
Disconnect your cabinet from the mains.
2.
Triple check the power cord polarity.
The coloured line on the cable (pin
number one) is the -12V rail.
3.
Connect the cable to the POWER connector. If you plug the module
backwards or to the ICSP connector, you might burn it out and
unfortunately this is not covered by the warranty.
4.
If you have any questions please drop us a mail.
I N T R O D U C T I O N
M I D I T H I N G : F O U R C H A N N E L M I D I T O C V I N T E R F A C E
The module allows you to convert MIDI messages into CV/Gate signals, featuring several functional modes
supporting multiple channels and polyphony as well as a drum trigger mode. With the simple press of a button
you are able to change between modes, automatically detect MIDI channels, enter calibration mode and change
several settings like clock resolutions or retrigger mode.
This manual has been updated for firmware
version 2.0 released in April's 2018.
F I R S T L O O K
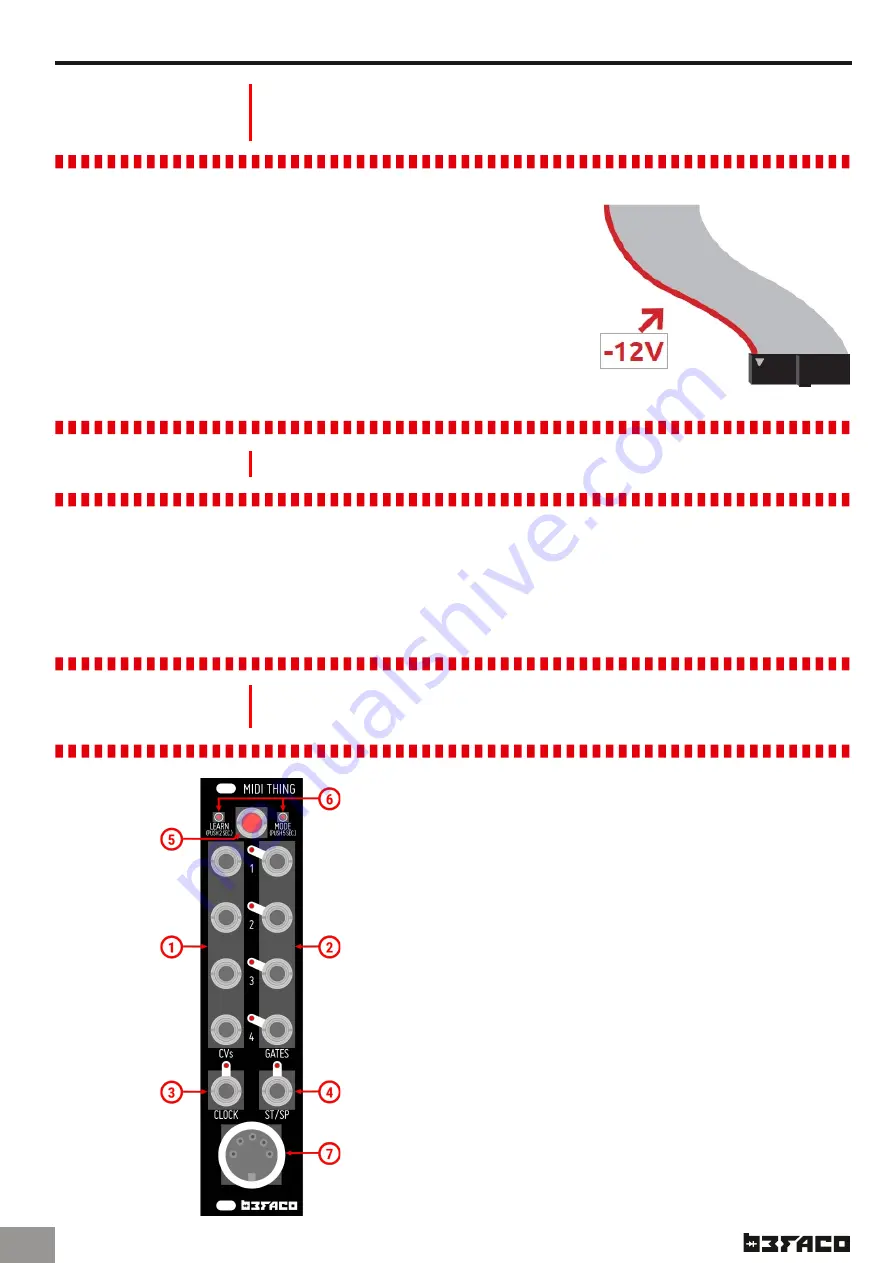
B R I E F V I E W O F T H E F R O N T P A N E L C O N N E C T I O N S A N D
C O N T R O L S
1.
CV Outputs (1-4)
Function varies with selected mode
2.
Gate Outputs (1-4)
Function varies with selected mode
3.
Clock
Clock output
4.
Start/Stop
Start/Stop output
5.
Mode Button
Used to enter Learn or Menu mode. Can also be
used to send an “All Notes Off” MIDI message.
6.
LEDs
Indicates when MIDI notes are received or a mode
is selected
7.
MIDI in
MIDI input
.1


