
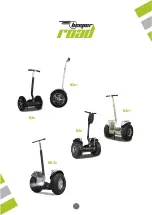

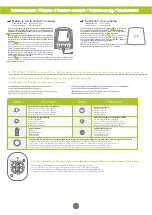


Installation / Install / Instalación / Einrichtung / Impianto
8
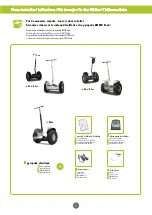
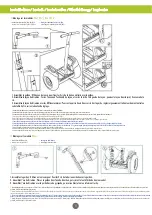
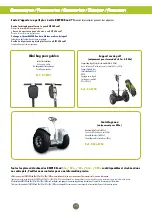
• Montage sur les modèles
R
2e
/
R2e+
/
R3e
/
R3e+
:
• Assembly on the models R2e/R2e+/R3e/R3e+:
• Montage den Modellen R2e/R2e+/R3e/R3e+:
• Montaje sobre los modelos R2e/R2e+/R3e/R3e+:
• Assemblaggio sui modelli R2e/R2e+/R3e/R3e+:
• Montage sur le modèle
R
X5e+
:
• Assembly on the RX5e+ model:
• Montage dem RX5e+-Modell:
• Montaje sobre el modelo RX5e+:
• Assemblaggio sul modello RX5e+:
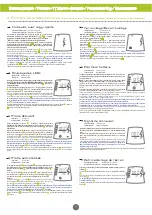
1. Assemblez le guidon : Utilisez un tournevis pour fixer les 3 vis de la barre auxiliaire avec le guidon.
2. Assemblez le tuyau de direction : Sortez lʼanneau à l'extrémité du tuyau, et sortez la vis du côté gauche du tuyau ; poussez le tuyau dans le joint, fixez ensuite la
vis.
3. Assemblez le tuyau de direction avec les différentes pièces : Poussez la partie haute dans vers le bas la partie, réglez soigneusement la hauteur du montant selon
votre taille. Enfin, serrez le boulon de réglage.
1. Assemble the handlebar: Use a screwdriver to fix the 3 screws of the auxiliary bar with the handlebar.
2. Assemble the pipe of direction: Leave the ring at the end the pipe, and leave the screw on the left side of the pipe; push the pipe in the joint, fix then the screw.
3. Assemble the pipe of direction with the various parts: Push the high part in to the bottom the part, carefully regulate the height of the amount according to your size. Lastly, tighten the bolt of adjustment.
1. Arme el manillar: Utilice un destornillador para fijar los 3 tornillos de la barra auxiliar con el manillar.
2. Arme el tubo de dirección: Saque el anillo a la extremidad del tubo, y saque el tornillo del lado izquierdo del tubo; empuje el tubo en la junta, fija a continuación el tornillo.
3. Arme el tubo de dirección con las distintas partes: Empuje la alta parte en hacia abajo la parte, regula cuidadosamente la altura del importe según su tamaño. Por fin, aprietan el perno de ajuste.
1. Setzen Sie die Lenkstange zusammen: Benutzen Sie einen Schraubenzieher, um die 3 Schrauben der Hilfsstange mit der Lenkstange festzulegen.
2. Setzen Sie das Direktionsrohr zusammen: Kommen Sie den Ring am Ende des Rohres heraus und kommen Sie die Schraube der linken Seite des Rohres heraus; drücken Sie das Rohr in der Fuge, festlegen danach die Schraube.
3. Setzen Sie das Direktionsrohr mit den verschiedenen Stücken zusammen: Nach unten drücken Sie den hohen Anteil am Teil, regulieren sorgsam die Höhe des Betrages nach Ihrer Größe. Schließlich ziehen die Einstellungsschraube an.
1. Riunite il manubrio: Utilizzate un cacciavite per fissare le 3 viti della sbarra ausiliaria con il manubrio.
2. Riunite il condotto di direzione: Fate uscire l'anello all'estremità del condotto, e fate uscire la vite del lato sinistro del condotto; spingete il condotto nel giunto, fissate in seguito la vite.
3. Riunite il condotto di direzione con le varie parti: Spingete la parte alta verso il basso nella parte, regolate accuratamente l'altezza dell'importo secondo la vostra dimensione. Infine, stringete il bullone di messa a punto.
1. Assemblez le guidon : Utilisez un tournevis pour fixer les 3 vis de la barre auxiliaire avec le guidon.
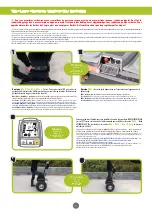
2. Assemblez lʼaxe de direction : Placez le guidon dans lʼaxe de direction, puis serrez le tout à lʼaide du boulon central.
3. Assemblez lʼaxe de direction avec la partie basse du gyropode, puis verrouillez le tout en refermant le clip.
1. Assemble the handlebar: Use a screwdriver to fix the 3 screws of the auxiliary bar with the handlebar. 2. Assemble the axis of direction: Place the handlebar in line with direction, then tighten the whole using the central bolt. 3. Assemble the axis of direction with the low part of the
gyropode, then lock the whole while closing the clip.
1. Arme el manillar: Utilice un destornillador para fijar los 3 tornillos de la barra auxiliar con el manillar. 2. Arme el eje de dirección: Coloque el manillar en el eje de dirección, luego aprietan todo ello con ayuda del perno central. 3. Arme el eje de dirección con la parte baja del gyropode,
luego cierran el volviendo a cerrar al mismo tiempo el clip.
1. Setzen Sie die Lenkstange zusammen: Benutzen Sie einen Schraubenzieher, um die 3 Schrauben der Hilfsstange mit der Lenkstange festzulegen. 2. Setzen Sie die Direktionsachse zusammen: Setzen Sie die Lenkstange in der Direktionsachse dann drücken das Ganze mittels des zentralen
Bolzens. 3. Setzen Sie die Direktionsachse mit dem niedrigen Teil des gyropode zusammen dann verriegeln, indem man den Klipp wieder schließend.
1. Riunite il manubrio: Utilizzate un cacciavite per fissare le 3 viti della sbarra ausiliaria con il manubrio. 2. Riunite l'asse di direzione: Mettete il manubrio nell'asse di direzione, quindi stringete la totalità per mezzo del bullone centrale. 3. Riunite l'asse di direzione con la parte bassa del
gyropode, quindi chiudete pur richiudendo la graffa.