


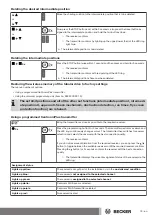


Now press and hold the programming button for a new transmitter.
▻
After 5 seconds, the LED rings on both transmitters start to fill in green.
Continue pressing and holding the programming button.
▻
Once the new transmitter has been added successfully, both transmitters
flash green to confirm.
►
The transmitter has been added successfully.
The programming process can be terminated at any time by pressing the
STOP button on the transmitter that has already been programmed or by re-
leasing the programming button.
Selection of the receiver for the setting mode
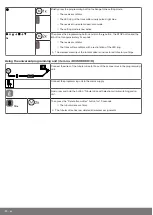
Bring the transmitter as close as possible to the required receiver.
3s
Press the programming button for 3 seconds. The transmitter performs a search and
the LED ring continuously changes colour. The transmitter then switches to receiver
selection and selects the receiver with the best connection quality.
▻
The receiver confirms.
If you do not receive confirmation from the required receiver, you can press the /
button to toggle between the available receivers until the required receiver confirms.
Pressing the button for 3 seconds confirms the receiver with the best connection
quality.
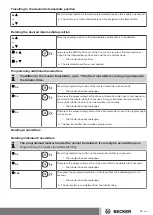
▻
The transmitter displays the current assignment status of the receiver via the
LED ring.
Assignment status
Lights up yellow:
The receiver is not yet part of the installation or is in the
as-delivered condition
.
Lights up blue:
The receiver is
not assigned to the selected channel.
Lights up green:
The receiver is
assigned to the selected channel.
Lights up white:
Centronic PLUS sensor selected.
Lights up purple
Centronic PLUS transmitter selected.
Lights up red:
No receiver located.
Briefly press the programming button to change to the setting mode.
▻
The receiver confirms.
▻
The LED ring of the transmitter slowly pulses light blue.
▻
The receiver now enters dead-man mode.
►
The setting mode is now active.
If a receiver has not yet been added to the installation (LED ring lights up
yellow), it will not be possible to select it in this way. The receiver must be ad-
ded to the installation beforehand. See chapter “Programming Centron-
icPLUS transmitters”.
13 - en
Summary of Contents for P5-20-C18 PLUS
Page 33: ...Declaration of conformity 33 en ...
Page 34: ...34 ...
Page 35: ...35 ...
Page 36: ......


