Becker BE P00 Operating Manual Download Page 47

47

NAVIGATION MODE

>>>

Selecting an address and starting route
guidance

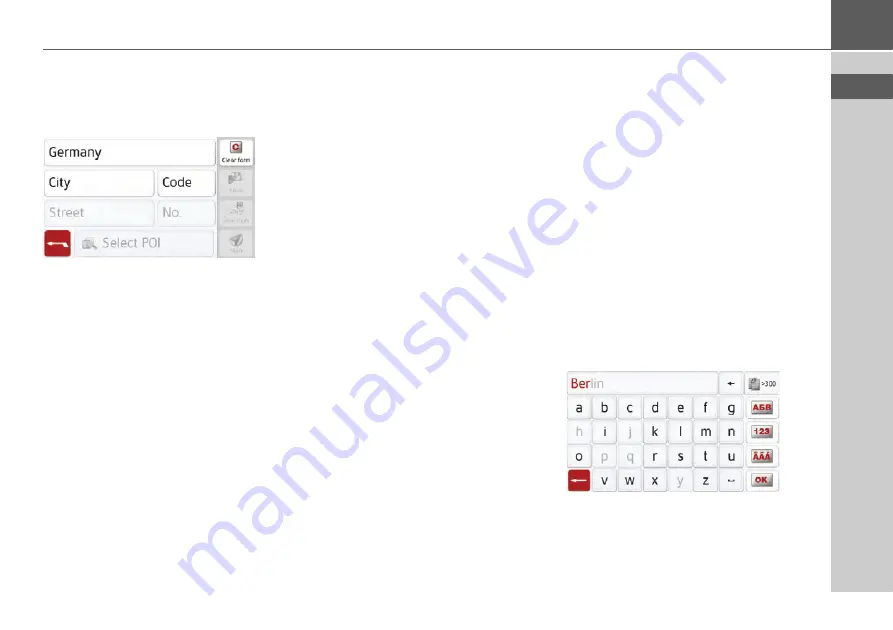
You can enter the exact destination ad-
dress in the address input menu.

The following settings can be made in
the address input menu:

• Town

• Zip code (or postal code)
• Street and house number

• Junctions as an orientation aid

It is also possible to:

• search for a point of interest near to

the address entered (

POI search

). This 

can be entered as described under 
„Point of interest near to an address“ 

on page 

53.

• save the destination in fast access

mode,

• show the route on the map. For 

details please see 

page 

81.

• start the route guidance straight away.

Selecting a town

The destination can be entered by either
using the name or ZIP code. 
When you enter the letters of a place, the
navigation device displays suggestions
(See "Accepting proposals" on page 31).
If you do not want to accept the proposal,
just enter the other letters of the location
you want.
The Navigationsgerät excludes all
impossible letter combinations and ZIP
codes and activates only letter fields or
numerical fields that lead to an existing
location or ZIP code. 

>

Select the option of entering the town
or postcode.

>

>

Enter the letters of the destination
town or the numbers of the postcode
consecutively.

Summary of Contents for BE P00

Page 1: ...OPERATING GUIDE...

Page 2: ...18 Method 1 Fastening with bracket screw on the handlebar 18 Method 2 Fastening on the brake or clutch lever 19 Mounting the device holder and connecting piece 19 Connection diagram 20 Installing veh...

Page 3: ...1 Point of interest in the vicinity 52 Point of interest near to an address 53 Point of interest near to destination 54 POI on route 54 Entering a point of interest directly 54 Additional point of int...

Page 4: ...lecting an image 91 Enlarging the image 92 Rotating the picture 92 Displaying image information 92 Slide show 92 Settings 92 Where am I 93 Change of battery 93 Country information 93 Trip computer dep...

Page 5: ...ted for any purpose whatsoever without express written per mission of United Navigation GmbH All technical information drawings etc are subject to copyright law Copyright 2015 United Navigation GmbH A...

Page 6: ...the buyer immediately after defects are discovered and must be accompanied by the initial buyer s purchase contract The warranty expires after 24 months battery 6 months neither warranty claims nor fu...

Page 7: ...iations in data Therefore you must always observe the actual road signs and traffic regulations In particular the navigation system must not be used as an orientation aid at times of poor visibility S...

Page 8: ...ding to the legal regulations in effect Improper use excludes all warranties The safety instructions are also valid for any original BECKER accessories Permissible temperature range 20 C to 70 C stora...

Page 9: ...ther the device is suitable for the intended use and connection The user shall bear all risks associated with the use of the device and the installation United Navigation GmbH will not be liable for a...

Page 10: ...you with a powerful PND Personal Navigation Device for use in and on vehicles Navigation The use of the GPS Global Positioning system eliminates the tedious process of looking in street maps The rece...

Page 11: ...evice Checking the contents Before you start using the Navigation device the scope and condition of the contents must be thoroughly checked see also page 13 Unpack the contents carefully and check the...

Page 12: ...nctions standard not available optional Navigation system mamba 4 CE LMU BE P00 mamba 4 LMU plus BE P10 Speed camera detector Driver warnings Headset Trip computer Display height profile Move route AD...

Page 13: ...ter Complaints In case of complaints please consult your dealer The equipment may be sent directly to United Navigation in its original packaging Handling the packaging Keep the original packaging in...

Page 14: ...nts DC current 12 V 1 A Battery When depleted the integrated rechargeable battery can be recharged by connecting the Navigation device to the power supply Connect the device to a 12 24 V socket in the...

Page 15: ...ing instructions A comprehensive explanation of the Navigation device functionalities is contained in these operating instructions Registration You can register your product using our software service...

Page 16: ...enu switch 4 3 LCD touchscreen On Off switch Insert for micro SD card under bat tery cover Mini USB connection under battery cover Battery cover Accessories Device holder Screw Plug connection Cover 1...

Page 17: ...menu switch Without Route Main menu With Route Delete stopover 2 Touchscreen with selected main menu 3 Touchscreen button Press Activation of the corresponding button command 4 ON OFF switch 5 Back bu...

Page 18: ...ning on the brake or clutch le ver Method 1 Fastening with bracket screw on the handlebar Push the rubber protection over the bracket screw This protects the hand lebar against scratches If necessary...

Page 19: ...or clutch lever Remove the existing fastening screws from the clamping holder on the brake lever or clutch Screw the square shaft with spherical head onto the clamping holder Use the screws washers s...

Page 20: ...older optio nal The Navigationsger t can be fastened di rectly to the windshield with the vehicle device holder 1 2 1 2 Notice Connect the DC DC adapter to a swit ched positive pole in the ignition ci...

Page 21: ...ge cable Connect the vehicle charge cable to the device holder Connect the other end of the vehicle charge cable to a current source in the vehicle Using the device holder Inserting device into the de...

Page 22: ...Loosen the screw Open the flap Remove the device Close the cover Inserting and removing the bat tery Make sure that the battery is inserted be fore operating the device Open the cover of the battery...

Page 23: ...ure is between 0 C und 45 C Open the cover of the battery compart ment Connect the USB adapter to an electri cal outlet Inserting an SD card optional Open the cover of the battery compart ment Remove...

Page 24: ...g operation when the unit warms up to operating temperature moisture may form internally causing damage to electronic components Do not drop your mobile navigation systemunit protectitfromshocksand do...

Page 25: ...n the display Some pixels may also appear brighter or darker However such instances do not represent a product flaw Start up Once the Navigation device has been unpacked and checked for damage the uni...

Page 26: ...the stop or in the case of a device with an active cradle on the underside of the supporting plate Model dependent this step is not required on navigation devices with magnetic holders Insert the adap...

Page 27: ...he manufactur er s logo appears on the touchscreen When the Navigation device is started for the first time the language selection is displayed automatically Using the buttons or the scroll wheel it i...

Page 28: ...ith a TTS tag support the text to speech function e g announcing roads and reading out text messages Note Use of the Navigation device is only permitted in accordance with the national road traffic re...

Page 29: ...aken The calibration function is started from the menu see also page 101 Basic information about the menus During operations you are assisted by various menus and entry windows The main menu The top m...

Page 30: ...en the two rows of buttons Press the button to cancel route guidance to the displayed destination directly in the main menu Entries made with the entry menu Some applications require entries to be mad...

Page 31: ...then after you en ter the letter H the proposal Hamburg is automatically displayed If no preferences are known for the letter entered then cities locations suitable for the entry are displayed as prop...

Page 32: ...n W rzburg then simply press WUERZBURG or WURZBURG Special characters can be useful when naming destinations and routes In order to switch to the special characters keyboard press the button marked wi...

Page 33: ...y until the desired method of entry is activated The inscription on the button symbolises the method of entry The button represents automatic mode This means that on entry the first letter is automati...

Page 34: ...ter that meets the following minimum requirements Installing the Content Manager You can install the Content Manager on your computer with the following steps Switch the navigation device comple tely...

Page 35: ...emovable storage medium on the computer Click on Start All Programs on the computer Select Becker Click on Content Manager When the Content Manager is started the program executes a number of steps be...

Page 36: ...ired function cannot be performed you should restart the Navigation device by removing the battery briefly and then insert it again If the messages reappear or the unit doesnot function correctly for...

Page 37: ...l can be calculated if signals are received from four or more satellites The Navigationsger t determines the direction and distance from the destination using a navigation computer and a digital stree...

Page 38: ...tination as described under The New destination menu on page 45 If you have already entered your home address you can start route guidance to your home address in the first line A home address once en...

Page 39: ...up using the fast access function The destination list The destination list displays line by line all destinations available for fast dialling Each line of the destination list is divided into two fie...

Page 40: ...button to the left of the desired destination A selection menu appears Icon Meaning Thisdestinationisastandard destination with no special features This destination is protected If the destination mem...

Page 41: ...r t and start route guid ance to one In the main menu press the button My destinations Press the Personal destinations button Remove protection The protection is re moved from the desti nation This fu...

Page 42: ...begin route guidance to the destination straight away You can also display the selected destination in the map On map save in the Rapid access Save or display the route to the destination Display rou...

Page 43: ...en contact you can select one of them after pressing the button My Tracks You can start off from self recorded tracks as well as from GPX tracks that you have imported to the device Furthermore you ca...

Page 44: ...ning Rename Track The track can be renamed Delete track The track is deleted from the list Show track The track is displayed on a map as a blue line Reverse track The direction of travel of thetrackis...

Page 45: ...f Interest button See Points of interest on page 51 Travel Guide model dependent With the travel guide you can select for example MARCO POLO Top Highlights or MARCO POLO Insider Tips and start the gui...

Page 46: ...ion If a country of destination has already been entered it will remain until you select a different country Press the button containing the country of destination to access the country selection list...

Page 47: ...how the route on the map For details please see page 81 start the route guidance straight away Selecting a town The destination can be entered by either using the name or ZIP code When you enter the l...

Page 48: ...et and house number can be entered separate ly using a letter and number field The Navigationsger t excludes all impossible letter combinations and activates only those letters that could give an exis...

Page 49: ...tion button The input menu for the name of the junction will appear Enter the name of the junction Once a few letters of the desired street have been entered a list will automati cally be displayed Pr...

Page 50: ...ed name has been entered and has been pressed to accept it the destination is transferred to fast access mode and protected Starting navigation The Start button starts the route guidance All data ente...

Page 51: ...ncluded in the map and can be displayed there Points of interest include airports and ferry ports restaurants hotels petrol stations public buildings You can use points of interests as navigation dest...

Page 52: ...ol stations a further selection menu is displayed in which you can narrow down the choice further e g by brand If you have selected the category any points of interest belonging to the rele vant categ...

Page 53: ...On map saved in fast access mode Save used for displaying a route to the POI Show route Point of interest near to an address Press POI near location Select the desired country In the City or Code fiel...

Page 54: ...icinity on page 52 POI on route Press the POI on route button The available Point of Interest categories available on the whole route will be displayed Select the desired point of interest on the rout...

Page 55: ...be dis played To display the additional information press the More button shown at the bot tom of the point of interest information screen You can scroll through the displayed text using the arrow bu...

Page 56: ...hosen point using the POI nearby button However you can also store your chosen point in fast access mode Save or display the route to the point of interest Show route You can select a new destination...

Page 57: ...Press the button Where possible an address matching the coordinates will be displayed You can view the destination on the map store it display the route to the destination or start the route guidance...

Page 58: ...llow you to delete the route from the stored routes Selecting and starting a route Press a route to select it The route is loaded and displayed in the stage menu Press the top button Select the start...

Page 59: ...w route Dr cken Sie in der Routenplanung die Taste Create new route You can now enter an intermediate destination as described under The New destination menu on page 45 Enter address Select from last...

Page 60: ...even after optimization however Call up the map display for the stages of the route Press Optimise The route is optimised and recalculated The optimised route is displayed Option Meaning Show details...

Page 61: ...lect whether the map is to be displayed in 3D or 2D mode in a split screen with 3D or 2D display or in arrow mode You can also select whether or not 3D buildings available in towns should be displayed...

Page 62: ...you can define the data to be displayed in the Info box in the top left corner of the map view You can select between Speed Speed limit Time and Height 3D City models You can select whether or not 3D...

Page 63: ...OIs displays no points of interest on the map Selecting User defined selection and then pressing the Select POIs button al lows you to determine for yourself in the menu which then appears whether eac...

Page 64: ...Height Under these options you can select dis plays for the travel without a selected route Here you can only select between Speed Speed limit Time and Height 3D city view With this option you can sel...

Page 65: ...pened Three point of interest catego ries can be selected If you touch the preset option of one of the POI Categories POI 1 2 and 3 a se lection list with 20 POI types appears The Guidance info button...

Page 66: ...about the sign you should follow Country info When this function is enabled you will automatically receive generally applicable traffic information for the relevant country when you cross a national b...

Page 67: ...ed Select a speed and exit the speed menu with the back button Exit the vehicle selection menu too with the back button The selected vehicle type is now displayed The required profile is displayed onc...

Page 68: ...correspondingly smaller roads are selected instead However on longer routes road sections can quite possibly even pass via multi lane highways or through towns Motorways should hardly be used any more...

Page 69: ...letely Noise Level With the Noise level button you can adjust the speed dependent volume control To do this select the noise level suitable for your vehicle Announce streets Using the Announce streets...

Page 70: ...e situation this setting can be fitted into the map display In the Voice guidance settings window press the Volume button The Volume settings window appears Select the desired volume with the and butt...

Page 71: ...he Driver alerts settings window ap pears The available driver alerts are divided into 4 categories The four categories can be enabled or disabled individually The warning sound can be set individual...

Page 72: ...road works for example The traffic situation and the local road signs take precedence over the navigation system information Setting Meaning Show signs Select whether speed limits are never displayed...

Page 73: ...tant for the correct calculation of the estimated time of arrival Press Time in the settings menu The Time settings window appears Using the Time zone you can set whether the time zone should be set a...

Page 74: ...display without guidance info If the navigation is not active almost the entire surface of the touchscreen is filled by the map display The speed limit of the road you are currently travelling on disp...

Page 75: ...field and a maximum of three fields can be displayed The information displayed depends on the settings that are selected in the Navigation settings in the map view menu Advanced Info box data fields T...

Page 76: ...calling the options Route overview button only active if route is selected Traffic lane recommendation can only be seen for certain multi lane roads red arrow recommended traffic lane The speed limit...

Page 77: ...the tunnel is displayed in the bottom on the right When you touch the display the tunnel view disappears If any maneuvres are performed in the tunnel or if the next maneuvre is performed outside the t...

Page 78: ...map and move it in the required direction The map is then moved accordingly You can also select a point as a destina tion as described under Selecting a des tination from the map on page 56 Map orient...

Page 79: ...and if applicable TMC events is displayed with the expected arrival time and distance from the current vehicle position Press the desired Point of Interest or TMC event Information such as the address...

Page 80: ...revious page of the options by pressing the and buttons or by using the scroll wheel The options menu is exited either by selecting a function or by pressing the button Note If there is a traffic jam...

Page 81: ...n the left hand side It takes just a short time for the function to beco me available and the icon to change As soon as this icon is displayed and you select it the route displayed can be moved Press...

Page 82: ...s to select the section of the route to be blocked Press the Block button Select Block for current route to block the section of the route for the current route guidance session only Selecting alterna...

Page 83: ...e Add stopover button You can now enter a stopover as described under The New destination menu on page 45 Enter address Select Point of Interest Personal destinations Contacts Select on map or Enter g...

Page 84: ...played in the lower part of the display Setting day night display You can switch the Navigationsger t display from day to night and vice versa Call up the options menu for the map display Press the Da...

Page 85: ...button you can change directly to the places of interest category Hospital in the current vicinity Also see chapter Points of interest on page 51 With the Petrol Station button you can change directl...

Page 86: ...isplay See Map display options on page 80 After a short time the map is displayed Each route is calculated after each other and displayed on the map The area on the right hand side shows the colour ke...

Page 87: ...file If you select a point by touching the pro file the corresponding height and dis tance from the starting point are dis played for it Press the button to go back to the route view Height profile fo...

Page 88: ...he connection to a connected device Delete this device from the list Delete all devices from the list Telephone Mode Similarly as described in the chapter Headset Mode a telephone can also be connecte...

Page 89: ...Start track recording menu you can record tracks that you can either start off from once again later or use with other devices Chapter My Tracks on page 43 describes how you can export the track Press...

Page 90: ...internal memory The jpg and bmp image formats are sup ported Press the Pictures button A message is displayed stating that the image viewer must not be used when driving Please observe this warning C...

Page 91: ...sired folder and then the desired image You can use the and buttons to scroll through the pages of images and folders The selected image is displayed along with an image menu You can use the menu butt...

Page 92: ...layed Press the button to close the information Slide show In the slide show all the pictures in the current folder level are automatically displayed sequentially Press Slide show in the image viewer...

Page 93: ...ction is particularly helpful for routes or tracks that have been planned for some time After selecting the function just wait until the screen becomes dark Afterwards the battery can be replaced by a...

Page 94: ...play contains the following information Current speed as a number and in the form of a bar graph Maximum speed Average speed without breaks in the journey Average speed with breaks in the journey Note...

Page 95: ...95 EXTRAS Total distance Travel time without breaks in the journey Travel time with breaks in the journey Press the Reset button to reset the values to zero 5 6 7...

Page 96: ...ettings menu You can select the various settings op tionsfrom the system settings menu Operation Selection options Select the desired menu item by press ing the appropriate button The function ality o...

Page 97: ...splay and shows the settings menu Automatic on off The Navigation device can switch automatically to sleep mode when the vehicle ignition is switched off Prerequisite for this The Navigation device mu...

Page 98: ...ween day and night display de pending on the time the current position and the time of year With the following button you can call up the setting Press the Day Night button Select from Automatic Day a...

Page 99: ...tton is labelled with the language name and the associated national flag Scrolling Using the buttons or the scroll wheel it is possible to scroll through the list in the direction of the relevant arro...

Page 100: ...Navigation device Press the Information button The information display appears with the software version number By pressing the Service information button you can display further information such as u...

Page 101: ...tly when buttons are pressed it needs to be calibrated Starting the calibration You can start the calibration using the following button Press the Calibration button The calibration procedure will be...

Page 102: ...to each satellite from the running time differences and thus evaluates its actual current position in terms of geographical length and width In order to determine the position signals from at least th...

Page 103: ...as softly as possible i e without the danger of scratching the screen The stylus is more accurate than opera tion using the fingers since only the thin tip touches the screen In addition dirty marks o...

Page 104: ...40 Standard 40 Storing 50 Display position 56 Display street names 62 Displaying information signs 71 Displaying the route 50 81 Driver warnings 71 E Easy route 67 Entering an address 47 Entering the...

Page 105: ...e options 66 Route planning 45 57 Route types 86 S Safety instructions 7 37 Satellites 85 Selecting a country 46 Selecting a town 47 Selecting destination Entering an address 47 Selecting the street 4...

Page 106: ...n MHz 800 Flash memory 4 GB 8 GB SD RAM 128 MB Li ion battery 1150 mAh Holder for windshield Holder for vehicle integration Dimensions in mm W x H x D 130x92x29 Screen size 10 9 cm Display resolution...

Page 107: ...ctronic devices as well as interfering influences on your unit from other electrical electronic devices are largely prevented EU Declaration of Conformity The United Navigation GmbH hereby declares th...

Page 108: ...life Please bring this product to the appropriate collection sites for processing and recycling The units will be accepted there free of charge The proper disposal of this product serves the purpose o...

Page 109: ...used batteries exclusively via the retail or at collection points specially equipped for this purpose statutory obligation to return It is the duty of the retail and of manufacturers to take back the...

Page 110: ...3LGRCB TGE RGML K J E LJ KL E JG Germany UUU KW CAICP AMK...

Reviews: