background image

8

9

Assembly / Operating Instructions

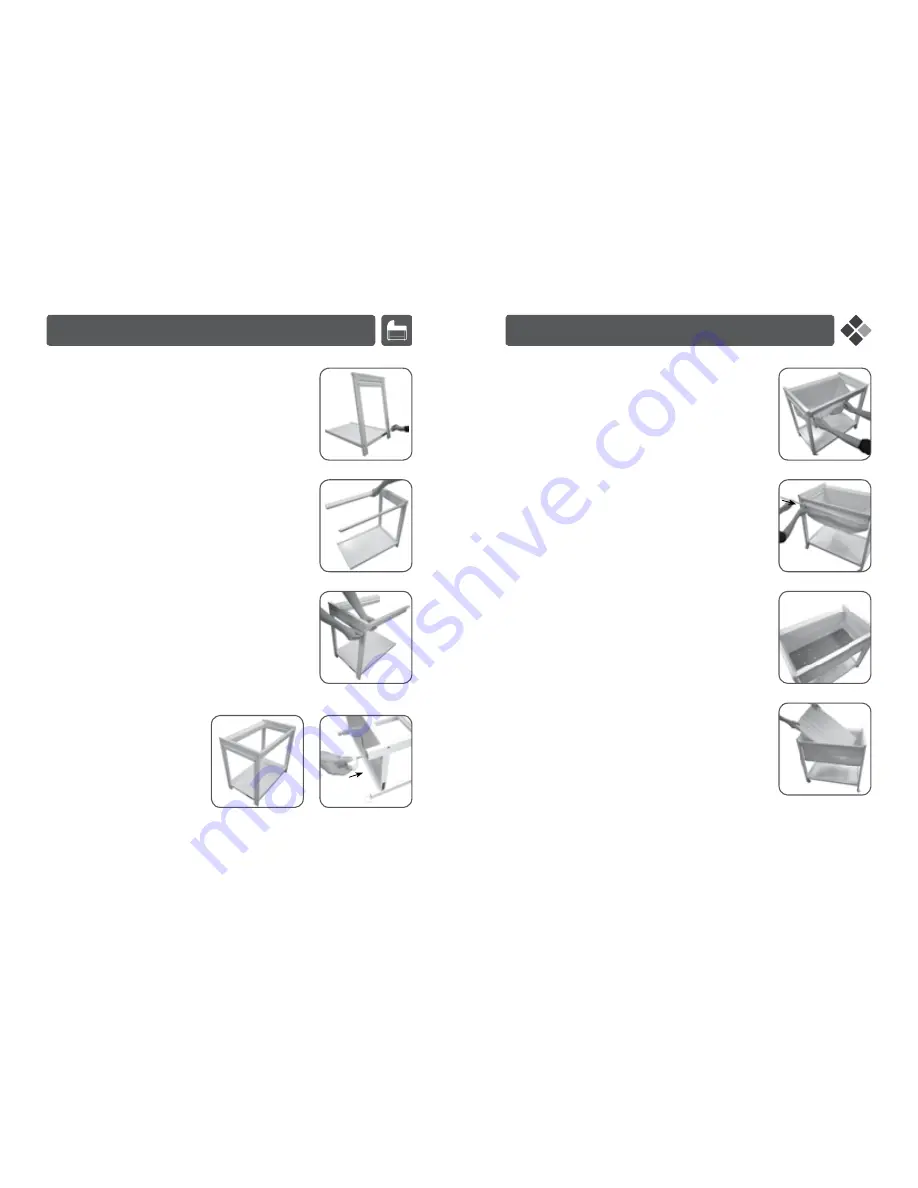
Attaching bottom shelf

1.  Attach the bottom shelf onto the headboard by aligning the 

bottom shelf grooves with the lower holes in the headboard.

2.  Insert two bolts, ensure they are secure but not tight.

Attaching upper (thick) top side rail

1.  Attach both upper (thick) top side rails onto the headboard by 

aligning them with the upper holes in the headboard. Ensure 
that the label “A” & “B” on the top side rail is matched to label 
“A” & “B” on the headboard.

2.  Insert two bolts, ensure they are secured but not tight.

Attaching lower (thin) top side rail

1.  Attach both lower (thin) top side rails onto the headboard by 

aligning them with the lower holes in the headboard directly 
under the upper (thick) top side rail. Ensure that the label “A” 
& “B” on the top side rail is matched to label “A” & “B” on the 
headboard.

2.  Insert two bolts, ensure they are secured but not tight.

Attaching foot end and castors

1.  Attach the foot end by aligning it 

with the top side rails and bottom 
shelf grooves.

2.  Insert and secure the remaining six 

bolts into the foot end.

3.  Tighten all bolts on crib changer.
4.  Insert all four castors into the legs of the headboard and foot  

end, press firmly to ensure they are secure.

Assembly / Operating Instructions

Inserting crib mesh

1.  Insert the crib mesh into the assembled crib frame. Ensure the 

long sides of the crib mesh correspond with the long sides of 
the crib frame. 

2.  Pull one long side of the crib mesh through the gaps between 

the upper (thick) top side rail and the lower (thin) top side rail.

PLEASE NOTE:


Ensure that the triangle point of all rails 

corresponds with the shape of the gaps between the top  
side rails.

Inserting mattress board and mattress pad

1.  Place the mattress board into the crib.

3.  Slide a long rail through the seam as shown in image.
4.  Repeat previous steps for other long seam and two short 

seams.

2. 

Press down firmly to ensure the mattress board is fully inserted.

3.  Insert mattress pad on top of the mattress board., with the 

fabric surface facing upwards.

Summary of Contents for 096328

Page 1: ...BEBECARECRIB Model 096328 IMPORTANT RETAIN FOR FUTURE REFERENCE READ CAREFULLY ...

Page 2: ... bassinet with only one child at a time Strings can cause strangulation Do not place items with a string around a child s neck such as hood strings or pacifier cords Do not suspend strings over a bassinet or attach strings to toys DO NOT leave child unattended in the crib NEVER place crib near a window where cords from curtains can strangle a child Remove any tools or excess parts including plasti...

Page 3: ...are Universal Crib This product has been designed and developed with safety comfort and functionality in mind Please take the time to read this manual carefully before using this product and keep it in a safe place for future reference x2 x1 x1 x1 x1 x2 Assembly Contents Top rail flat pre assembled Headboard with Bebecare badge attached Foot end Bottom shelf Mattress board Upper thick top side rai...

Page 4: ...x2 x2 x2 x1 x1 x1 x14 x4 x2 x1 Assembly Contents Assembly Contents Lower thin top side rail Long rail Short rail Mattress pad with fitted sheet Crib mesh Allen key Bolts Castors Towel rail moulds Towel rail ...

Page 5: ...tors 1 Attach the foot end by aligning it with the top side rails and bottom shelf grooves 2 Insert and secure the remaining six bolts into the foot end 3 Tighten all bolts on crib changer 4 Insert all four castors into the legs of the headboard and foot end press firmly to ensure they are secure Assembly Operating Instructions Inserting crib mesh 1 Insert the crib mesh into the assembled crib fra...

Page 6: ...f your crib wipe down with a damp cloth and use a mild soap solution if necessary Do not use abrasive cleaners Always store product in a clean dry place Maintenance Always check parts regularly for tightness of screws nuts and other fasteners tighten or replace if required To maintain the safety of your product seek prompt repairs for bent torn worn or broken parts Use only those parts and accesso...

Page 7: ...o Drive VIC 3030 Customer Service 1300 667 137 www cnpbrands com au Distributed in New Zealand by Wainhouse Distribution 2 6 Argyle St Morningside PO Box 41 014 St Lukes Auckland New Zealand Customer Service 0800 567 5000 helpline wainhousedist co nz ...

Reviews: