background image


25 

WY• WIETLACZ 

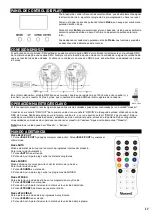
Panel ster

owania oferuje kilka funkcjonalności: możesz łatwo ustawić 

adresowanie DMX, włączyć gotowe programy lub zresetować urządzenie. Menu 

główne jest dostępne po naciśnięciu przycisku 

Mode

. Możesz się poruszać w 

menu za pomocą przycisków 

Up

 oraz 

Down

.  


Naciśnij 

Enter

, aby wybrać pożądany tryb.  


Możesz zmienić wybór naciskając 

Up

 oraz 

Down

. Potwierdź każdorazowo nowy 

wybór naciskając 

Enter

.  


Możesz opuścić tryb naciskając 

Mode

. Funkcje urządzenia są opisane w dalszej 

części instrukcji.  


POŁĄ CZENIE DMX512 

Jeśli używasz standardowego sterownika DMX, możesz podłączyć go kablem DMX do pierwszego urządzenia zgodnego ze 

standardem DMX w łańcuchu. Podłączaj kolejne urządzenia zgodnie ze schematem zamieszczonym poniżej.  

Jeśli korzystasz ze sterownika wyposażonego w 5-pinowe gniazdo DMX, będziesz potrzebował odpowiedniego adaptera.  


Na końcu ostatniego urządzenia należy wpiąć terminator DMX. Jest to niewielkie urządzenie wyglądające jak wtyk 

XLR, w którym piny 2 oraz 3 są połączone ze sobą oraz opornikiem 120 Ohm. 
 

TRYB MASTER/SLAVE 

Tryb master/slave pozwala na to, aby kilka takich samych urządzeń powielało ustawienia jednego urządzenia “master”.  
 

Podłącz 3-pinowy kabel DMX do wyjścia DMX w pierwszym urządzeniu oraz wejścia DMX w kolejnym urządzeniu. Powtórz 
proces 

z trzecim, czwartym itd. urządzeniem, albo zobacz sekcję powyżej (Połączenie DMX). Wybierz urządzenie, które będzie 

kontrolować pozostałe, oraz za pomocą panelu z wyświetlaczem ustaw w nim tryb „master”. Pozostałe urządzenia, które 

powinny przyjmować ustawienia urządzenia „master”, należy ustawić w trybie „slave”. Teraz wszystkie urządzenia będą 

pracować tak samo. 
  

Informacja:


Każde urządzenie może pracować jako “master” lub “slave”.


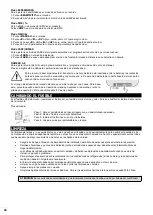
PILOT ZDALNEGO STEROWANIA 

BLACK OUT Mode 

Naciśnij 

<BLACK OUT>

 aby opu

ścić aktualny tryb. Naciśnij ponownie 

<BLACK OUT>

 by 

powrócić do poprzedniego trybu. 

 
AUTO Mode 

Za pomocą tego przycisku możesz skorzystać z wbudowanych programów automatycznych. 

Aby włączyć tryb automatyczny: 
1. 

Naciśnij na pilocie przycisk

<AUTO>

2. Naciskaj

 <+>

 lub 

<–>,


aby wybierać pośród gotowych programów. 


SOUND Mode 

Za pomocą tego przycisku możesz skorzystać z wbudowanych programów dźwiękowych 

reagujących na muzykę. 

Aby włączyć tryb dźwiękowy: 
1. 

Naciśnij na pilocie przycisk 

<SOUND>.


2. Naciskaj

 <+>

 lub 

<–>,


aby wybierać pośród gotowych programów dźwiękowych. 


STROBE Mode 

Za pomocą tego przycisku możesz skorzystać z funkcji stroboskopu. 
1. 

Naciśnij na pilocie przycisk  

<STROBE>

2. Naciskaj

 <+>

 lub 

<–> 

aby zwiększyć bądź zmniejszyć częstotliwość błysku. 

3. 

Naciśnij ponownie 

<STROBE>

, aby opuścić tryb stroboskopu. 


Summary of Contents for 150.735

Page 1: ...BX30PAR 3x10W 4 in 1 Ref nr 150 735 INSTRUCTION MANUAL GEBRUIKSAANWIJZING BEDIENUNGSANLEITUNG MANUAL DE INSTRUCCIONES MANUEL D INSTRUCTIONS INSTRUKCJA OBSŁUGI V1 0 ...

Page 2: ...2 ...

Page 3: ...sity LEDs Do not look into the LED light to prevent damage to your eyes Do not repeatedly switch the product on and off This shortens the life time Keep the unit out of the reach of children Do not leave the unit unattended Do not use cleaning sprays to clean switches The residues of these sprays cause deposits of dust and grease In case of malfunction always seek advice from a specialist Only ope...

Page 4: ...fuse Make sure the device has an appropriate electrical ground to avoid the risk of electrocution or fire INSTALLATION Attention The installation of the product has to be built and constructed in a way that it can hold 10 times the weight for 1 hour without any harming deformation The installation must always be secured with a secondary safety attachment e g an appropriate catch net This secondary...

Page 5: ...one master unit Connect the first unit DMX OUT socket with the second unit DMX IN using a 3pin DMX Cable Repeat this process with the third fourth etc or see a above section DMX 512 connection Choose the unit that will control all other and set this in master mode via display The other units that must react on the master you must set in slave mode The Slave will synchronously follow the Master Not...

Page 6: ...battery support 2 For operation one 3V button cell type CR 2025 is required When inserting pay attention that the positive pole of the button cell shows upwards in the support REPLACING THE FUSE If the fuse is defective replace the fuse with a fuse of the same type and value Before replacing the fuse unplug mains lead Procedure Step 1 Open the fuse holder on the rear panel with a fitting screwdriv...

Page 7: ...hanging Monteer minimaal 50 cm van brandbare objecten en laat tenminste 1meter vrij aan weerszijden voor een deugdelijke ventilatie Dit apparaat bezit een hoge intensiteit LED kijk nooit in de LED om oogbeschadigingen te voorkomen Het apparaat buiten bereik van kinderen houden Bovendien mag het apparaat nooit onbeheerd gelaten worden Gebruik geen schoonmaakspray om de schakelaars te reinigen Resta...

Page 8: ...het apparaat direct op de netspanning worden aangesloten en mag géén dimmer of regelbare voeding worden gebruikt Sluit het apparaat altijd aan op een beschermd circuit aardlekschakelaar of zekering Zorg ervoor dat het apparaat voldoende elektrisch is geaard om het risico op elektrocutie of brand te vermijden INSTALLATIE De constructie van de ophanging dient zo te zijn dat deze 10 keer het gewicht ...

Page 9: ...ve bediening maakt het mogelijk verschillende zelfde apparaten te bedienen door een Master apparaat Sluit het eerste apparaat DMX OUT connector met het tweede apparaat DMX IN door gebruik te maken van een 3 pins DMX kabel Herhaal deze procedure met de derde vierde enz of zie het hoofdstuk DMX 512 Aansluiten Kies het apparaat dat alle andere moet aansturen en zet deze in de master modus via het dis...

Page 10: ...dan de batterij Aan de achterzijde van de afstandsbediening drukt de schuif met inkeping naar rechts 1 tegelijkertijd verwijdert de batterijhouder 2 Voor de werking is een 3V knop cel type CR2025 nodig Let op bij de het vervangen van de batterij dat u de positieve pool van de knoopcel omhoog plaatst VERVANGEN ZEKERING Indien de zekering defect is dient u de zekering te vervangen door een zekering ...

Page 11: ...rleisten Das Gerät besitzt eine hochintensive LED Niemals direkt in die LED blicken um die Augen nicht zu beschädigen Niemals das Gerät kurz hintereinander ein und ausschalten Dadurch verkürzt sich die Lebensdauer erheblich Das Gerät außerhalb der Reichweite von Kindern halten Das Gerät niemals unbeaufsichtigt lassen Die Regler nicht mit Reinigungssprays reinigen Diese hinterlassenen Rückstände di...

Page 12: ...hne Spuren von Verformung tragen können Verwenden Sie immer das mitgelieferte Montagebügel um das Gerät zu hängen Das Gerät darf nur über den Montagebügel nicht enthalten an der mitgelieferten Hänge Befestigungsbügel installiert werden Das Gerät muss immer mit Hilfe von Sicherungsseil gesichert werden Die Anlage muss immer mit einer zweiten Sicherheitsvorrichtung z B einem geeigneten Fallnetz Sich...

Page 13: ...X OUT Busche mit dem zweiten Gerät DMX IN durch Verwendung eines 3 Pin DMX Kabel Wiederholen Sie diesen Vorgang mit dem dritten vierten usw oder sehen Abschnitt DMX 512 Anschluss Wählen Sie das Gerät die alle anderen müssen steuern und setzen Sie ihn in den Master Modus über das Display Die anderen Geräte die auf dem Master reagieren müssen müssen Sie im Slave Modus einstellen Die Slave werden syn...

Page 14: ...ienung wird eine 3 V Knopfzelle Typ CR 2025 benötigt Achten Sie beim Einsetzen darauf dass der Pluspol der Knopfzelle im Halter nach oben zeigt SICHERUNGSWECHEL Wenn die Feinsicherung des Gerätes defekt ist darf diese nur durch eine Sicherung gleichen Typs ersetzt werden Vor dem Sicherungswechsel ist das Gerät allpolig von der Netzspannung zu trennen Netzsteckerziehen Vorgehensweise Schritt 1 Öffn...

Page 15: ... inflamables y deje un espacio de al menos 1 metro a cada lado para permitir que haya suficiente ventilación Este aparato contiene LEDs de alta luminosidad No mire a la luz del LED para evitar daños en su vista No lo apague y encienda repetidamente Esto acorta su tiempo de vida Mantenga el aparato fuera del alcance de los niños No deje el aparato sin vigilancia No utilice sprays limpiadores para l...

Page 16: ...ircuito protegido disyuntor o fusible Asegúrese de que el producto tiene una toma de tierra adecuada para evitar el riesgo de electrocución o incendio INSTALACIÓN Atención La instalación del aparato debe ser de una manera que pueda soportar 10 veces su peso durante 1 hora sin sufrir deformaciones dañosas La instalación siempre debe ser efectuada con un accesorio de seguridad secundario por ejemplo...

Page 17: ...arios mismas unidades pueden ser controladas por una unidad maestro Conectar en el enchufe DMX OUT de la primera unidad con el enchufe DMX IN de la segunda unidad utilizando un cable DMX de 3 pines Repita este proceso con la tercera cuarta etc o ver una sección anterior DMX 512 de conexión Elija la unidad que controlará a todas las demás y establezca esto en el modo maestro a través de la pantalla...

Page 18: ...Si el fusible está defectuoso reemplace el fusible por un fusible del mismo tipo y valor Antes de sustituir el fusible desconectar de la corriente Procedimiento Paso 1 Abra el portafusibles del panel trasero con un destornillador adecuado Paso 2 Retire el fusible viejo del portafusibles Paso 3 Instale el fusible nuevo en el portafusibles Paso 4 Vuelva a colocar el portafusibles en la caja LIMPIEZA...

Page 19: ...vision N allumez pas et n éteignez pas l appareil de manière répétée Cela réduit sa durée de vie Conservez l appareil hors de la portée des enfants Ne laissez pas l appareil sans surveillance N utilisez pas d aérosols pour nettoyer les interrupteurs Les résidus créent des dépôts et de la graisse En cas de dysfonctionnement demandez conseil à un spécialiste Ayez toujours les mains propres pour util...

Page 20: ... de l appareil doit être pensée et réalisée de telle sorte que le support de fixation puisse supporter 10 fois le poids de l appareil pendant une heure sans aucune déformation L installation doit toujours être assurée par un second système de fixation par exemple un filet ou une élingue Ce second système doit être conçu de telle sorte que aucun élément de l installation ne puisse tomber si la fixa...

Page 21: ...rer plusieurs appareils via un seul appareil Master Reliez la prise du premier appareil DMX OUT au deuxième appareil DMX IN en utilisant un cordon XLR 3 pôles Répétez la procédure avec le troisième quatrième appareil ou reportez vous au chapitre Branchement DMX 512 Choisissez l appareil qui va contrôler les autres et réglez le en mode Master via l affichage Les autres appareils devant réagir aux i...

Page 22: ... appuyez sur la petite languette avec la fente vers la droite 1 et simultanément retirez le support de batterie 2 Une pile bouton 3 V type CR2025 est nécessaire Veillez à respecter la polarité pôle plus de la pile bouton vers le haut REMPLACEMENT DU FUSIBLE Si le fusible est défectueux il faut le remplacer par un fusible de même type et de même valeur Avant de le remplacer veillez à débrancher l a...

Page 23: ...m od materiałów łatwopalnych i zachowuj co najmniej 1m wolnej przestrzeni z każdej strony aby zapewnić odpowiednie chłodzenie Urządzenie posiada diody LED wysokiej mocy Nie patrz bezpośrednio na diody aby nie uszkodzić wzroku Nie włączaj i wyłączaj urządzenia co chwilę Skraca to jego żywotność Trzymaj z dala od dzieci Nie zostawiaj sprzętu bez opieki Nie używaj spray ów do czyszczenia przełącznikó...

Page 24: ...lektrycznego za pomocą bezpiecznika lub wyłącznika instalacyjnego Upewnij się że urządzenie jest uziemione aby uniknąć pożaru lub śmiertelnego porażenia prądem INSTALACJA Uwaga Instalacja urządzenia powinna być przeprowadzona na konstrukcji która jest w stanie utrzymać 10 krotność wagi sprzętu przez godzinę bez żadnych deformacji Instalacja musi być zawsze dodatkowo zabezpieczona np linką bezpiecz...

Page 25: ...inowy kabel DMX do wyjścia DMX w pierwszym urządzeniu oraz wejścia DMX w kolejnym urządzeniu Powtórz proces z trzecim czwartym itd urządzeniem albo zobacz sekcję powyżej Połączenie DMX Wybierz urządzenie które będzie kontrolować pozostałe oraz za pomocą panelu z wyświetlaczem ustaw w nim tryb master Pozostałe urządzenia które powinny przyjmować ustawienia urządzenia master należy ustawić w trybie ...

Page 26: ...u z tyłu urządzenia przesuń w prawo malutki plastik 1 oraz w tym czasie wyciągnij tackę baterii 2 Do używania pilota wymagana jest jedna bateria CR 2025 3V Podczas wkładania baterii powinien być na górze WYMIANABEZPIECZNIKA Jeśli bezpiecznik jest niesprawny wymień go na nowy egzemplarz tego samego typu i wartości Przed wymianą bezpiecznika wyciągnij kabel zasilający z gniazda Instrukcja Krok 1 Otw...

Page 27: ...de Soun So 1 4 Sound program Speed SPEE SP 1 9 Speed Mic Sensitivity SEnS SE 1 9 MIC sensitivity PAR Edit colour Colo r000 255 Red 0 100 g000 255 Green 0 100 b000 255 Blue 0 100 u000 255 UV 0 100 Dimming dIMM dI1 dI 9 Master dimming Silent scene SILE on oFF Silent scene by sound program Slave SLAV Slave Slave Infrared InFr on oFF Enable or disenable IR remote ...

Page 28: ... 060 069 Magenta 070 079 Cyan 080 089 Dark orange 090 099 Green yellow 100 109 Salmon 110 119 Turquoise 120 129 Light Green 130 139 Orange 140 149 Lavender 150 159 Light blue 160 169 Dark blue 170 255 Pink 4 Strobe SMD 000 009 No function 010 255 SMD Stroboscope Rate 0 100 5 SMD Effect 000 009 No function 010 149 White SMD combination 150 255 Rainbow effect slow fast 6 RGB Ring 000 009 No function...

Page 29: ...e 170 255 Pink 8 Strobe SMD 000 009 No function 010 255 SMD Stroboscope Rate 0 100 9 SMD Effect 000 009 No function 010 149 White SMD combination 150 255 Rainbow effect slow fast 10 RGB Ring 000 009 No function 010 029 Red 030 049 Green 050 069 Blue 070 089 Red Green 090 109 Green Blue 110 129 Red Blue 130 149 Red Green Blue 150 255 Rainbow effect slow fast 11 Auto Sound 000 009 No function 010 03...

Page 30: ...wer 40Watt LED 3x 10Watt 4 in 1 RGB UV White SMD LED 27 x 0 5Watt RGB SMD LED 18 x 0 5Wat Fuse T1A DMX Channels 1 7 11 Channels Function DMX Auto Sound active Master Slave and IRC Dimensions per unit 218 x 122 x 245mm Weight per unit 1 1 kg The specifications are typical The actual values can slightly change from one unit to the other Specifications can be changed without prior notice ...

Page 31: ...BEAMZ Regulatory Requirement EN55015 2013 EN 61000 3 2 2014 3 3 2013 EN 61547 2009 EN 61000 4 2 2009 4 3 2006 A1 2008 A2 2010 4 4 2012 4 5 2014 4 6 2014 4 8 2010 4 11 2004 EN 60598 1 2015 2 17 1989 A2 1991 EN 62471 2008 IEC 62321 1 2013 I hereby declare that the product meets the requirements stated in Directives 2014 35 EU and 2014 30 EU and conforms to the above mentioned Declarations Almelo 22 ...

Page 32: ...32 Specifications and design are subject to change without prior notice www tronios com Copyright 2017 by TRONIOS the Netherlands ...

Reviews: