

2) Iridium & GPS Antenna Connections
The antenna connections exit from the rear of the LiteDOCK
Extreme cradle, via the antenna loom. There are two RF
connections required, the Iridium TNC female connector and
GPS SMA female connector.
1.
Refer to the antenna installation guide for antenna
mounting and location requirements.
WARNING
DO NOT pull with force on the cables from the rear of the
LiteDOCK. Please install strain relief clamping for the antenna
cables where required.
Correct installation of the antenna system is a vital part of the
LiteDOCK system, to ensure reliable functionality, and drop-free
calls.
1. Attach one pivot base to the
rear of the LiteDOCK Extreme
using the M4 screws and washers
supplied.
2. Secure the second pivot base to
the location you have selected for
mounting the LiteDOCK Extreme.
(Screws not supplied)
3. Use the interconnecting arm of
the RAM® mount to secure the
LiteDOCK Extreme to the pivot
base and tighten into the desired
location firmly using the wing
nut on the arm.
1) Mounting Cradle
The LiteDOCK Extreme is supplied with a universal RAM® mount bracket that enables mounting to any flat surface (vertical or
horizontal) within a vehicle, or other required location.
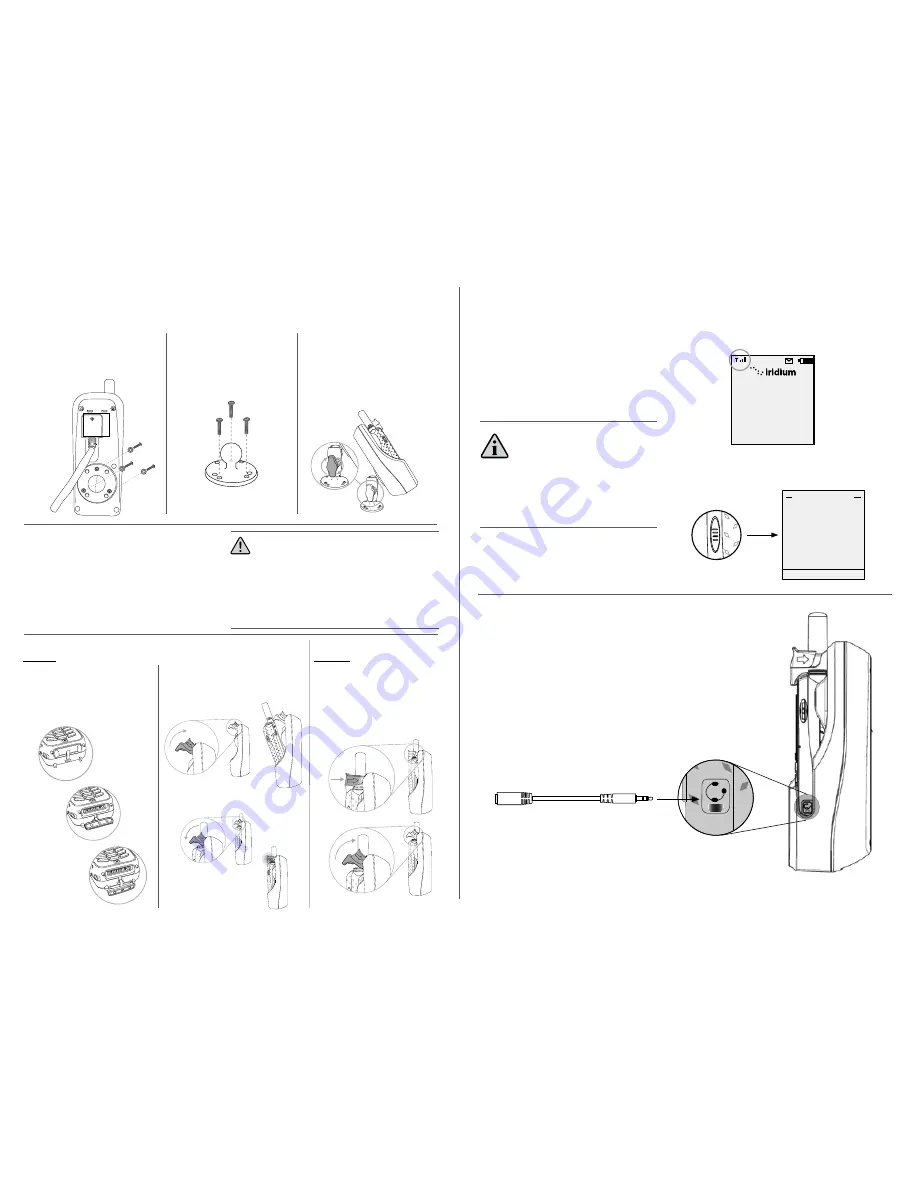
5) How to Make a Call
To use the LiteDOCK for a call, you will need to either:
1.
Enable the Iridium Extreme handset speakerphone function
after the call is connected. (Refer to the Iridium Extreme User
Manual)
2.
Connect the Iridium Extreme earpiece to the Extreme
handset. The connection for the Iridium Extreme earpiece is
on the right side and an extension cable (supplied with the
LiteDOCK) will need to be plugged in before docking the
handset into the LiteDOCK. This cable will allow the use of
the earpiece.
4. Check the Iridium signal on the handset to make
sure that the antenna is connected correctly and is
receiving a signal.
5. Press the button on the right side of the phone to
check the GPS fix.
4) Power Connection
1. Connect a power source to the DC power jack on
the cable loom, either the Iridium AC/DC adaptor,
or the Iridium car cigarette lighter adaptor. Power
can also be connected via USB to the USB port on
the bottom of the LiteDOCK.
2. The green status LED will turn on to indicate it has
power.
3. When the Iridium Extreme handset is docked it will
automatically start charging.
NOTE
If the Iridium Extreme handset is OFF, the LiteDOCK will
not automatically switch the Iridium Extreme handset
ON. You will need to manually switch ON the Iridium
Extreme handset.
Registered
15:40
Menu
09-JUL-11
Help
Current Location
Lat:
Lon:
Alt:
Age of Fix
Updating...
Select
Back
Earpiece Extension Cable
1. At the base of the Iridium Extreme
handset there is an accessory
connector cover. Open the cover and
move it to the back of the handset,
securing it to the two rear retaining
features.
2. Press down the latch button and then
gently rotate it up to open the latch.
Place the Iridium Extreme handset into
the LiteDOCK Extreme.
3. Lift the latch back over the handset
until it Click’s into place.
“CLICK”
1. To remove the handset, first press
down on the latch button and then
rotate the latch up and away from
the handset. The handset can now
be slid up and out of the LiteDOCK.
Refit the accessory connector cover
to maintain the IP rating of the
Iridium Extreme handset.
3) Inserting and Ejecting Extreme Handset
Inserting:
Removing:


