11
10
IMPORTANT OBSERVATIONS
•
The time taken to heat baby’s meal will vary depending on its consistency: thick or wate-
red-down milk, thick or runny baby food, initial temperature of the baby bottle.
•
You will learn yourself very quickly the temperature at which you need to set the bottle
heater for your child’s meal.
•
Refer to the recommended time given by the food manufacturers, but, in all cases, always
check that the temperature is not too high and that it will not burn your child. Do this by
pouring a drop of milk on the back of your hand or by tasting the food in the jar.
•
The product sets itself automatically according to the outside temperature. Therefore, the
settings may vary in the event of high temperatures (triggered from position 2 or 3).
BOTTLE HEATER FUNCTION
•
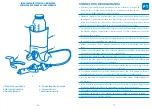
Remove the rim and the teat. Place the bottle in the reservoir (a) and fill it with water 1cm
below the top.
•
Put the button (c) on a setting between 1 and 5 depending on the amount to be heated.
•
After 5 to 10 minutes, the temperature setting light switches off: the bottle is ready.
• Shake the bottle and always check that it is not too hot by pouring a drop of liquid
on the back of your hand.
• For small quantities, never use position 5 on the temperature setting button (c).
BABY JAR HEATER FUNCTION
• Important: always remove the lid of the baby food jar before placing it in the
reservoir.
•
Place the tongs (e) around the jar and put it in the reservoir (a).
•
Fill the reservoir with water.
•
Put the button (c) on a setting between 4 and 5 depending on the quantity to be heated.
•
The temperature setting light (b) comes on.
•
Remember to stir the contents of the jar occasionally in order to ensure an even temperature.
•
After 15 to 20 minutes, the temperature setting light switches off: the baby food jar is ready.
• After having mixed the contents, always check that it is not too hot and that it will
not burn your child by tasting a small amount.
• For small quantities, never use position 5 on the temperature setting
button (c).
WARMER FUNCTION
• Never leave a bottle or baby food jar to heat for more than one hour.
You may also keep the baby bottle or baby food jar, which you have just heated, warm.
• Put the baby bottle or baby food jar back in the reservoir (a) and check that there is still
enough water.
• Put the button (c) on a setting between 1 and 3.
USING WITH A CIGARETTE LIGHTER ADAPTER (F)
•
Your bottle heater may be used in a car with the cigarette lighter adapter (f).
• Never use it while the car is in motion or you run the risk of scalding yourself.
•
nsert the adapter (f) on the power cable and plug it into your vehicle’s cigarette lighter.
The device works in the same way as described above. However, in this case, heating time is slightly
longer. Therefore, in order to heat bottles more quickly, turn the button to the highest setting.
CLEANING
•
Unplug the device and leave it to cool.
•
Never soak the device in water and never wash it under the tap.
•
Clean it with a damp cloth or sponge. Dry it with care.
•
Do not use scouring pads, alcohol, or scouring powder.
•
To descale the heating reservoir (a) use white vinegar only.
GB
The logo on this product featuring a crossed out wheelie bin indicates
that the product must not be disposed of with your other household
waste. In order to prevent damage to the environment or human health,
please separate the product from other waste in order to ensure that it
is recycled in a manner that is safe for the environment. For further infor-
mation about existing collection sites, please contact your local city
office or the shop where you purchased the product.


