background image

11

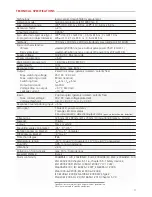
TECHNICAL SPECIFICATIONS

Specifications are subject to changes without prior notice.

All values measured in specific conditions.

Technology:
Detection mode:
Max. detection range:
Remission factor:
Angular resolution:
Min. detected object size (typ.):
(in proportion to object distance)
Testbody:
Emission characteristics:
     IR laser:
     Red visible laser:
Supply voltage:
Power consumption:
Peak current at power-on:
Cable length:
Response time:
Output:
     Max. switching voltage:
     Max. switching current:
     Switching time:
     Output resistance:
     Voltage drop on output:
     Leakage current:
Input:
     Max. contact voltage:  
     Voltage threshold:
Response time monitoring input:
LED-signal:

Dimensions:
Material:
Colour:
Mounting angles on bracket:
Rotation angles on bracket:
Tilt angles on bracket:
Protection degree:
Temperature range:
Humidity:
Vibrations:
Pollution on front screens:
Expected lifetime:
Norm conformity:

laser scanner, time-of-flight measurement
motion and presence (EN 12453 Typ. E)
LZR

®

-I100: 9.9 m x 9.9 m; LZR

®

-I110: 5.0 m x 5.0 m

> 2 %
0,3516 °
LZR

®

-I100: 2,1 cm @ 3 m ; 3,5 cm @ 5 m ; 7 cm @ 10 m

LZR

®

-I110: 2,1 cm @ 3 m ; 3,5 cm @ 5 m

700 mm x 300 mm x 200 mm (testbody A according to EN 12445)

wavelength 905 nm; max. output pulse power 75 W (CLASS 1)
wavelength 650 nm; max. output CW power 3 mW (CLASS 3R)
10-35 V DC @ sensor side 
< 5 W
1.8 A (max. 80 ms @ 35 V)
10 m
typ. 20 ms; max. 80 ms
2 electronic relays (galvanic isolated - polarity free)
35 V DC / 24 V AC
80 mA (resistive)
t

ON

=5 ms; t

OFF

=5 ms

typ 30 Ω
< 0.7 V @ 20 mA
< 10 µA
2 optocouplers (galvanic isolated - polarity free)
30 V DC (over-voltage protected)
Log. H: >8 V DC; Log. L: <3 V DC
< 5 ms
1 blue LED: power-on status
1 orange LED: error status
2 bi-coloured LEDs: detection/output status 

(green: no detection; red: detection)

125 mm (D) x 93 mm (W) x 70 mm (H) (mounting b 14 mm)
PC/ASA
black or white
-45 °, 0 °, 45 °
-5 ° to +5 ° (lockable)
-3 ° to +3 °
IP65
-30 °C to +60 °C if powered; -10 °C to +60 °C unpowered
0-95 % non-condensing
< 2 G 
max. 30 %; homogenous
8 years
2006/95/EC: LVD; 2002/95/EC: RoHS; 2004/108/EC: EMC; 2006/42/EC: MD; 
EN 12453:2000 chapter 5.1.1.6, chapter 5.5.1 Safety device E; 
EN 12978:2009; EN ISO 13849-1:2008 Pl “d”/ CAT2;
EN 60529:2001; IEC 60825-1:2007; EN 60950-1:2005; 
EN 61000-6-2:2005; EN 61000-6-3:2006;
IEC 61496-1:2009; EN 61496-3:2008 ESPE Type 2; 
EN 62061:2005 SIL 2; DIN 18650-1:2010 Chapter 5.7.4

Summary of Contents for LZR-I100

Page 1: ...1 LZR I100 I110 EN I100 max detection range of 9 9 m x 9 9 m I110 max detection range of 5 0 m x 5 0 m LASER SCANNERS FOR INDUSTRIAL DOORS User s Guidefor product version 0400 and more ...

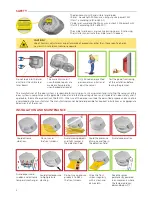
Page 2: ...is responsible for carrying out a risk assessment and installing the sensor and the door system in compliance with applicable national and international regulations and standards on door safety and if applicable the machinery directive 2006 42 EC Other use of the device is outside the permitted purpose and can not be guaranteed by the manufacturer The manufacturer cannot be held responsible for in...

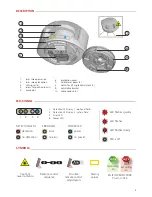
Page 3: ...D is off 1 laser sweep emission 2 laser sweep reception 3 LED signal 4 4 screw for position lock 2 5 connector 6 protection cover 7 visible laser beam 3 8 notch for tilt angle adjustment 2 9 adjustable bracket 10 cable conduit 4 1 Detection LED relay 1 optional field 2 Detection LED relay 2 safety field 3 Error LED 4 Power LED Remote control sequence Possible remote control adjustments Factory val...

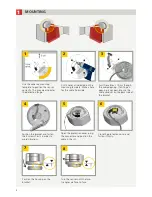
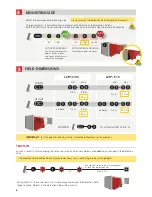
Page 4: ...e 10 cm though the cable opening If drilling an opening is not possible use the cable conduits on the back side of the bracket Position the bracket and fasten the 4 screws firmly in order to avoid vibrations Close the protection cover and fasten it firmly Turn the sensor until the two triangles are face to face Position the housing on the bracket MOUNTING Open the protection cover plug the connect...

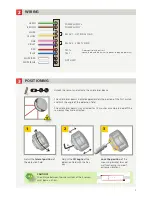
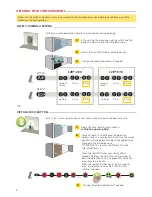
Page 5: ...ely the postion of the first curtain and limit the angle of the detection field The visible laser beams stay activated for 15 minutes or can be turned off the same way they were activated Door control without test connect red and blue wires to power supply no polarity WIRING POSITIONING POWER SUPPLY POWER SUPPLY RELAY 1 OPTIONAL FIELD RELAY 2 SAFETY FIELD TEST TEST NOT USED GREEN BROWN WHITE YELLO...

Page 6: ...o field no field The detection field should be free of snow buildups heavy rain snowfall fog or other moving objects Stay outside of the detection field to avoid disturbances Select the corresponding mounting side The sensor learns its environment and automatically determines the detection field s Both RED LEDs flash slowly and the 3 visible laser beams automatically light up during 30 seconds EXA...

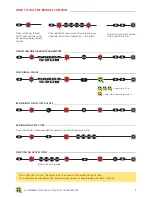
Page 7: ...COVERED ZONE Increase in case of snow dead leaves etc opening safety safety opening or safety NUMBER OF ACTIVE CURTAINS safety field only indoor outdoor low outdoor med outdoor high off The distances between the curtains depend on the mounting height and side When mounted on the left the distance between the first and the last curtain is approximately 10 cm for every meter mounting height Example ...

Page 8: ...emote control Launch a teach in to configure the detection zone s Launch a new teach in each time the sensor position is changed or new objects are added to or changed in the detection zone ATTENTION This teach in is different from the safety field teach in When the red LED flashes very slowly after 3 seconds hold your hand in front of the sticker to learn the detection zone The green LED flashes ...

Page 9: ...ACTORY VALUES SAVING AN ACCESS CODE DELETING AN ACCESS CODE The access code is recommended for sensors installed close to each other After unlocking the red LED flashes and the sensor can be adjusted by remote control If the red LED flashes quickly after unlocking you need to enter an access code from 1 to 4 digits X NUMBER OF FLASHES VALUE OF THE PARAMETER field width 4 2 m field width is defined...

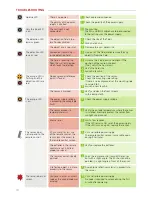
Page 10: ...k cable and connexion Check wiring The RED and BLUE cable have to be connected to the test input or the power supply Check the size of the fields Launch a teach in Step out of the field and or remove the any object s from the field Activate the 3 red beams and check if the position of the sensor is correct If not adjust the hex screws Verify the field size Launch a teach in Check the position of t...

Page 11: ...5 cm 5 m 7 cm 10 m LZR I110 2 1 cm 3 m 3 5 cm 5 m 700 mm x 300 mm x 200 mm testbody A according to EN 12445 wavelength 905 nm max output pulse power 75 W CLASS 1 wavelength 650 nm max output CW power 3 mW CLASS 3R 10 35 V DC sensor side 5 W 1 8 A max 80 ms 35 V 10 m typ 20 ms max 80 ms 2 electronic relays galvanic isolated polarity free 35 V DC 24 V AC 80 mA resistive tON 5 ms tOFF 5 ms typ 30 Ω 0...

Page 12: ...ctives 2006 95 EC 2002 95 EC 2004 108 EC and 2006 42 EC Notified Body for EC inspection 0044 TÜV NORD CERT GmbH Langemarckstr 20 45141 D Essen EC type examination n 44 205 09 555755 003 Angleur October 2011 Jean Pierre Valkenberg Authorized representative The complete declaration of conformity is available on our website www bea industrial be For EC countries according to the directive 2002 96 EC ...

Reviews: