background image


29

Installation 


3.6.7 Additional Connectors

3.6.7 Additional Connectors  

(1) 

1) 

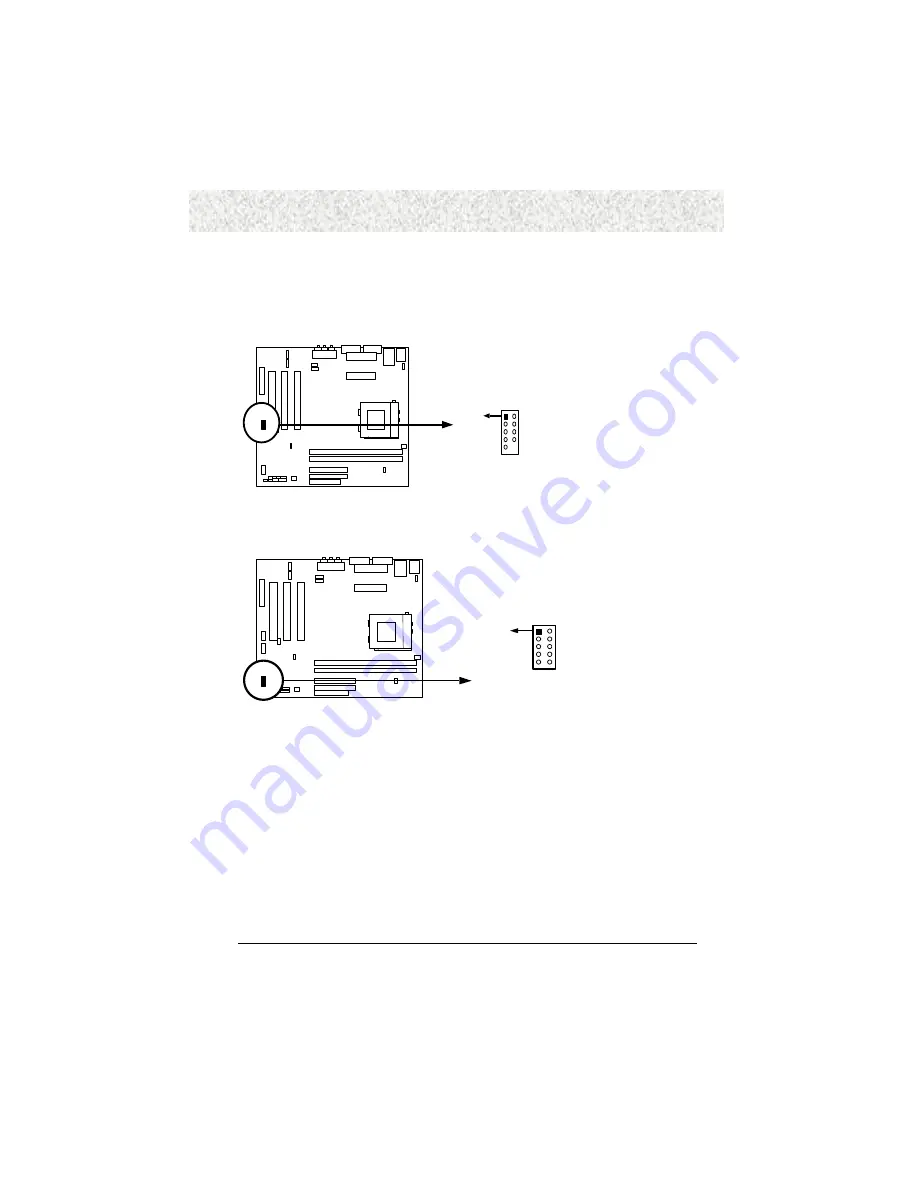
COM2 Headers (10-pin block): COM2


This board has another serial port COM2, it come with cable providing serial port COM2. 


COM2  

Pin 1 

Note: Orient the read marking on the 

COM2 ribbon cable to pin 1 


          2)


USB Port Headers (10-pin block): USB1


These headers are used for connecting the additional USB port plug.  By attaching an option 
USB cable, your can be provided with two additional USB plugs affixed to the back panel 


USB1 

Pin 1 


          3) 

IDE Activity LED: IDE LED


This connector connects to the hard disk activity indicator light on the case.  


 4) 

Turbo LED switches: TURBO LED


Since the motherboard’s turbo function is always on.  The turbo LED will remain constantly 

on while the system power is on.  You may wish to connect the Power LED from the system 

case to this lead.  See the figure below. 

           5) 

Reset switch lead: RESET 


This 2-pin connector connects to the case-mounted reset switch for rebooting your computer 

without having to turn off your power switch.  This is a preferred method of rebooting in 

Summary of Contents for IN730S

Page 1: ...AMD AMD Socket 462 Socket 462 Motherboard Motherboard IN730SE IN730S IN730SE IN730S User s Manual...

Page 2: ...gistered trademark of Award Software Inc Responsibility This manual is provided As is with no warranties of any kind either expressed or implied including but not limited to the implied warranties or...

Page 3: ...PUTERS CE Declaration CE Declaration CE marking is a visible declaration by the manufacturer or his authorized representatives that the electrical equipment to which it relates satisfies all the provi...

Page 4: ...ing your motherboard For details please refer to Precaution section in Chapter 3 Install the CPU by correctly aligning the CPU with the socket 370 as noted in the motherboard diagram Once aligned pres...

Page 5: ...tached fans In addition interface materials allow effective transfers of heat from the processor to the heatsink For optimum heat transfer AMD recommends the use of thermal grease and mounting clips t...

Page 6: ...lation Procedure 18 3 4 3 DIMM Module Combinations 18 3 5 Expansion Slot 19 3 6 Connectors 20 3 6 1 Primary IDE Connector 40 pin block Red 20 3 6 2 Secondary IDE Connector 40 pin block White 20 3 6 3...

Page 7: ...4 13 Typematic Rate Setting 44 4 4 14 Typematic Rate Chars Sec 44 4 4 15 Typematic Delay Msec 44 4 4 16 Security Option 44 4 4 17 OS Select for DRAM 64MB 45 4 4 18 Report No FDD For Windows 45 4 5 Ad...

Page 8: ...s 51 4 8 4 PCI VGA Palette Snoop 51 4 9 PC Health Status 52 4 9 1 Shutdown Temperature 52 4 9 2 Show PC Health in POST 52 4 9 3 Detect CPUFAN in POST 52 4 9 4 Current system Temperature 52 4 9 5 Curre...

Page 9: ...U AGP PCI motherboard Follow the installation procedure presented on the Easy Installation Page and refer to the section number following each step if you require more detailed instructions USER MANUA...

Page 10: ...to 850 MHz Support 100 133 MHz for IN730S CPU Bus Clock Support 200 266 MHz for IN730S DDR Double Data Rate F S B System Chipset SiS 730SE 730S single chipset 100 133 MHz Bus speed Cache Memory Integr...

Page 11: ...onitor W83782D Onboard Fan power connectors has speed monitoring Additional Features ACPI 1 0a LDCM WFM2 0 compliant Keyboard Mouse USB wake up Wake on LAN Wake on Ring PCI 2 2 compliant PME and 3 3VA...

Page 12: ...12 Installation 3 3 I In ns st ta al ll la at ti io on n 3 1 Motherboard Layout Main Parts...

Page 13: ...l port Refer to Sec 3 6 6 VGA port Refer to Sec 3 6 6 Serial port Refer to Sec 3 6 6 Expansion Slots Sockets CPU Socket Refer to Sec 3 3 DIMM Sockets Refer to Sec 3 4 Expansion Slot Refer to Sec 3 5 P...

Page 14: ...rounded anti static surface component side up Immediately inspect the board for damage Due to shifting during shipping it is suggested that the installer press down on the entire socket ICs to ensure...

Page 15: ...s you how to set a proper jumper setting PIN 1 PIN 1 Note In the following pages the triangle s mark stands for pin 1 of connectors 3 3 CPU Central Processing Unit This motherboard supports a PGA 462...

Page 16: ...ep 2 Place the CPU on the middle of the socket orienting its beveled corner to line up with the socket s beveled corner Make sure the pins of the CPU fit evenly to the socket openings Step 3 Press the...

Page 17: ...herboard features four 168 pin DIMM sockets share memory module If you have only one DIMM RAM note that you must insert it into DIMM 1 You can configure the system memory size from 8MB to 512MB in a v...

Page 18: ...the DIMM Module into DIMM sockets in wrong direction This module can be inserted into the socket only one way To release the memory module push both latches down and carefully rock the module forward...

Page 19: ...19 Installation 3 5 Expansion Slot This motherboard contains 3 Bus Mastering PCI 32bit slot and 1 ANR slot...

Page 20: ...make sure that the second IDE device is set to slave mode as indicated in the device s manual 3 6 2 Secondary IDE Connector 40 pin block White This connector supports two secondary channel IDE device...

Page 21: ...34 33 33 2 2 1 1 The FDC sub system can control three types of floppy drives 1 2 1 44 and 2 88MB or compatible tape drives The connection to the floppy drive is via a header J26 The floppy disk inter...

Page 22: ...Connector 20 pin block 20 10 11 1 This connector supports one standard ATX power supply When connecting make sure the lock key matches the hook attached on a power supply cable The power cord should...

Page 23: ...erboard supports two straight 2 pin headers set for connecting to front Panel Hard Disk activity LED indicator LAN LED 2 pin The motherboard supports two straight 2 pin headers set for connecting to f...

Page 24: ...his header can be connected to a 2 color LED that will light yellow or green when the computer is in Suspend or Normal operation Speaker Connector 3 pin It is used to drive a chassis mounted speaker i...

Page 25: ...25 Installation PS 2 Keyboard and Mouse Ports The motherboard offers 1 PS 2 Keyboard and 1 PS 2 Mouse port Mouse USB2 Printer Port Keyboard USB1 COM1 VGA Speaker Line In Mic Mouse Keyboard...

Page 26: ...city True Plug Play This new bus technology will support over 127 different peripherals through a Hub USB1 USB2 Parallel Port Printer The motherboard includes a parallel port EPP ECP compatible The pa...

Page 27: ...fications The serial ports may be remapped over other installable serial ports or disabled through the BIOS COM1 VGA This product integrates the AGP function via a VGA port beside the COM1 The Acceler...

Page 28: ...C in The motherboard also provides external sound system through a user accessible stereo jack connector soldered to the PWA This jack allow the connection of self amplified speakers Line in voice inp...

Page 29: ...with two additional USB plugs affixed to the back panel USB1 Pin 1 3 IDE Activity LED IDE LED This connector connects to the hard disk activity indicator light on the case 4 Turbo LED switches TURBO...

Page 30: ...the Power LED from the system case to this pin 8 Power switch PW BTN This 2 pin connector connects to the case mounted power switch to power ON OFF the system System Case Connections GND Turbo LED GN...

Page 31: ...ders 3 pin CPUFAN SYSFAN These connectors support cooling fans of 350mA 4 2 Watts or less depending on the fan manufacturer the wire and plug may be different The red wire should be positive while the...

Page 32: ...on InfraredModuleHeaders I R I R R X G N D I R T X V C C 1 6 5 1 0 C I R C I R R X I O V S B N C N C N C IR Pin1 Pin5 forStandardIR C IR Pin6 Pin10 forConsum erIR 12 CD Audio In Headers 4 pin CD_IN CD...

Page 33: ...nitor may light up or switch between orange and green after the system is on If it complies with green standards or if it is has a power standby feature The system will then run power on test While th...

Page 34: ...ter You must first exit or shut down your operating system before switch off the power switch For ATX power supply you can press ATX power switching after exiting or shutting down your operating syste...

Page 35: ...er 2 Switch off all power 3 Connect the power supply cord into inlet of the system case 4 Connect the power supply cord into an outlet of power supply 5 Connect Monitor signal cable to the system VGA...

Page 36: ...36 Installation If the power on self test goes well hold down Del button on the keyboard to enter BIOS Setup Next follow the instructions in the next chapter BIOS SETUP...

Page 37: ...if you want to enter SETUP If the above message disappears before you have responded and you still wish to enter Setup reboot the system to try again by pressing the RESET button on the system case Yo...

Page 38: ...ory Standard CMOS Features Options in the original PC AT compatible BIOS Advanced BIOS Features Award enhanced BIOS options Advanced Chipset Features Options specific to your system chipset Integrated...

Page 39: ...Saving Abandon all changes and exit Setup 4 3 Standard CMOS Features Menu In the Standard CMOS Menu you can set the system clock and calendar record disk drive parameters and the video subsystem type...

Page 40: ...UTO DECTECTION function in Setup Here is a brief explanation of drive specifications Type The BIOS contains a table of pre defined drive types Each defined drive type has a specified number of cylinde...

Page 41: ...dapter power up in 80 column mode MONO Monochrome adapter includes high resolution monochrome adapters 4 3 6 Halt on During the power on self test POST the computer stops if the BIOS detect a hardware...

Page 42: ...t PCs and their software can use extended memory Total Memory System total memory is the sum of base memory extended memory and other memory 4 4 Advanced BIOS Features Menu These screens Figure 3 1 an...

Page 43: ...4 4 2 CPU L1 Cache Enable or Disable Default is Enable 4 4 3 CPU L2 Cache Enable or Disable Default is Enable 4 4 4 Processor Number Feature This category speeds up Power On Self Test POST after you p...

Page 44: ...trolled by keyboard controller or chipset hardware Fast The A20 signal is controlled by port 92 or chipset specific method 4 4 13 Typematic Rate Setting Keystrokes repeat at a rate determined by the k...

Page 45: ...are Yes or No 4 5 Advanced Chipset Features 4 5 1 DRAM Timing Settings Please refer to section DRAM Timing 4 5 2 AGP Graphics Aperture Size Select the size of the Accelerated Graphics Port AGP apertur...

Page 46: ...However if any program writes to this memory area a system error may result The settings are Enabled or Disabled 4 5 6 Video RAM Cacheable Select Enabled allows caching of the video BIOS resulting in...

Page 47: ...nabled to activate the secondary IDE interface Select Disabled to deactivate this interface The choices are Enabled and Disabled 4 6 3 Onboard SuperIO Function To enable or disable USB Keyboard 4 6 4...

Page 48: ...ccess onboard parallel port controller with which I O address The choices are 378H IRQ7 278H IRQ5 3BC IRQ7 and Disabled 4 6 9 Parallel Port Mode The parallel port can be used with devices that adhere...

Page 49: ...your own style of computer use 4 7 1 ACPI function ACPI Advanced Configuration and Power Interface evolves the existing motherboard configuration interfaces to support these advanced architectures in...

Page 50: ...ion Pressing the power button for more than 4 seconds forces the system to enter the Soft Off state The settings are Delay 4 Sec Instant Off 4 7 6 PM Wake Up Events Ring Power Up Control During Disabl...

Page 51: ...4 8 2 Resources Controlled By The Award Plug and Play BIOS can automatically configure all the boot and Plug and Play compatible devices If you select Auto all the interrupt request IRQ and DMA assig...

Page 52: ...and temperature at POST the option are Enable or Disable 4 9 3 Detect CPUFAN in POST Shows system CPU fan speed at POST the option are Enable or Disable 4 9 4 Current system Temperature The temperatur...

Page 53: ...l Safe option if your computer is experiencing system configuration problems 4 11 Load Optimized Defaults The chipset defaults are settings which provide for maximum system performance While Award has...

Page 54: ...type the password and press ENTER key To abort the process at any time press ESC key In the Security Option item in the BIOS Features Setup screen select System or Setup System Enter a password each t...

Page 55: ...olt power outlet your system may be already damaged in that case consult your vendor f Some problems and or conflict can be resolved as simple as by flashing the BIOS with the latest version downloada...

Page 56: ...d with slowest speed setup then it may require a repair or a replacement You can get it repaired or replaced for free if within warranty of your reseller Check your reseller for the warranty and excha...

Reviews: