background image

Baby bottle and food warmer

EN

12

WARMING UP BABY FOOD

a.  Home use

!

Attention:

Never use the bottle warmer without water in the heating tank!


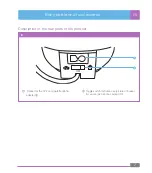
Stand the bottle warmer on a horizontal and stable surface .


Open the jar with the baby food, remove the lid and any labels, then place it into the food tray A

6

 and place 

this into the heating tank A

3

 . 


To pour the correct amount of water into the heating tank, use the removable measuring cup A

8

 or a container 

with an appropriate measuring scale .


Adhere to the precise amount of water depending on the volume of baby food in the jar based on the 
information in the Reference baby food warming table below and use it to find the necessary warming time: 

Reference baby food warming table 

Volume of baby 

food in the jar

Initial 

temperature of 
the food inside 

the jar

Amount of water 

that needs to be 

poured into the 

heating tank for 

home use 

Approximate 

warming up time 

at home

(in minutes) 

Amount of water 

that needs to be 

poured into the 

heating tank for 

in-car use

Approximate 

warming up time 

in a motor car

(in minutes) 

130 g

20 °C

9 ml

2’50

7 ml

6’50

190 g

20 °C

11 ml

3’00

11 ml

10’15

130 g

4 °C

20 ml

4’30

17 ml

13’44

190 g

4 °C

20 ml

5’50

19 ml

16’40

Note:

The warming time depends on the amount of food being heated and its initial temperature, for example room 
temperature (20 °C) or the temperature after being removed from a refrigerator (5 °C) .


Due to the large number of possible consistencies of baby food, the values provided above are only indicative 
in nature .


While warming up baby food, it is recommended to regularly stir the jar contents to ensure even temperature 
distribution . Take care not to burn your hands when holding the container . 


In the event that you find that the baby food is not heated sufficiently, restart the warming cycle and next time 
you may add a little more water into the heating tank A

3

 . 

Summary of Contents for BBW 2010

Page 1: ...ns and important notes 3 Description 6 Operation 8 Cleaning the appliance and removal of limescale deposits 15 Technical specifications 16 Explanation of symbols used on the product its accessories an...

Page 2: ...p baby bottles or baby food to an ideal temperature within a few minutes both indoors as well as when travelling by car thanks to its car cigarette lighter socket adapter It can warm up all types of b...

Page 3: ...her liquid Do not leave the power cord in the vicinity of hot surfaces When the appliance is powered using 230V connect it only to a grounded power socket Always check that the plug is properly insert...

Page 4: ...ed with using the appliance Cleaning and user maintenance must not be performed by children younger than than 8 years of age and that are unsupervised Children must not play with the bottle warmer Cle...

Page 5: ...ithout supervision when it is connected to a power socket When not using the appliance disconnect it from the power socket Before cleaning the appliance allow it to cool down Follow the instructions f...

Page 6: ...escription Description of the product A 1 6 7 8 9 2 3 4 5 1 Baby bottle adapter ring 2 Bottle tray 3 Heating tank 4 ON switch 5 Indicator light 6 Food tray 7 Mains power socket cable 8 Measuring cup 9...

Page 7: ...and food warmer EN 7 Description of the rear parts of the product B 1 2 OFF 1 Socket for the 12V car cigarette lighter adapter9 2 Toggle switch for home use picture of house in car use picture of a c...

Page 8: ...the Reference baby bottle warming table below and use it to find the time necessary for warming up the milk Reference baby bottle warming table Volume of food in the baby bottle Initial temperature o...

Page 9: ...edge of the bottle warmer Check that the switch B2 is in the OFF position turned off and plug the bottle warmer into a power socket using the power cord in socket A7 Select the warming method by setti...

Page 10: ...d off insert the cigarette lighter adapter A9 into the 12V cigarette lighter adapter socket B1 and the other end into the your car s cigarette lighter socket Select the warming method by setting switc...

Page 11: ...lighter adapter A9 is specifically made for this bottle warmer and should never by used with other appliances Before using it always check that the 12V car cigarette lighter socket is clean and clean...

Page 12: ...ds to be poured into the heating tank for home use Approximate warming up time at home in minutes Amount of water that needs to be poured into the heating tank for in car use Approximate warming up ti...

Page 13: ...for turning off the appliance The bottle warmer will automatically turn off at the end of the warming cycle Attention The steam that is released during the warming process is hot Keep your hands away...

Page 14: ...e appliance The bottle warmer will automatically turn off at the end of the warming cycle Attention The steam that is released during the warming process is hot Keep your hands away during the warming...

Page 15: ...tle warmer operates at a different voltage see the Reference warming table Cleaning the appliance and removal of limescale deposits Cleaning After every use disconnect the bottle warmer from the power...

Page 16: ...ever turn on the bottle warmer while the water and vinegar solution is in the heating tank A3 After emptying out the bottle warmer repeatedly clean the outer and inner side of the bottle warmer using...

Page 17: ...nvironment and human health which could result from improper waste disposal Ask your local authorities or collection facility for more details In accordance with national regulations penalties may be...

Reviews: