background image

Installing the ATMSpeed/155 Modules

893-01047-B

2-19


Removing and Replacing a Module

This section describes how to remove and replace an ATMSpeed/155 module 
described in the following procedures:

Removing a module

Replacing a module

Removing a Module

ATMSpeed/155 modules can be hot-inserted in a chassis at any time. However, to 
remove an active module from the Centillion 50/100 chassis, follow these steps:

1.

Disable all ports on the module using SpeedView, or disconnect the cables 
from each port.

Disabling the ports on a module is described in Using SpeedView 3.0 for 
Windows

2.

Wait 45 seconds.

Waiting allows the system software to process the requests to disable the 
ports. 

3.

Using the medium flat-tip screwdriver, loosen the two captive retaining 
screws on the module until they pop free of the chassis.

Note: 

If the power for the Centillion 50/100 chassis is off, this step is not 

necessary.

Caution: 

If you remove a module without waiting 45 seconds after 

disabling the ports, you must power cycle the Centillion 50/100 chassis. 
When you turn off the power on the Centillion 50/100 chassis, you must 
wait 15 to 20 seconds before turning the power back on. The Centillion 50/
100 modules begin switching an additional 15 to 20 seconds after power is 
resumed.

Summary of Contents for Centillion 100

Page 1: ...Part No 893 01047 B June 1998 Using the Centillion 50 100 ATMSpeed 155 Switch Modules and Media Dependent Adapters ...

Page 2: ... described herein USA Requirements Only Federal Communications Commission FCC Compliance Notice Radio Frequency Notice Note This equipment has been tested and found to comply with the limits for a Class A digital device pursuant to Part 15 of the FCC rules These limits are designed to provide reasonable protection against harmful interference when the equipment is operated in a commercial environm...

Page 3: ...l apparatus as set out in the Radio Interference Regulations of the Canadian Department of Communications Règlement sur le brouillage radioélectrique du ministère des Communications Cet appareil numérique ATMSpeed 155 Switch Module ATMSpeed 155 MCP Switch Module ATMSpeed 155S Switch Module ATMSpeed 155 MMF Switch Modules ATMSpeed 155 MDA Switch Module and ATMSpeed 155 MDA Switch Module respecte le...

Page 4: ... during its warranty period which begins on the date Software is first shipped to Licensee If any item of Software fails to so function during its warranty period as the sole remedy Bay Networks will at its discretion provide a suitable fix patch or workaround for the problem that may be included in a future Software release Bay Networks further warrants to Licensee that the media on which the Sof...

Page 5: ... reason Licensee will immediately destroy or return to Bay Networks the Software user manuals and all copies Bay Networks is not liable to Licensee for damages in any form solely by reason of the termination of this license 8 Export and Re export Licensee agrees not to export directly or indirectly the Software or related technical data or information without first obtaining any required export li...

Page 6: ...vi 893 01047 B ...

Page 7: ...odules and Media Dependent Adapters About the ATMSpeed 155 Modules 1 2 ATMSpeed 155 MDA Switch Module 1 3 ATMSpeed 155 MDA MCP Switch Module 1 3 Model 5720 x ATM Media Dependent Adapters 1 5 Features 1 5 ATMSpeed 155 Module Ports and Connectivity 1 6 Fault Tolerance 1 6 Network Management 1 7 Chapter 2 Installing the ATMSpeed 155 Modules Preparing for Installation 2 1 Installing the ATMSpeed 155 M...

Page 8: ...Applications and Default Configuration Connecting Centillion 50 100 Switches Directly 3 1 Connecting Centillion 50 100 Switches Through an Intermediate ATM Switch 3 2 Connecting an ATM LAN Emulation Station to a Centillion 50 100 Switch 3 3 Default Configuration 3 3 Parameter Descriptions 3 4 Loop Timing 3 4 Network Timing 3 4 Scrambling 3 4 Predefined Configurations 3 4 Appendix A Technical Speci...

Page 9: ... Figure 2 12 Attaching the Product Label 2 9 Figure 2 13 Preparing the MDA for Removal 2 9 Figure 2 14 Removing the MDA from the Switch Module 2 10 Figure 2 15 Installing the New MDA 2 10 Figure 2 16 Aligning the MDA Connector 2 11 Figure 2 17 Seating the Connector 2 11 Figure 2 18 Tightening Screws 2 12 Figure 2 19 Connecting a UTP Cable to an ATM MDA 2 12 Figure 2 20 Removing the Dust Plug from ...

Page 10: ...gaging the Module 2 20 Figure 2 29 Removing the Module from the Centillion 50 100 Chassis 2 20 Figure B 1 RJ 45 Connector Pin Numbers B 1 Figure B 2 10BASE T Ethernet UTP Crossover Cable B 2 Figure B 3 Mini DIN 8 Connector Pin Numbers B 2 Figure B 4 Coaxial BNC Connector B 4 Figure B 5 SC Fiber Connector B 4 ...

Page 11: ... MCP Module LED Definitions for ATM Ports 2 17 Table 2 2 ATMSpeed 155 MDA MCP Module LED Definitions for the 10BASE T MCP Port 2 18 Table 3 1 Factory Defaults 3 3 Table B 1 Male Mini DIN 8 to Male DB 25 Cable B 3 Table B 2 Female DB 25 to Female DB 9 Adapter B 3 Table B 3 Model 5720 x 10BASE T Port Pin Assignments B 4 ...

Page 12: ...xii 893 01047 B ...

Page 13: ...ed 155 MDA MCP Switch Module can provide the master control processing functions for the Centillion 50 100 switch Purpose This guide provides information about installing and using the ATMSpeed 155 modules Configuration of the ATMSpeed 155 modules is covered in Using SpeedView 3 0 for Windows For more information on these guides see Related Publications Audience This guide is intended for local ar...

Page 14: ...tier to complete the task The second tier describes the step in more detail and includes results of performing the step Use of Enter Type and Press This guide uses enter type and press to describe the following actions When you read enter type the text and press the Enter key When you read type type the text but do not press the Enter key When you read press press only the alphanumeric or named ke...

Page 15: ...ht mouse button Click the right mouse button to select an object to display a pop up menu Related Publications For more information about using the ATMSpeed 155 modules refer to the following publications Installation and Reference for the Centillion 50 100 Chassis Bay Networks part number 893 894 C Using SpeedView 3 0 for Windows Bay Networks part number 893 891 C Reference Guide for the Centilli...

Page 16: ...nd CDs are available through your local Bay Networks sales office or account representative Bay Networks Customer Service You can purchase a support contract from your Bay Networks distributor or authorized reseller or directly from Bay Networks Services For information about or to purchase a Bay Networks service contract either call your local Bay Networks field sales office or one of the followi...

Page 17: ...reseller for assistance If you purchased a Bay Networks service program call one of the following Bay Networks Technical Solutions Centers Technical Solutions Center Telephone Number Fax Number Billerica MA 800 2LANWAN 978 916 5314 Santa Clara CA 800 2LANWAN 408 495 1188 Valbonne France 33 4 92 96 69 68 33 4 92 96 69 98 Sydney Australia 61 2 9927 8800 61 2 9927 8811 Tokyo Japan 81 3 5402 0180 81 3...

Page 18: ......

Page 19: ...cal description functionality and capability page 1 2 A summary of module and MDA features page 1 5 In this guide the ATMSpeed 155 MDA Switch Module and ATMSpeed 155 MDA MCP Switch Module are referred to collectively as the ATMSpeed 155 modules These modules include ATMSpeed 155 MDA Switch Module ATMSpeed 155 MDA MCP Switch Module Each model is referred to specifically when features and functions ...

Page 20: ...ial port and a 10BASE T port The ATMSpeed 155 switch module is an assembly that consists of a printed circuit board with a metal module faceplate The module includes inserter extractor levers and captive retaining screws on each side of the module front panel The module occupies a single slot in the Centillion 50 100 chassis Figure 1 1 shows an ATMSpeed 155 MDA module with two MDA slots for two po...

Page 21: ...Model 5720 15 MDA provides STS 3c STM 1 connectivity over Category 5 UTP cable A single mode fiber optic MDA Model 5720 17 MDA provides synchronous optical network synchronous digital hierarchy SONET OC 3c SDH STM 10 connectivity over 8 5 125 µm single mode fiber cable The Model 5720 31 MDA is a DS3 MDA that provides two separate channels with two 75 ohm BNC coaxial connections for each channel Th...

Page 22: ...nous optical network synchronous digital hierarchy SONET OC 3c SDH STM 10 connectivity over 62 5 125 µm multimode fiber cable An unshielded twisted pair UTP MDA Model 5720 15 MDA provides STS 3c STM 1 connectivity over Category 5 UTP cable A single mode fiber optic MDA Model 5720 17 MDA provides synchronous optical network synchronous digital hierarchy SONET OC 3c SDH STM 10 connectivity over 8 5 ...

Page 23: ...ty types Table 1 1 shows the available types of MDAs and their order numbers Features This section provides a summary of the features of the ATMSpeed 155 modules including the following topics ATMSpeed 155 module ports and connectivity Fault tolerance Network management Table 1 1 Types of ATMSpeed 155 Media Dependent Adapters Order Number Model Number Port Type Connector Type Cable Type CL1333001 ...

Page 24: ...ching for local traffic without using any ATM backplane bandwidth The following ATM connectivity is currently supported by the switch software ATM connectivity between two Centillion 50 100 switches with or without intermediate ATM switches ATM Forum UNI 3 0 and 3 1 compliance release 2 0 or later Connectivity to another manufacturer s ATM switch or to carrier services through PVC PVP or Interim I...

Page 25: ...management features Simple Network Management Protocol SNMP agent with Centillion 50 100 management information base MIB extensions Bootstrap Protocol BootP and Trivial File Transport Protocol TFTP support SpeedView application for configuration management and monitoring SpeedView for Windows runs over SNMP or serial port connection For additional information on SpeedView refer to Using SpeedView ...

Page 26: ......

Page 27: ...55 ports page 2 15 Verifying the installation page 2 17 Removing and replacing a module page 2 19 Preparing for Installation Before you install the ATMSpeed 155 module make sure that the Centillion 50 100 chassis is assembled and ready to accept modules For more information refer to Installation and Reference for the Centillion 50 100 Chassis You need the following tools and materials for installa...

Page 28: ...ty Static discharge from your clothing or other items around you even at levels that do not create a spark can cause damage You should take all possible precautions to prevent static discharge damage when working with printed circuit boards Keep each board in its protective conductive bag until you are ready to install it Before you touch a printed circuit board be sure to put on a grounded antist...

Page 29: ...he ATMSpeed 155 Modules 893 01047 B 2 3 Figure 2 1 Removing the Filler Panel 2 Extend the module s inserter extractor levers forward Figure 2 2 Figure 2 2 Inserter Extractor Levers Ready for Installation 6463 6464 ...

Page 30: ...d guides on each side of the slot Figure 2 3 Figure 2 3 Slot Module Guides 4 Slide the module into the chassis until you feel it engage the backplane The inserter extractor levers should still be protruding and in contact with the front of the chassis Do not push the module all the way into the chassis Figure 2 4 Figure 2 4 Inserting the Module Until it Engages the Backplane 6465 6466FA ...

Page 31: ...river to tighten the captive retaining screws at both ends of the module front panel Installing or Replacing the Media Dependent Adapter The following section provides information about Installing any of the MDAs on a ATMSpeed 155 MDA and ATMSpeed 155 MDA MCP switch modules Replacing an MDA on an MDA switch module Connecting UTP cables to the MDA Connecting fiber optic cables to the MDA Connecting...

Page 32: ...01047 B Installing the MDA The following steps guide you through installing an MDA 1 Remove the screws from the cover on an MDA slot Figure 2 6 Figure 2 6 MDA Slot Cover Screws 2 Lift the cover out of the slot Figure 2 7 Set the cover aside Figure 2 7 Removing an MDA Slot Cover 7873PEA 7874PEA ...

Page 33: ... 7 3 Tilt the MDA and slip it into place against the back of the front panel Figure 2 8 Figure 2 8 Installing the MDA 4 Align the connector on the MDA with the connector on the baseboard Figure 2 9 Figure 2 9 Aligning the MDA Connector 7875PEA 7876PEA ...

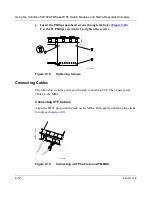
Page 34: ...he board at the ends of the connector to seat the MDA in the connector on the baseboard Figure 2 10 Figure 2 10 Seating the MDA in the Baseboard Connector 6 Insert the Phillips pan head screws through the holes Figure 2 11 Use the 1 Phillips screwdriver to tighten the screws Figure 2 11 Tightening Screws 7877PEA 7878PEA ...

Page 35: ...label that is printed in the appropriate language for the country where you are installing the equipment Figure 2 12 Attaching the Product Label Replacing an MDA The following steps guide you through replacing an MDA on an ATMSpeed 155 MDA and ATMSpeed 155 MDA MCP switch module 1 Remove the screws from the MDA Figure 2 13 Figure 2 13 Preparing the MDA for Removal 1 2 5718EC CLASS 1 LASER PRODUCT C...

Page 36: ...93 01047 B 2 Loosen the connector Figure 2 14 Then tilt the MDA and lift it away from the baseboard Figure 2 14 Removing the MDA from the Switch Module 3 Tilt the new MDA and slip it into place against the back of the front panel Figure 2 15 Figure 2 15 Installing the New MDA 7879PEA 7875PEA ...

Page 37: ...ctor on the MDA with the connector on the baseboard Figure 2 16 Figure 2 16 Aligning the MDA Connector 5 Press firmly on the board at the ends of the connector to seat the MDA in the connector on the baseboard Figure 2 17 Figure 2 17 Seating the Connector 7876PEA 7877PEA ...

Page 38: ...he 1 Phillips screwdriver to tighten the screws Figure 2 18 Tightening Screws Connecting Cables The following sections guide you through connecting UTP fiber and coaxial cables to the MDA Connecting UTP Cables Align the RJ 45 plug with the jack on the MDA Push gently until the plug clicks into place Figure 2 19 Figure 2 19 Connecting a UTP Cable to an ATM MDA 7878PEA 6108FB ...

Page 39: ...ertragung Vorsichtig vorgehen um die Augen keinen Laserstrahlen auszusetzen AVERTISSEMENT Les adaptateurs dependants aus les media 5720 17 utilisent des lasers de Classe 1 comme éléments de transfert de données Il est important d éviter tout contact entre le rayonnement laser et les yeux AVISO Os Adaptadores Dependente de Mídia 5720 17 usam o laser do tipo Class 1 como elemento de transferimento d...

Page 40: ...e dust caps for later use Figure 2 21 Removing a Dust Cap from the MDA Fiber Cable Connector 3 Hold the cable connector so the keyed surface will insert easily into the MDA connector Carefully insert the cable connector into the MDA connector and push gently until you hear the cable connector snap into place Figure 2 22 Figure 2 22 Inserting the Cable Connector into the MDA Connector 6105 6106FB ...

Page 41: ...C receptacle on the MDA Push and twist the BNC connector until it locks into place Figure 2 23 Figure 2 23 Connecting Coaxial Cables Connecting Cables to ATMSpeed 155 Ports This section describes how to connect cables to the serial and Ethernet ports on an ATMSpeed 155 MDA MCP module with serial and Ethernet MCP connections 8373FA EPS ...

Page 42: ...ial connection attach the serial MCP cable that was shipped with the Centillion 50 100 chassis to the Mini DIN 8 port on the MCP module Figure 2 24 Attach the other side of the MCP cable to the serial port of your PC Figure 2 24 Connecting the Serial MCP Cable to the MCP Module To use the Ethernet connection attach an Ethernet cable to the RJ 45 port on the ATMSpeed 155 MDA MCP module Figure 2 25 ...

Page 43: ...Speed 155 module LEDs and the LED sequence at startup Interpreting ATMSpeed 155 Module LEDs The ATMSpeed 155 MDA and MDA MCP modules have six LEDs for each ATM port as shown in Figure 2 26 Table 2 1 lists the meaning of each LED Figure 2 26 ATMSpeed 155 MDA and MDA MCP Module LEDs for ATM Ports Table 2 1 ATMSpeed 155 MDA and MDA MCP Module LED Definitions for ATM Ports LED Name Meaning En Remains ...

Page 44: ...hey turn on and off in the following sequences depending on the type of module On the ATMSpeed 155 MDA and MDA MCP modules with six LEDs per port the following sequence occurs The En LED turns on when the port is enabled through network management software The LOS LOF and FERF LEDs turn off when valid SONET framing is received on the port Table 2 2 ATMSpeed 155 MDA MCP Module LED Definitions for t...

Page 45: ...ule is described in Using SpeedView 3 0 for Windows 2 Wait 45 seconds Waiting allows the system software to process the requests to disable the ports 3 Using the medium flat tip screwdriver loosen the two captive retaining screws on the module until they pop free of the chassis Note If the power for the Centillion 50 100 chassis is off this step is not necessary Caution If you remove a module with...

Page 46: ...t and right inserter extractor levers away from the center of the module to their protruding positions Figure 2 28 The module is disengaged from the backplane Figure 2 28 Disengaging the Module 5 Slide the module out of the chassis Figure 2 29 Figure 2 29 Removing the Module from the Centillion 50 100 Chassis 6470 6471 ...

Page 47: ...rts and remove the module following the instructions in Removing a Module on page 2 19 3 Install the new module following the instructions in Installing the ATMSpeed 155 Module on page 2 2 4 Load the saved configuration file on the new ATMSpeed 155 MDA MCP module For module configuration instructions and for help with saving and loading configuration files refer to Using SpeedView 3 0 for Windows ...

Page 48: ......

Page 49: ...ing an ATM LAN emulation station to a Centillion 50 100 switch Connecting Centillion 50 100 Switches Directly To connect two Centillion 50 100 switches directly follow these steps 1 Configure each ATMSpeed 155 module port To configure ATM ports refer to Using SpeedView 3 0 for Windows Both switches must have the same kind of virtual port configured 2 Connect one end of the fiber cable to the first...

Page 50: ...red Configure the intermediate ATM switch and the Centillion 50 100 switch with matching VPI and VCI values 2 Connect one end of the fiber cable to the ATMSpeed 155 port The SC connector of the fiber cable is keyed 3 Connect the other end of the fiber cable to the other ATM switch On an ATMSpeed 155 module with six LEDs per port the LOS LOF and FERF LEDs for the ATM port turn off when the switch r...

Page 51: ...to the other ATM switch 4 Repeat steps 1 through 3 to install and configure the other switch Default Configuration The Centillion 50 100 switch supports plug and play operation Table 3 1 lists the factory defaults for the ATMSpeed 155 module ports Table 3 1 Factory Defaults Parameter Factory Default Configurable Option Physical type SONET SDH Auto sensing not configurable Physical media type Multi...

Page 52: ...ck generates transmit timing When loop timing is enabled timing is derived from the receive side of the port Network Timing When network timing is enabled the clock is derived from an input port and can be distributed to any of the output ports on a module it may not be distributed to other modules across the backplane Scrambling SONET uses a scrambling algorithm to prevent long strings of zeros o...

Page 53: ...T SDH ATM Forum UNI 3 0 and 3 1 STS 3c IISP LANE version 1 0 Microprocessors ATMSpeed 155 MDA MCP baseboard 64 bit MIPS 4000 series processor 133 MHz MIPS Memory DRAM 16 MB expandable to 32 MB ATMSpeed 155 MDA MCP switch modules Packet buffer 4 MB ATMSpeed 155 MDA MCP modules Flash 2 5 MB ATMSpeed 155 MDA MCP modules Cell buffers 16 384 cells ATMSpeed 155 MDA MCP switch modules Backplane interface...

Page 54: ... x 31 7 W x 2 5 H cm Weight 2 5 lbs 1 1 kg Environmental Specifications Operating temperature 41 to 104 F 0 to 40 C Storage temperature 13 to 158 F 25 to 70 C Operating altitude Up to 10 000 ft 3 000 m maximum Operating humidity 85 maximum relative humidity noncondensing Storage humidity 95 maximum relative humidity Storage altitude Up to 10 000 ft 3 000 m maximum Free fall drop ISO 4180 s NSTA 1A...

Page 55: ...64 byte packets 350 000 packets per second per port maximum full duplex mode 1 4 million packets per second per module maximum with four ports local or backplane switched Electromagnetic Emissions Meets requirements of FCC Part 15 Subpart B Class A VCCI Class 1 ITE EN 55022 CISPR22 1985 Class A Safety Agency Approvals UL listed UL 1950 CSA certified CSA 22 2 950 TUV licensed EN 60 950 UL 94 V1 fla...

Page 56: ... dBm Receiver average power range Minimum 28 dBm Optical power budget 13 dB Maximum run length 12 4 mi 20 km 5720 15 ATM Media Dependent Adapter Port connector type Shielded RJ 45 modular jack Cable type EIA Category 5 UTP Maximum cable run 328 ft 100 m including all patch cables panels and connectors Model 5720 31 41 ATM Media Dependent Adapter Port connector type 75 ohm BNC Cable type RG 59 B WE...

Page 57: ...ibed 10BASE T Ethernet MCP connections UTP crossover cable Serial MCP connections male Mini DIN 8 to male DB 25 cable and female DB 25 to female DB 9 adapter Either port can be used to manage a Centillion 50 100 switch 10BASE T Ethernet MCP Connections Figure B 1 provides pin numbers for an RJ 45 connector Figure B 1 RJ 45 Connector Pin Numbers 4026 1 2 3 4 5 6 7 8 ...

Page 58: ...ions The Centillion 50 100 chassis package includes a male Mini DIN 8 to male DB 25 cable and a female DB 25 to female DB 9 adapter for serial MCP connections These cables are described in this section Male Mini DIN 8 to Male DB 25 Cable Figure B 3 shows the pin numbers for a Mini DIN 8 connector Figure B 3 Mini DIN 8 Connector Pin Numbers 1 2 3 4 5 6 7 8 1 2 3 4 5 6 7 8 TD TD RD Unused Unused RD ...

Page 59: ...8 Pin Numbers Signal Male DB 25 Pin Numbers 1 Not connected 2 Data terminal ready 20 3 Transmit data 3 4 Signal ground 7 5 Receive data 2 6 Not connected 7 Not connected 8 Signal ground 7 Table B 2 Female DB 25 to Female DB 9 Adapter Female DB 25 Pin Numbers Signal Female DB 9 Pin Numbers 8 Data carrier detect 1 3 Receive data 2 2 Transmit data 3 20 Data terminal ready 4 7 Signal ground 5 6 Data s...

Page 60: ...connector receptacle assignments for the DS3 E3 MDA and Figure B 5 shows the SC connector for the fiber cable MDAs Figure B 4 Coaxial BNC Connector Figure B 5 SC Fiber Connector Table B 3 Model 5720 x 10BASE T Port Pin Assignments Legend RX Receive Data Input TX Transmit Data Output RJ 45 connector port Pin Signal 1 RX 2 RX 3 Not used 4 Not used 5 Not used 6 Not used 7 TX 8 TX 4026 1 2 3 4 5 6 7 8...

Page 61: ... DIN 8 1 3 B 2 RJ 45 1 2 1 5 2 12 2 16 RJ 45 B 1 SC 1 2 1 5 2 13 2 16 3 2 conventions xiv customer support programs xvi Technical Solutions Centers xvii D data rate A 1 default configuration ports 3 4 dimensions module A 2 E electrical specifications A 2 electromagnetic emissions A 3 environmental specifications A 2 Ethernet port 1 3 Ethernet port connection B 1 F fault tolerance 1 6 features faul...

Page 62: ...1 5 functional description 1 2 installing 2 2 LED display 1 6 2 17 MDA installing 2 5 physical description 1 2 port connectivity features 1 6 removing and replacing 2 19 types 1 2 verifying installation 2 17 N network management BootP 1 7 SNMP 1 7 SpeedView 1 7 TFTP 1 7 network management station 1 3 network timing parameter 3 4 P performance specifications A 3 physical specifications A 2 pin assi...

Page 63: ... serial port connection MCP description 1 3 pin assignments B 2 SNMP agent 1 7 SpeedView description 1 7 enabling disabling ports 2 17 management station connection 2 16 standards ATM A 1 T Technical Solutions Centers xvii TFTP 1 7 U UNI 3 0 and 3 1 compliance 1 6 V verifying installation 2 17 ...

Page 64: ......

Reviews: