background image

Installation Requirements - Page 3

GENERAL

The installation must be carried out by a Corgi Registered
Installer or other competent person and be in accordance
with relevant BS Codes of Practice, I.E.E. Regulations, Gas
Safety Regulations, Building Regulations and by-laws of the
Local Water Undertaking. References should be made to BS
6891, BS 6798, BS 5440 Pt 1 & 2, BS 5449, BS 5546 and
BS 1363.

IMPORTANT INFORMATION

VENTILATION

Detailed recommendations for air supply are given in BS
5440:2.

The following notes are intended to give general guidance.
The room in which the open flue unit is situated requires an
air vent which should be direct to outside or to a room which
itself has an air vent direct to outside. Where the boiler is in
a compartment with air vents direct to outside, the room
containing the compartment does not require the provisions

This product contains Refractory Ceramic Fibres (R.C.F.)
which are man-made vitreous silicate fibres. Excessive
exposure to these materials may cause temporary irritation
to eyes, skin and respiratory tract. Care must be taken when
handling these articles to ensure the release of dust or fibres
is kept to a minimum. To ensure that the release of fibres
from these articles is kept to a minimum, during installation
and servicing it is recommended that a H.E.P.A. filtered
vacuum is used to remove any dust, soot or other debris
accumulated in and around the appliance. This should be

of additional ventilation.

The actual minimum
effective area
requirements of
cupboard/compartment
air vents are based
upon the rated input of
the appliance.

performed before and after working on the installation. It is
recommended that any replaced item(s) are not broken up
but sealed within heavy duty polythene bags and clearly
labelled “R.C.F. waste”. This is not classified as “hazardous
waste” and may be disposed of at a tipping site licensed for
the disposal of industrial waste. Protective clothing is not
required when handling these articles but it is recommended
that gloves are worn and the normal hygiene rules of not
smoking, eating or drinking in the work area are followed and
always wash hands before eating or drinking.

SITING

The boiler must be fitted on a suitable outside or inside wall
with due considerations of the open flue requirements.

It should not be installed in a bathroom, bedroom or bed

sitting room.

A new or existing cupboard or compartment used to enclose
the boiler must be constructed specifically for this purpose.

Details of essential features of Cupboard / compartment

design are given in BS 5440:2.

CLEARANCES

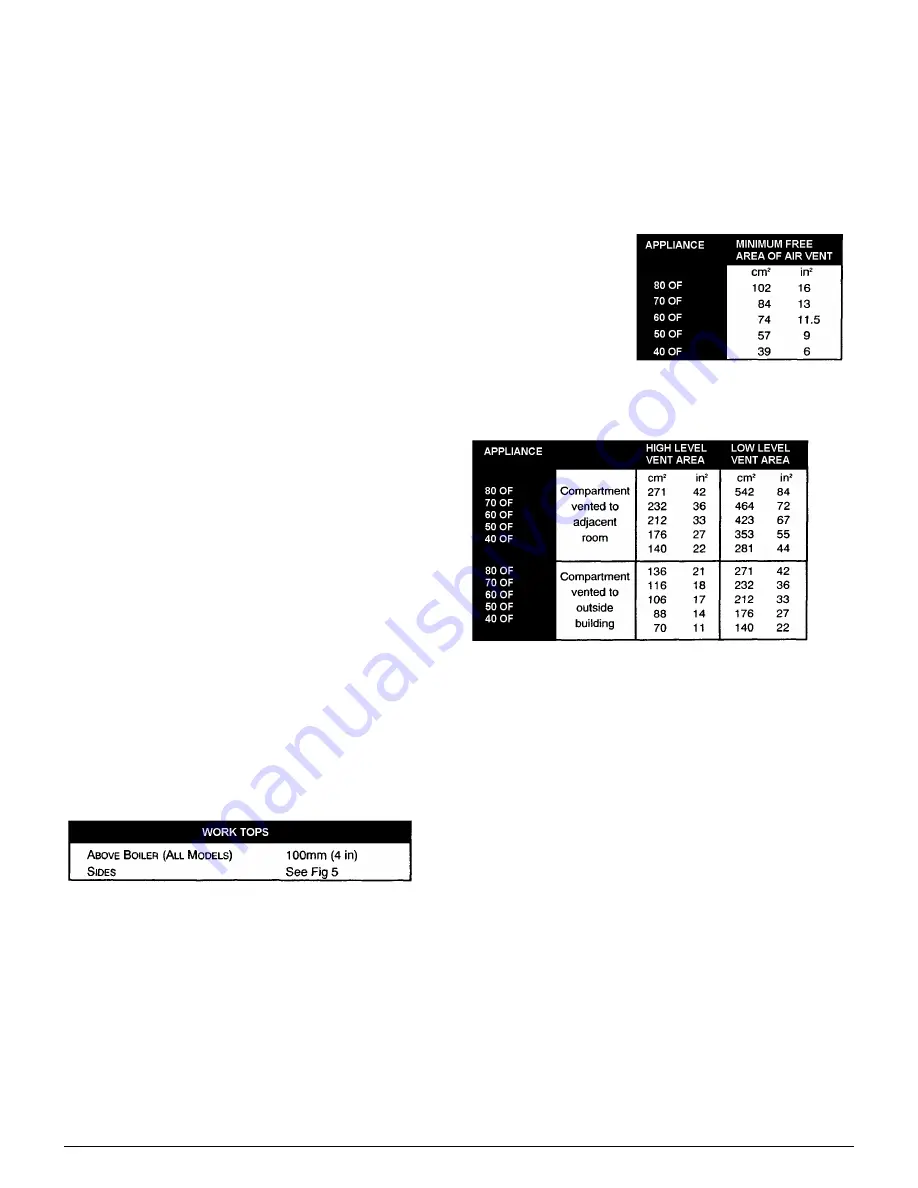
The minimum vertical areas required for the appliances
depend on the appliance rating and its application. The
details are given in Fig 5.

We recommend the use of the Stadium BM729 “Black Hole”
ventilator which is available from your local merchant.

Ventilation areas required:

FLUE ARRANGEMENT

The 80, 70 OF are intended for connection with 125mm (5
in) flue tube. The 60, 50 and 40 OF are intended for
connection with 100mm (4 in) flue tube.

For full information on flues refer to BS 5440, but the general
requirements are as follows:

1)

The flue should be kept as short and as warm as
possible.

2)

Give maximum possible vertical rise from the appliance
before using any bends (preferably at least 600mm (24
in)). Avoid the use of right angled bends.

3)

Terminate in an approved terminal preferably above
ridge height but at least above the eaves of a pitched
roof.

4)

If Twin-wall type flue tubing is to be used the inner
tubing of the boiler adaptor must not project into the
draught diverter of the boiler. A boiler adaptor which
meets this requirement is obtainable.

5)

An existing brick chimney should be lined with acid and
moisture resistant materials such as stainless steel
flexible flue pipe. This is particularly important if the flue
is above 6.5 metres (20 ft) in height and not wholly
internal.
WHETHER OR NOT THE CHIMNEY IS TO BE LINED
IT MUST BE SWEPT THOROUGHLY BEFORE THE
INSTALLATION.

6)

Whatever type of flue is used it must be properly
supported and not simply supported on the boiler.

Summary of Contents for Boston 2 40 OF

Page 1: ...Please leave these Instructions with the User Baxi Boston 2 OF Floor Standing Open Flue Gas Fired Central Heating Boilers Natural Gas Comp N 235305 Iss 8 4 00 Installation and Servicing Instructions ...

Page 2: ...al heating pump using standard fittings All appliances are designed for use on Gas Type G20 Natural Gas only at supply pressure 20 mb Each appliance consists essentially of two components namely 1 COMBUSTION CHAMBER with heat exchanger burner and controls 2 OUTER CASE Benchmark Log Book As part of the industry wide Benchmark initiative all Baxi boilers now include an Installation Commissioning and...

Page 3: ...hing is not required when handling these articles but it is recommended that gloves are worn and the normal hygiene rules of not smoking eating or drinking in the work area are followed and always wash hands before eating or drinking SITING The boiler must be fitted on a suitable outside or inside wall with due considerations of the open flue requirements It should not be installed in a bathroom b...

Page 4: ...y to use copper pipe for the boiler Flow and Return The copper must extend at least 1 metre from the boiler and include any branches GAS SUPPLY The gas connection is located at the bottom left hand side of the appliance and is Rc in B S P T internal Ensure that the pipework from the meter to the appliance is of adequate size Do not use pipes of a smaller size than the appliance gas connection ELEC...

Page 5: ... 50 15 60 or equivalent Myson or Wilo with ball type isolating valves and 22mm compression fittings may be fitted inside the outer case The pump should be connected to the in flow connection on the front of the heat exchanger using the following standard fittings A 1 off Elbow 3 4 BSP male x 3 4 BSP female B 1 off Conex straight connector 3 4 BSP male x 22mm copper C 3 off 22mm Yorkshire elbows D ...

Page 6: ...Page 6 ...

Page 7: ...carrying conductors become taut before the earthing conductor if the cable should slip out of the cable grip 1 With the outer case assembled as in Outer Case 1 4 remove the 2 screws securing the thermostat cover to the facia panel 2 Fit the input cable to the terminal strip and clamp using the cable grip provided and clamp the incoming cable into the cable clips provided on the outer case side pan...

Page 8: ...inder must be used If a self priming indirect type is employed it must be of adequate size and applied strictly in accordance with the cylinder manufacturers instructions FUEL ECONOMY Better fuel economy is achieved by exercising control of the boiler by means of a room thermostat and or a cylinder thermostat as appropriate ALLOWING THE BOILER TO CYCLE ON THE BOILER THERMOSTAT DOES NOT PRODUCE THE...

Page 9: ...light the pilot as previously described Operate the burner and allow the system to reach normal operating temperature Make further checks for leaks and check the burner setting pressure adjusting if necessary This is done by adjusting the throttle screw red plastic surround in either direction as required Remove the pressure gauge and tighten the pressure test point sealing screw The boiler and sy...

Page 10: ... the 3 securing screws Fig 11 c Brush any deposits from the blades and ensure none of the ports are blocked Clean any deposits from the venturi d Remove the injector from the inlet manifold clean carefully and replace 13 Clean the pilot as follows Unscrew the pilot tubing nuts at both ends and remove the pilot tube Remove and clean the pilot injector and clean the pilot shroud Fig 12 14 Re assembl...

Page 11: ...Page 11 ...

Page 12: ...el 8 Re assemble in reverse order of dismantling ensuring that the thermostat phial is replaced into the thermostat pocket GAS VALVE Fig 12 1 Remove the burner and controls assembly as described in steps 1 to 6 Servicing the Unit 2 Disconnect the thermocouple nuts at the valve and at the pilot bracket 3 Disconnect interrupter adaptor 4 Disconnect the pilot feed pipe at the valve and at the pilot b...

Page 13: ...Page 13 ...

Page 14: ...00 T1037 Burner Pilot Honeywell Q349A 1059 Injector Pilot Honeywell 56 42 A Electrode Pilot ignition Kigass E3356 Lead Electrode Thermocouple 18 Honeywell Q3909 A Kit Piezo Unit Thermostat Kit Ranco Knob Thermostat Arrester Lint T T B Assembly Black Sleeve T T B Assembly Red Sleeve G C N 364 260 364 719 378 898 378 899 378 901 378 902 364 330 364 331 364 332 379 810 170 580 381 702 387 852 183 628...

Reviews: