


8
Vert SHRU
4.0
Installation
4.1
Contents of Pack
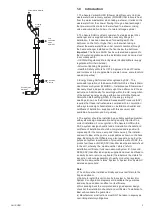
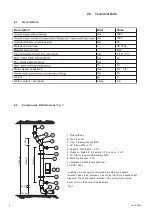
1. The Assure Vertical SHRU is supplied in two packs,
one for the unit itself and the other containing various
fittings - see Section 2.2 Fig. 1 on page 4.
4.2
Installing
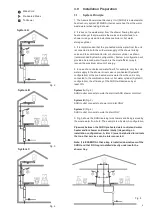
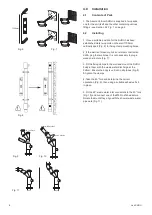
1. Once a suitable position for the SHRU has been
established mark two points on the wall 1100mm
vertically apart (Fig. 6) for fixing clamp mounting holes.
2. If the wall is of masonry, brick or similar construction
drill & plug the two holes. It is not necessary to plug a
wooden structure (Fig. 7).
3. Fit the fixing clamps to the wall and mount the SHRU
body in them with the waste water discharge at the
bottom. Ensure the body is vertical in all planes (Fig. 8)
& tighten the clamps.
4. Take the 45° fork and determine the correct
orientation (Fig. 9), then using a suitable adhesive fix it
in place.
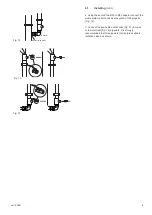
5. Fit the 45° waste water inlet connectors to the 45° fork
(Fig. 10) and connect one of the Ø50 to Ø43 adaptors.
Rotate them until they align with the shower waste water
pipework (Fig. 11).
1100mm
!
!
!
GLUE
45˚ Tee Piece
2 x 45˚ Elbows
Adaptor - Ø50 to Ø43
Fig. 6
Fig. 7
Fig. 8
Fig. 9
Fig. 10
Fig. 11
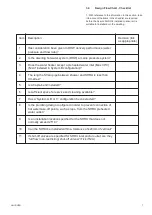
Summary of Contents for Assure Vertical SHRU
Page 11: ...Vert SHRU 11 ...


