Baumatic BWC455BGL Instruction Manual Download Page 14


14 

o


Wines kept at a higher temperature will age faster. Wine that is 
exposed  to  temperatures  that  are  greater  than  21°C (70°F) will 
suffer from poorer flavour and aroma.  


o


If  wine  is  kept  at  too  low  a  temperature,  this  can  result  in  the 
development of harmful deposits. A humidity of 70% is ideal for 
keeping corks from shrinking. 


o


After  a  bottle  of  wine  has  been  opened,  the  wine  comes  into 
contact with air. So it is best to store the remainder of the bottle 
upright, to minimize the surface area of the wine that is coming 
into contact with the air. 


o


Once  opened,  wine  will  remain  in  a  drinkable  condition  for  two 
days  for  delicate  whites  or  three  days  for  rich  reds,  as  long  as 
the bottle as been resealed. You should make sure that the seal 
is firm by checking the stopper. 


o


Special  stoppers  that  keep  wine  sparkling  and  Champagne 
bubbling  for  one  or  two  days  after  opening,  can  be  bought  at 
most good wine shops. 


o


When  stored  correctly,  white  wines  can  keep  well  for  up  to  two 
years.  Full  bodied  reds  will  age  well  for  ten  years  and  dessert 
wines will age well for up to twenty years.  


o


When  you  buy  a  bottle  of  wine,  you  should  transfer  it  to  a 
suitable  storage  location  immediately  (if  you  are  not  going  to 
store it in your wine cabinet). 


o


Cheaper  bottles  of  wine  will  not  age  as  well  as  more  expensive 
ones. 


o


To make the most of the bouquet and taste of your wine, never 
fill more than half a glass at a time. It will also help if the shape 
of  your  wine  glass  is  appropriate  for  your  wine.  The  size  and 
shape of your wine glass’s bowl will determine the intensity and 
complexity  of  the  bouquet.  The  stem  should  be  long  enough  to 
allow  you  to  avoid  hand  contact  with  the  bowl  of  the  glass  and 
should be tulip-shaped or tapered at the top. 


Summary of Contents for BWC455BGL

Page 1: ...BWC455BGL Built in wine cabinet...

Page 2: ...ction Manual contains important information including safety installation points which will enable you to get the most out of your appliance Please keep it in a safe place so that it is easily availab...

Page 3: ...trol panel 11 The interior light 12 Setting the temperature 12 Changing between Fahrenheit and Celsius 12 Loading the wine cabinet 13 Storing your wines 13 14 Wine storage problems 15 Cleaning and mai...

Page 4: ...le off directly behind the appliance to prevent misuse This should be undertaken by a competent person Disable the door lock to make sure that children cannot get stuck inside the appliance o The pack...

Page 5: ...caused o Altering the specification of the appliance must not be attempted for reasons of safety Before using your appliance o Check the appliance for any signs of transport damage If you notice any d...

Page 6: ...pliance outdoors or any place where it is likely to come into contact with the elements o Before cleaning the appliance or performing maintenance work ensure that the appliance has been disconnected f...

Page 7: ...y 55 litres o Bottle capacity 24 x 0 75 litre Bordeaux style wine bottles o Energy efficiency class C o Noise level 39 dB o Fan assisted operation o LED display o Celsius and Fahrenheit option o 3 woo...

Page 8: ...ing plate The rating plate is located on the front left edge of the appliance The rating plate will indicate the ambient temperature range that your appliance will function correctly within It is also...

Page 9: ...abinet o The cooling zone has a temperature control and temperature display Interior light o The cooling zone has an interior light The light can be switched on and off by using the light button The w...

Page 10: ...allow any refrigerant gasses that may have been disturbed during the transportation process to settle o The outside of the appliance and the removable accessories contained within it should be cleaned...

Page 11: ...st allow at least 5 minutes before restarting the appliance or reconnecting it to your mains supply Turning the appliance on and off o When the wine cabinet is connected to the power outlet it will tu...

Page 12: ...liance has been unplugged or there has been a power failure the first touch of these buttons will automatically set the default temperature of 12 C o Each press of the temperature plus button will inc...

Page 13: ...ures for different types of wine Type of wine Temperature Celsius Temperature Fahrenheit Red wine 15 5 18 5 C 59 9 65 3 F White wine 10 15 C 50 59 F Sparkling wines champagne 7 2 9 5 C 45 49 1 F Rose...

Page 14: ...pper o Special stoppers that keep wine sparkling and Champagne bubbling for one or two days after opening can be bought at most good wine shops o When stored correctly white wines can keep well for up...

Page 15: ...l be drinkable if the leakage was recent however you should be aware that if the wine cools down again contraction can cause more air to be sucked into the bottle and result in further deterioration S...

Page 16: ...ter washing the appliance wipe over the area that you have cleaned with a damp cloth and then dry it thoroughly o When cleaning is complete dry your hands and then reconnect the plug to your mains sup...

Page 17: ...item Power failure o Most power failures are corrected within a few hours and should not affect the temperature of your appliance if you minimise the number of times the door is opened o If the power...

Page 18: ...is connected by a qualified electrician who is a member of the N I C E I C and who will comply with the I E E and local regulations o Your wine cabinet comes supplied with a 13 amp plug fitted If in f...

Page 19: ...0 to 32 degrees centigrade N 16 to 32 degrees centigrade ST 18 to 38 degrees centigrade T 18 to 43 degrees centigrade o Positioning the appliance requires two people in order to avoid injuries or dama...

Page 20: ...he glass door touching the floor before it is installed o The white levelling feet need to be replaced with the 2 black levelling feet provided before the appliance is installed The 2 black feet need...

Page 21: ...abinet o You can also install an additional top mounting bar which is supplied with the appliance onto the top of the appliance to secure it to the kitchen cabinet Installing the handle o Remove the d...

Page 22: ...h a right door hinge installed already 1 Loosen the 2 screws with a cross screwdriver and take off the upper right hinge cover There are 2 wiring harnesses with their terminals connected together 2 Di...

Page 23: ...or frame and cover it with the right door corner cover 6 Insert a flat blade screwdriver into the groove of the left door corner cover and prize it up 7 Slowly pull out the harness at the left door co...

Page 24: ...e bottom left side of the cabinet with 4 screws 11 Install the upper left hinge to the top left side of the cabinet with 3 screws 12 Fix the door to the bottom hinge with a screw 13 Connect the two wi...

Page 25: ...il it does adhere to the cabinet properly all the way around the door or b Use a hair dryer on its lowest heat setting and lightly heat the areas of the door seal that are not adhering correctly The h...

Page 26: ...ckwise direction using your fingers from the outer side of the door The screw holes will then be ready for installing the handle on the right hand side 2 Remove the gasket on the left inner side of th...

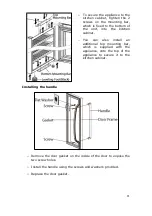
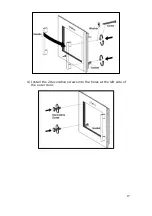
Page 27: ...27 4 Install the 2 decorative screws into the holes at the left side of the outer door...

Page 28: ...e appliance is not plugged in The circuit breaker tripped or a fuse has blown The light is turned off Too much vibration Check to ensure the appliance is level Check to ensure that no parts inside of...

Page 29: ...ge The appliance must be accessible for the engineer to perform any necessary repair If your appliance is installed in such a way that an engineer is concerned that damage will be caused to the applia...

Page 30: ...g o BC003 Ceramic Hob Cleaner 250ml o BC004 Oven Cleaner 250ml o BC005 Stainless Steel Cleaner and Protector 250ml o BC007 E Cloth General Purpose Cloth o BC008 Microwave Cover To order a Baumatic con...

Page 31: ...artments N A Temperature Rise Time N A Freezing Capacity N A Climate Class 3 N Noise Level 39 dB Installation Type Built in This appliance is intended to be used exclusively for the storage of wine 1...

Page 32: ...www baumatic co uk Facebook www facebook com baumatic uk Republic of Ireland Service Telephone 1 890 812 724 Spares Telephone 091 756 771 Czech Republic Baumatic CR s r o L pov 665 460 01 Liberec 4 C...

Page 33: ...33...

Page 34: ...34...

Page 35: ...35...

Page 36: ......

Reviews: