background image


26

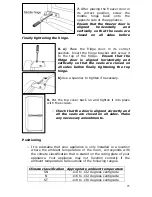
+18 to +43 degrees centigrade 


o


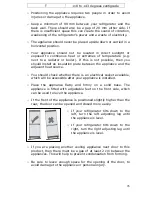
Positioning the appliance requires two people in order to avoid 
injuries or damage to the appliance. 


o


Keep a minimum of 90 mm between your refrigerator and the 
back wall. There should also be a gap of 20 mm either side. If 
there is insufficient space this can create the sound of vibration, 
weakening of the refrigerator’s power and a waste of electricity.  


o


The appliance should never be placed upside down or carried in a 
horizontal position. 


o


Your appliance should not be located in direct sunlight or 
exposed to continuous heat or extremes of temperature (e.g. 
next  to  a  radiator  or  boiler).  If  this  is  not  possible,  then  you 
should install an insulation plate between the appliance and the 
adjacent heat source. 


o


You should check whether there is an electrical socket available, 
which will be accessible after your appliance is installed. 


o


Place the appliance flatly and firmly on a solid base. The 
appliance is fitted with adjustable feet on the front side, which 
can be used to level the appliance. 


o


If the front of the appliance is positioned slightly higher than the 
rear, the door can be opened and closed more easily.  


o


If your refrigerator tilts down to the 
left, turn the left adjusting leg until 
the appliance is level.  


o


If your refrigerator tilts down to the 
right, turn the right adjusting leg until 
the appliance is level.  


o


If you are placing another cooling appliance next door to this 
product, then there must be a gap of at least 2 cm between the 
appliances. This will help to prevent condensation from forming. 


o


Be  sure  to  leave  enough  space  for the opening of the door, to 
avoid damage to the appliance or personal injury.  


Summary of Contents for BRCF1855SL

Page 1: ...d yo BRCF1855SL W Fridge freezer...

Page 2: ...contains important information including safety installation points which will enable you to get the most out of your appliance Please keep it in a safe place so that it is easily available for future...

Page 3: ...e section 12 13 The freezer compartment 14 Freezing fresh food 14 Tips on freezing 15 Storing commercially frozen food 15 Defrosting frozen food 16 Making ice cubes 16 Normal operating noises 16 17 Sa...

Page 4: ...le off directly behind the appliance to prevent misuse This should be undertaken by a competent person Disable the door lock to make sure that children cannot get stuck inside the appliance o The pack...

Page 5: ...will accept no liability for any damage that is caused o Altering the specification of the appliance must not be attempted for reasons of safety Before using your appliance o Check the appliance for...

Page 6: ...efore cleaning the appliance or performing maintenance work ensure that the appliance has been disconnected from your mains supply o Never allow the back coils of the appliance to come into contact wi...

Page 7: ...Safety glass shelves 3 adjustable o 3 x Transparent freezer drawers o Salad crisper shelf o 1 x Salad crisper o 1 x Bottle shelf o 1 x Egg tray o 3 x General door shelves o Reversible door o Adjustabl...

Page 8: ...number Date of purchase Description of the appliance 1 Thermostat control dial 2 Internal light 3 Adjustable safety glass shelves 4 Bottle shelf 5 Salad crisper 6 Egg tray 7 Transparent freezer drawe...

Page 9: ...r drawer is in the bottom of your refrigerator and there is a cover that goes over it o The cover helps to prevent fruit and vegetables from drying out prematurely 3 Upper door shelves o The door line...

Page 10: ...cess has been completed o There can be an odour when you first switch on the appliance It will lessen as the appliance starts to cool During first use o When you first switch on the appliance the comp...

Page 11: ...2 hours to ensure the fridge is at the ideal temperature of between 3 C and 4 C o The freezer compartment temperature will vary between 18 C and 25 C during a typical cycle o IMPORTANT The ambient te...

Page 12: ...ely Particular attention should be given to bottles that may protrude when placed on shelves inside the main section of the refrigerator o Some organic solutions such as the oils in lemon orange peel...

Page 13: ...of your appliance o Cool areas These areas of the fridge are most suitable for foods such as milk eggs yoghurt fruit juices hard cheeses opened jars and bottles of salad dressings sauces jams butter m...

Page 14: ...d increase the amount of power that the appliance uses o The guidance of the food manufacturer should be followed in regard to the maximum storage time o Thawed foods must not be frozen for a second t...

Page 15: ...ezer as they could cause the bottle to burst during freezing Storing commercially frozen food o The storage time and recommended temperature for storing commercially frozen foods are indicated on the...

Page 16: ...water and place it in the upper freezer drawers o After the water is completely frozen and turned to ice you can twist the ice cube tray as shown in the drawing below to dispense the ice Normal operat...

Page 17: ...ncrease the energy consumption by 15 Cleaning and Maintenance o Occasionally clean the condenser coils if present at the back of the appliance to maintain a high performance level o Clean the door gas...

Page 18: ...fridge see if there s a chlorofluorocarbons CFCs recycler in your area The government department which looks after the environment in your area may be able to help you Cleaning and maintenance WARNING...

Page 19: ...clockwise direction Take care to ensure that the bulb is fully secured in the bulb holder o Refit the light bulb cover and reconnect your appliance to the mains supply and turn on The defrost drain ho...

Page 20: ...the thermostat knob to position 0 and disconnect the appliance from your mains supply o Remove the drawers from the freezer section and leave the door to the freezer compartment open You can place a...

Page 21: ...ular operation of the electric system Electrical connection YOUR FRIDGE FREEZER IS INTENDED FOR FITTED AND PERMANENT INSTALLATION We recommend that the appliance is connected by a qualified electricia...

Page 22: ...ied out before the fridge freezer is positioned in the desired location The appliance should not be connected to the mains supply o The door reversal process should only be carried out a suitably qual...

Page 23: ...right hinge cover 2 a Undo the screws and lift the hinge bracket up to take it off b Remove the bolt with a screwdriver and flip the hinge bracket over Reattach the bolt to the hinge bracket Carefull...

Page 24: ...to the opposite side ensuring that it is securely fitted 5 a Tilt the fridge carefully to allow access to the bottom 2 people are required to carefully tilt the fridge Do not rest the appliance on its...

Page 25: ...ing the top hinge b Use a spanner to tighten if necessary 9 Put the top cover back on and tighten it into place with the screws o Check that the door is aligned correctly and all the seals are closed...

Page 26: ...heat source o You should check whether there is an electrical socket available which will be accessible after your appliance is installed o Place the appliance flatly and firmly on a solid base The ap...

Page 27: ...your appliance My fridge freezer appears to be performing poorly o Check that the appliance isn t overloaded and that food hasn t been packed too tightly into it o The thermostat setting is too low y...

Page 28: ...inds that the problem is not the result of an appliance fault then you may be liable for the cost of the call out charge The appliance must be accessible for the engineer to perform any necessary repa...

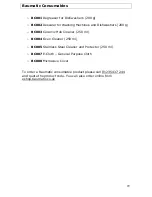
Page 29: ...o BC003 Ceramic Hob Cleaner 250 ml o BC004 Oven Cleaner 250 ml o BC005 Stainless Steel Cleaner and Protector 250 ml o BC007 E Cloth General Purpose Cloth o BC008 Microwave Cover To order a Baumatic c...

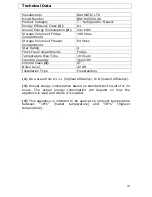
Page 30: ...partments Fridge Temperature Rise Time 10 hours Freezing Capacity 3kg 24hr Climate Class 3 ST Noise Level 42 dB Installation Type Freestanding 1 On a scale from A highest efficiency to G lowest effici...

Page 31: ...baumatic co uk Facebook www facebook com baumatic uk Republic of Ireland Service Telephone 1 890 812 724 Spares Telephone 091 756 771 Czech Republic Baumatic CR s r o L pov 665 460 01 Liberec 4 Czech...

Page 32: ......
Reviews: