background image


28

o


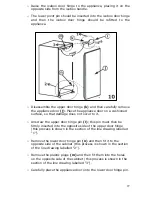
The upper pivot pin should be inserted into the appliance door 
and then the upper door hinge should be fixed to the appliance 
(on the opposite side to its original position). 


IMPORTANT: Check that the door opens and shuts correctly, 
without fouling, after you have completed the door reversal 
process. 


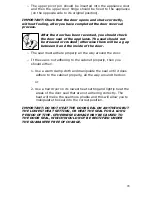
After the door has been reversed, you should check 
the door seal of the appliance. The seal should not 
be creased or crushed; otherwise there will be a gap 
between it and the inside of the door. 
 

o


The seal must adhere properly all the way around the door. 


o


If the seal is not adhering to the cabinet properly, then you 
should either:- 


1. Use a warm damp cloth and manipulate the seal until it does 

adhere to the cabinet properly, all the way around the door. 


or 


2. Use a hair dryer on its lowest heat setting and lightly heat the 

areas of the door seal that are not adhering correctly. The 
heat will make the seal more pliable and this will allow you to 
manipulate the seal into the correct position. 

 
IMPORTANT: DO NOT HEAT THE DOOR SEAL ON ANYTHING BUT 
THE LOWEST HEAT SETTING, OR HEAT THE SEAL FOR A LONG 
PERIOD OF TIME. OTHERWISE DAMAGE MAY BE CAUSED TO 
THE DOOR SEAL, WHICH WOULD NOT BE RECTIFIED UNDER 
THE GUARANTEE FREE OF CHARGE. 


Summary of Contents for BR15.3A

Page 1: ...BR15 3A Built in fridge with icebox...

Page 2: ...ual contains important information including safety installation points which will enable you to get the most out of your appliance Please keep it in a safe place so that it is easily available for fu...

Page 3: ...13 16 Icebox door open indicator 13 Freezing fresh food 14 Tips on freezing 14 15 Storing commercially frozen food 15 Defrosting frozen food 15 Making ice cubes 16 Cleaning and maintenance 16 18 The...

Page 4: ...d disconnect it from the power supply Cut off and render any plug useless Cut the cable off directly behind the appliance to prevent misuse This should be undertaken by a competent person Disable the...

Page 5: ...be caused o Altering the specification of the appliance must not be attempted for reasons of safety Before using your appliance o Check the appliance for any signs of transport damage If you notice an...

Page 6: ...e back coils of the appliance to come into contact with the wall surface o Always ensure that the location where you are installing your appliance is free of stored items such as papers and other flam...

Page 7: ...pth 550 mm o Automatic defrost fridge section only o 4 star icebox o Icebox door open indicator o Adjustable thermostat o Butter compartment o Egg holder o Bottle rack o Reversible door o Slider fitti...

Page 8: ...side of the fridge section You will need to open the door of your appliance to be able to find it The rating plate will indicate the ambient temperature range that your appliance will function correct...

Page 9: ...o It is important that this channel never becomes clogged see The defrost drain hole section for a detailed explanation of how to keep the channel clear 3 Salad crisper drawers and cover o The crispe...

Page 10: ...nd accessories should be thoroughly dried after the cleaning process has been completed o There can be an odour when you first switch on the appliance It will lessen as the appliance starts to cool Du...

Page 11: ...u a lower temperature inside the refrigerator o Ideally the thermostat should be set to a position between 3 to 4 o Your refrigerator can maintain a temperature of between 4 6 degrees centigrade o IMP...

Page 12: ...on shelves inside the main section of the refrigerator o Some organic solutions such as the oils in lemon orange peel and acid in butter can cause damage to the plastic parts contained inside of the...

Page 13: ...midity will cause quicker ice formation and increase the amount of power that the appliance uses o The guidance of the food manufacturer should be followed in regard to the maximum storage time o Thaw...

Page 14: ...not allow fresh food to touch items that are already frozen o After 24 hours you should check that the fresh food is satisfactorily frozen If it is then the thermostat should be turned down to its nor...

Page 15: ...en stored in a freezer where the temperature does not rise above 18 C o Do not buy packages of food that are covered with frost This could indicate that the package has thawed at least once before o T...

Page 16: ...TO CLEAN IT o Do not clean the appliance by pouring water onto it or spraying water over it o The freezer should be cleaned periodically using a solution of bicarbonate of soda and lukewarm water o C...

Page 17: ...an the defrost drainage channel o You should be careful to make sure that food packages do not touch the rear wall of the appliance as this can interrupt the automatic defrosting process and deflect w...

Page 18: ...r to the appliance and the icebox open You can place a bowl of warm water inside the icebox to speed up the defrost process o Once all the ice that has built up has melted then the inside of the icebo...

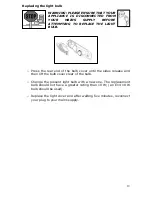
Page 19: ...o Press the rear end of the bulb cover until the sides release and then lift the bulb cover clear of the bulb o Change the present light bulb with a new one The replacement bulb should not have a gre...

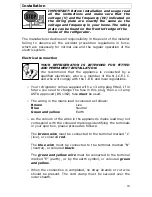
Page 20: ...E I C and who will comply with the I E E and local regulations o Your refrigerator comes supplied with a 13 amp plug fitted If in future you need to change the fuse in this plug then a 13 amp ASTA ap...

Page 21: ...o continuous heat or extremes of temperature e g next to a radiator or boiler o The door should be able to open completely and freely o The appliance should be situated so you can easily access the fo...

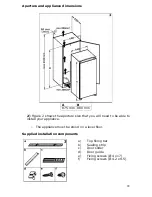
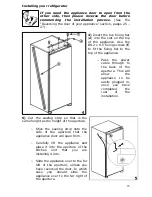
Page 22: ...hows the aperture size that you will need to be able to install your appliance o The appliance must be stood on a level floor Supplied installation components a Top fixing bar b Sealing strip c Door s...

Page 23: ...hrough to the back of the aperture This will allow the appliance to be easily plugged in once you have completed the rest of the installation 5 Cut the sealing strip so that is the same height as the...

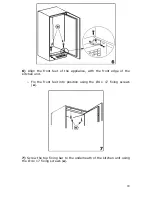
Page 24: ...t of the appliance with the front edge of the kitchen unit o Fix the front feet into position using the 4 x 17 fixing screws e 7 Screw the top fixing bar to the underneath of the kitchen unit using th...

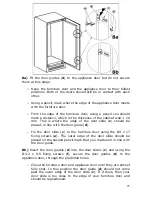
Page 25: ...ould be placed in line with the door guide d o Fix the door slide c to the furniture door using the 4 x 17 fixing screws e The outer edge of the door slide should be placed on the second pencil mark t...

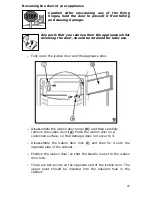
Page 26: ...the appliance door o Disassemble the icebox door hinge h and then carefully remove the icebox door g Place the icebox door on a cushioned surface so that damage does not occur to it o Disassemble the...

Page 27: ...ot occur to it o Unscrew the upper door hinge pin l this pin must then be firmly inserted into the opposite side of the upper door hinge this process is shown in the section of the line drawing labell...

Page 28: ...here properly all the way around the door o If the seal is not adhering to the cabinet properly then you should either 1 Use a warm damp cloth and manipulate the seal until it does adhere to the cabin...

Page 29: ...n the rating plate of your appliance My fridge appears to be performing poorly o Check that the appliance isn t overloaded and that food hasn t been packed too tightly into it o The thermostat setting...

Page 30: ...ATTEMPT TO REPAIR THE APPLIANCE YOURSELF Please note that if an engineer is asked to attend whilst the product is under guarantee and finds that the problem is not the result of an appliance fault the...

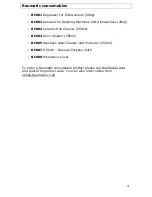
Page 31: ...g o BC003 Ceramic Hob Cleaner 250ml o BC004 Oven Cleaner 250ml o BC005 Stainless Steel Cleaner and Protector 250ml o BC007 E Cloth General Purpose Cloth o BC008 Microwave Cover To order a Baumatic con...

Page 32: ...uk Website www baumatic co uk Republic of Ireland Service Telephone 1 890 812 724 Spares Telephone 091 756 771 Czech Republic Baumatic CR s r o L pov 665 460 01 Liberec 4 Czech Republic 420 483 577 2...

Page 33: ...33...

Page 34: ...34...

Page 35: ...35...

Page 36: ...36...

Reviews: